
Print Design 101: How to Add Safe Zones and Bleed Areas in Adobe Photoshop and Adobe Illustrator
Written By: Signs.com | Article Date: September 27, 2025

Creating eye-catching prints always starts with drawing up your designs. A big part of this process is nailing the proper size and layout so your design will come out perfectly once it's printed. But how do you ensure that the final prints are precise and nothing important gets cut off? That's where margin guides, such as bleed areas and safe zones, come in.
Whether you are printing a banner, poster, or flyer, it's essential to include these handy markers in your final design to ensure your prints look professional and are accurately trimmed. In this guide, we break down how to add bleed areas, trim lines, and safe zones so your first promotional design comes out flawless.
Defining the Important Printing Margins and Zones
When designing materials for professional printing, such as flyers, posters, or banners, it’s essential to establish clear margins and layout guides that help the printers know which areas to cut and size. These lines help keep your design aligned and scaled to the correct size. Measurements can vary by print format, but the following key print margins you need to know remain consistent.

Bleed Area
- The bleed area marks the space that extends beyond the final trim size of your design.
- Designers intentionally stretch backgrounds, images, or colors into this zone to ensure there are no white edges once the printed piece is trimmed.
Trim Line
- The trim line represents the actual size of the printed material.
- Once the brochure or flyer is printed, the print providers cut along this line to ensure the finished piece matches the intended dimensions perfectly.
Safe Zone
- The safe zone is the area inside the trim line where the most important elements of the design should be placed.
- Designers keep text, logos, and key visuals within this space and closer to the center to avoid accidental cuts during trimming.
Crop Marks
- Crop marks are small corner indicators placed around the edges of the design to show precisely where the paper should be trimmed.
- These marks help printers cut accurately, especially when dealing with thin trim lines near the corners.
How to Add Bleed Areas in Adobe Illustrator
Now that you’re familiar with trim lines, bleed areas, and safe zones, you only need to apply them in your designs so that your printing partners can accurately produce your posters or flyers.
Most people use Adobe Illustrator for their professional print designs, and this straightforward guide will help you set up and apply the margins using this design tool.
1. Set Up Your File
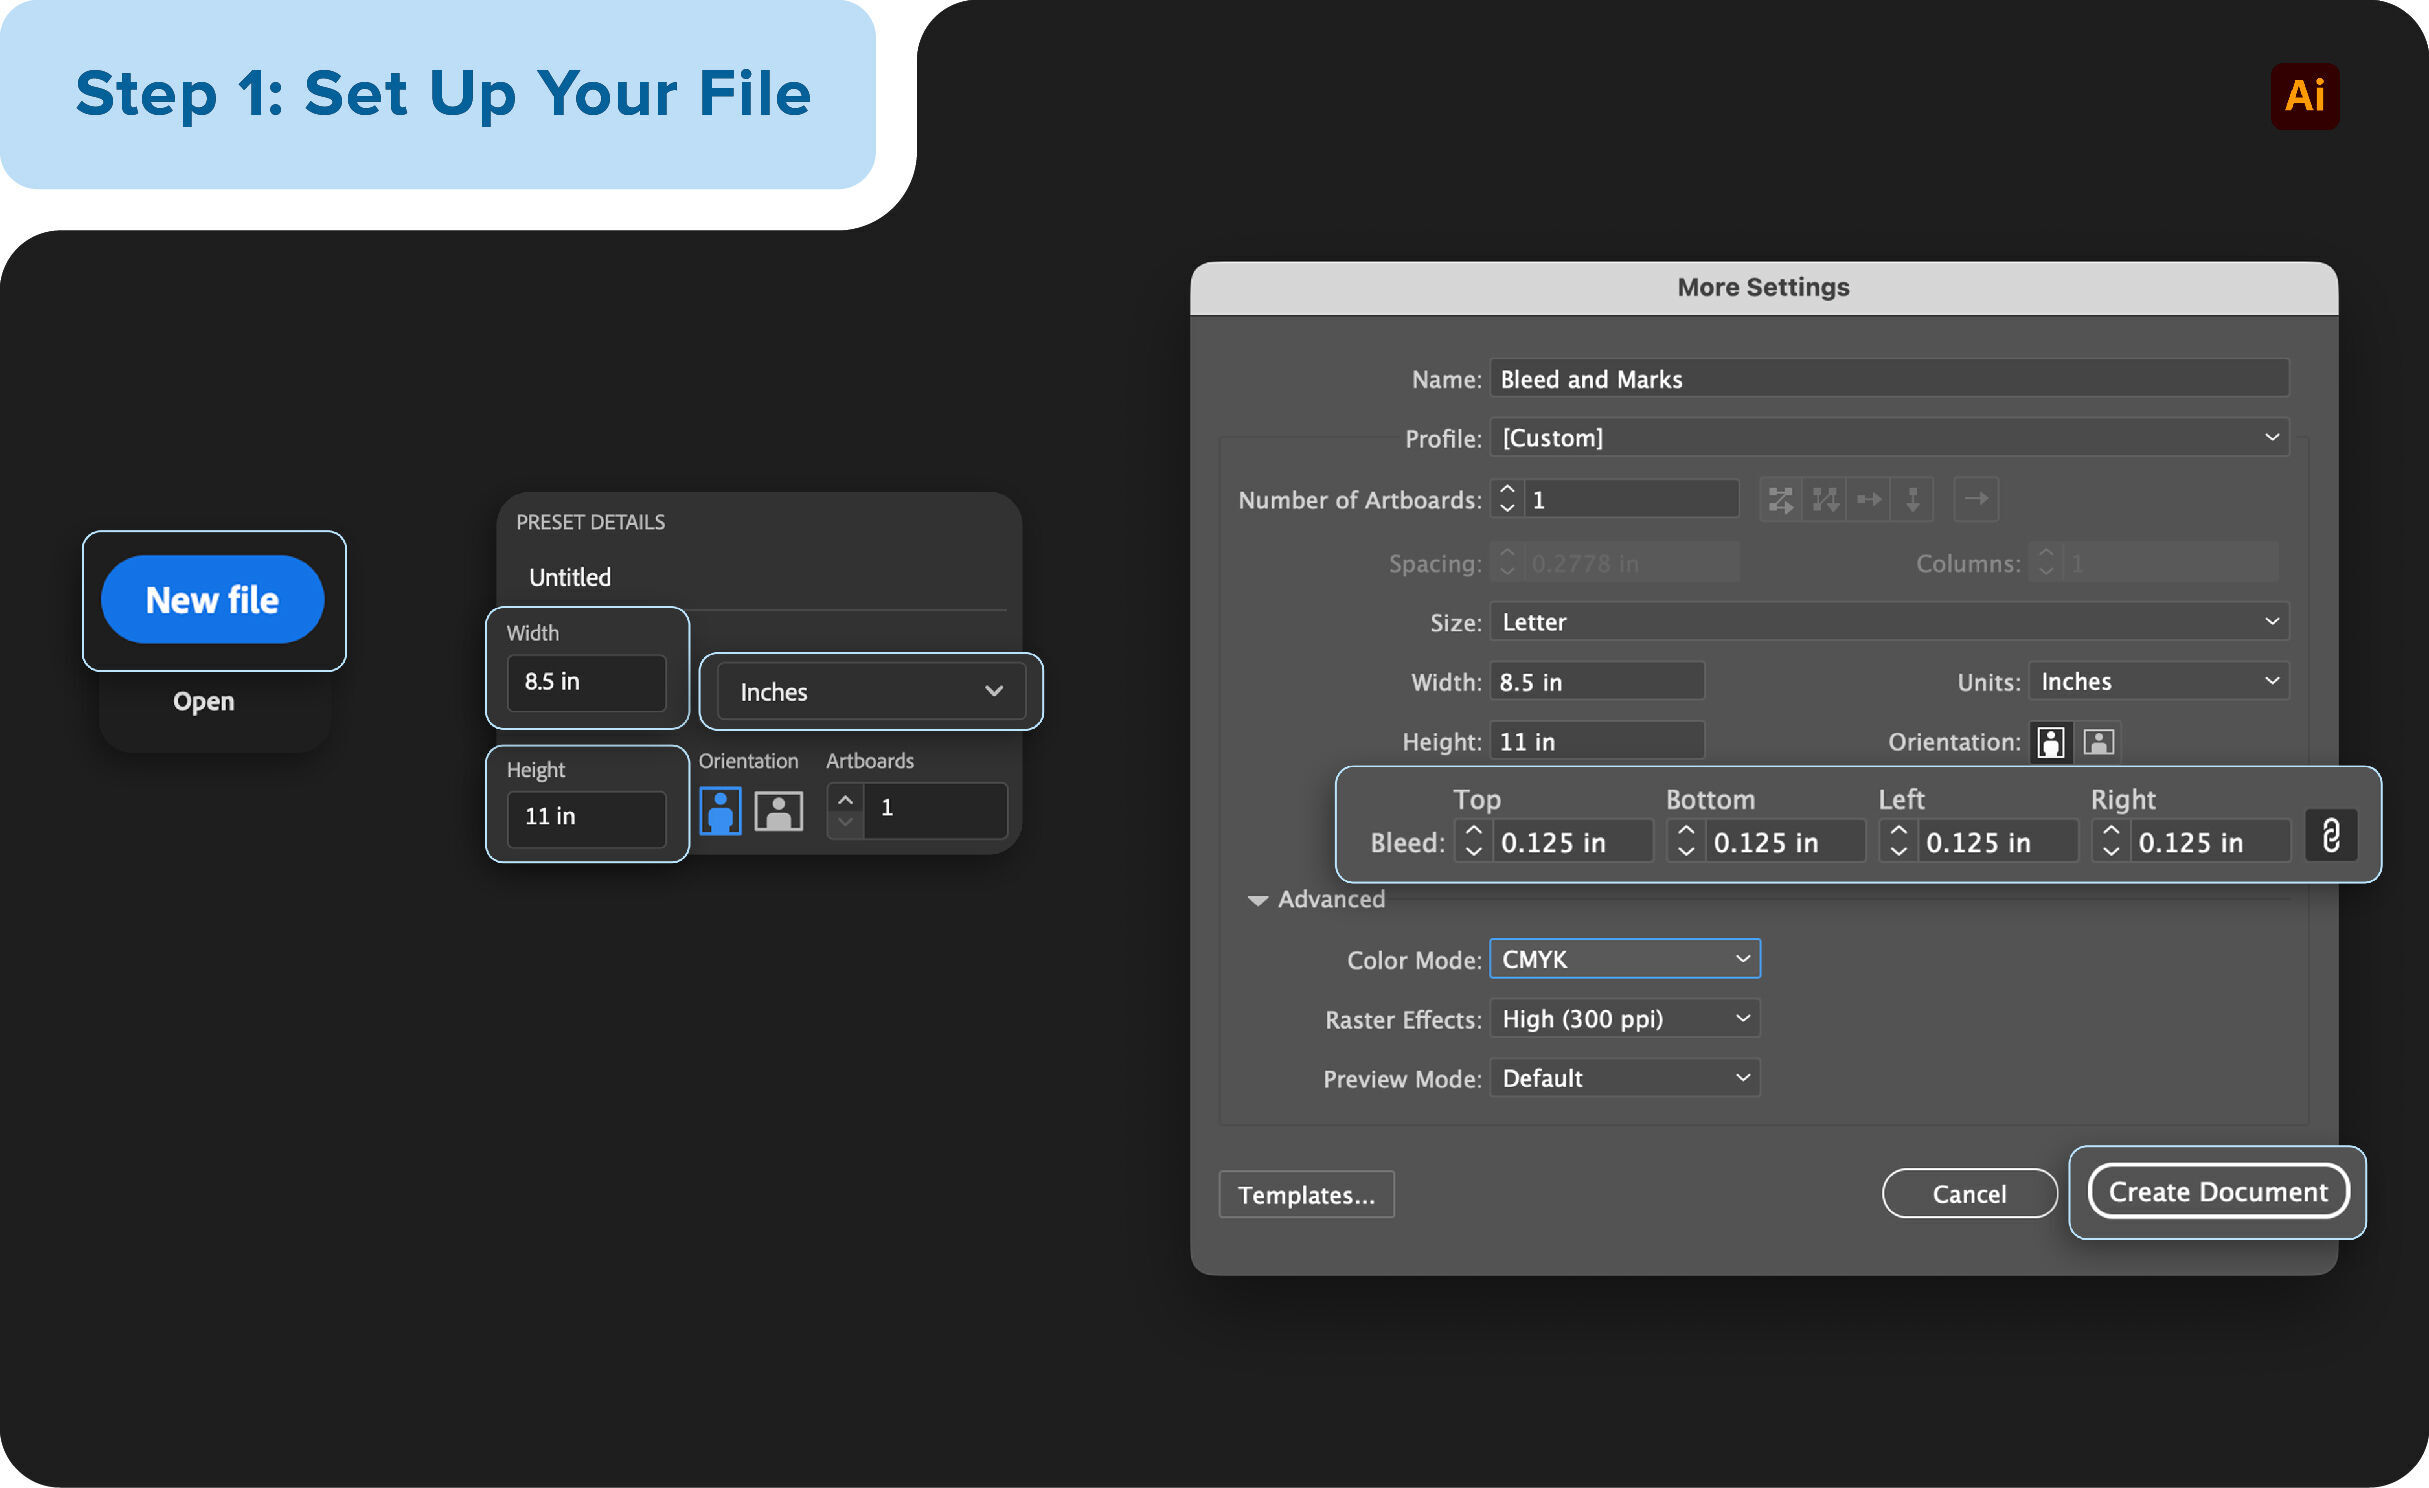
- Create a new document and enter the final size you want for your print design.
- In the Bleed section, type 0.125" to add bleed space for all sides. (Click the chain icon to match the bleed size for all four sides.)
- Click Create to open your canvas.
2. Start Designing

- Your canvas will show two borders: the white area is your safe zone, with the black borders being your trim lines. There's an extra red outline that marks the bleed area.
- You can now design your print materials using this canvas. Add your images, text, and other vital elements to your layout, but keep all these graphics inside the safe zone.
- Extend your layout's background all the way to the red line, without changing your image and text's placement.
3. Save with Trim Marks
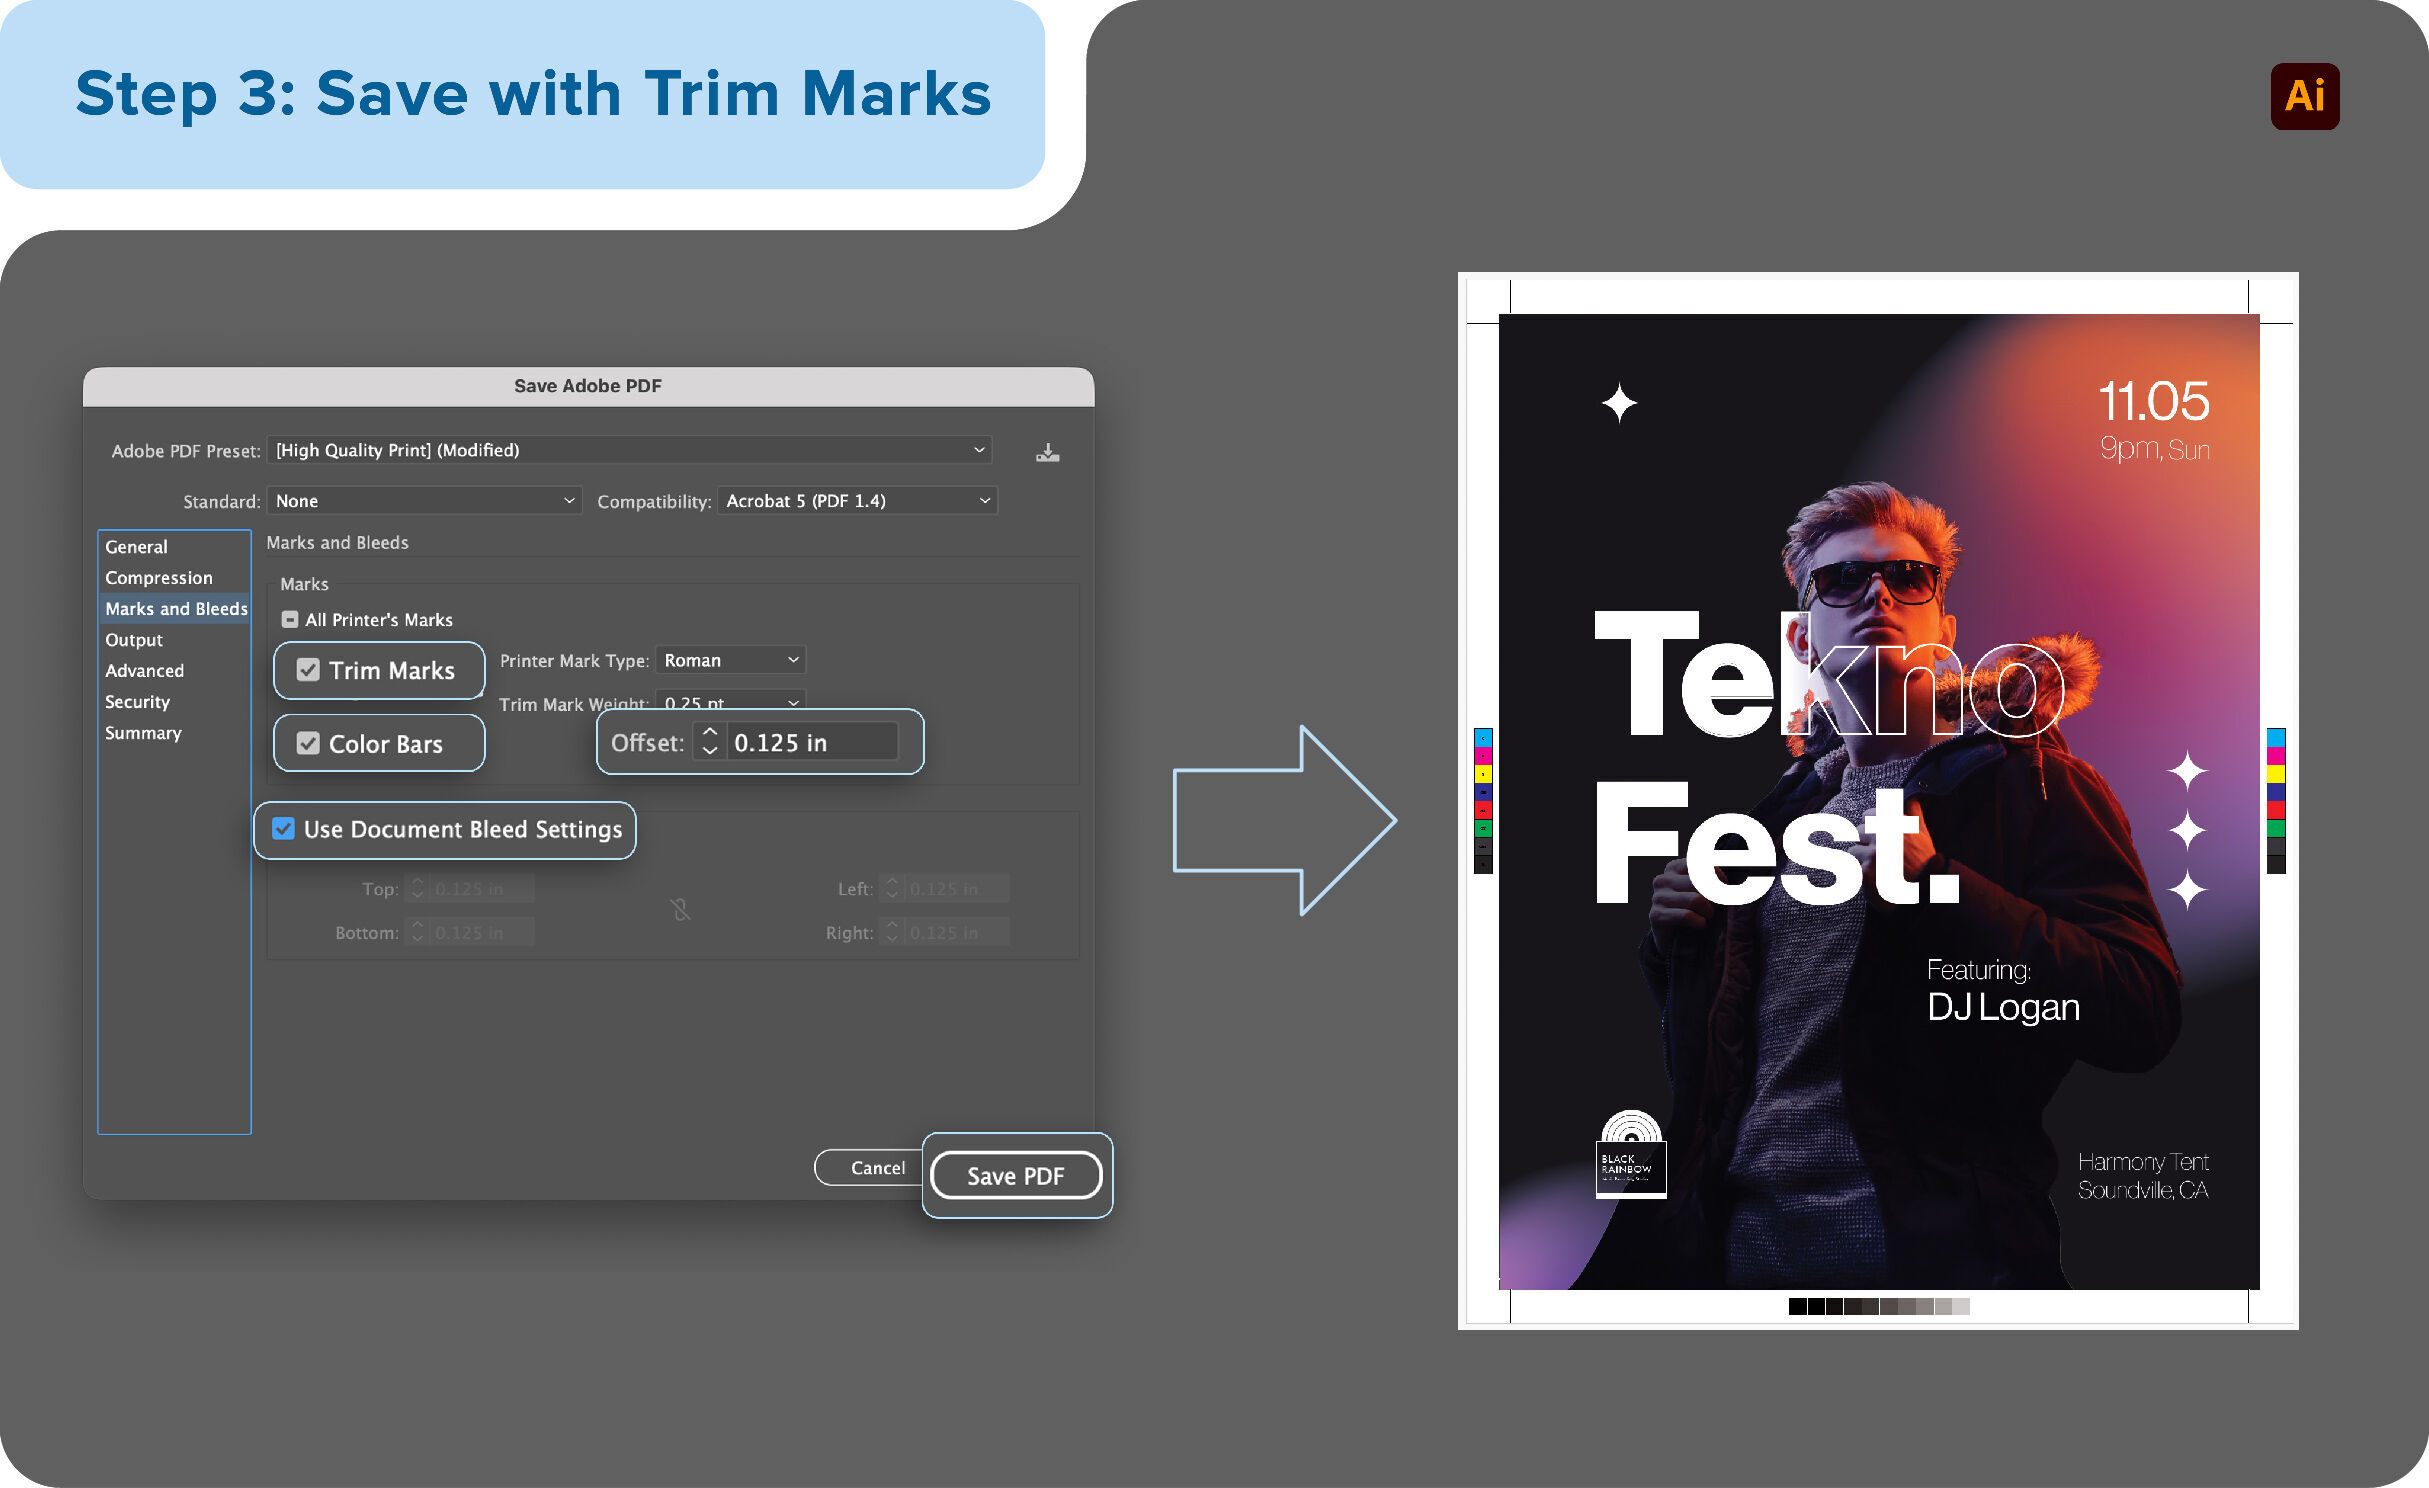
- When you're ready to export, go to File > Save As and choose PDF.
- In the options window, select Marks and Bleeds, check Use Document Bleed Settings, and enable Trim Marks.
- Set the Offset to 0.125", then click Save PDF.
- The result is your completed design with the trim lines marked near the corners, indicating where your safe zone and bleed areas are.
How to Add Crop Marks in Adobe Photoshop
Unlike Illustrator, Photoshop doesn’t let you set bleed and trim lines while you’re still designing. Instead, you can expand your finished artwork later and manually add the necessary bleed and trim marks once the main layout is complete.
1. Set Up Your Design
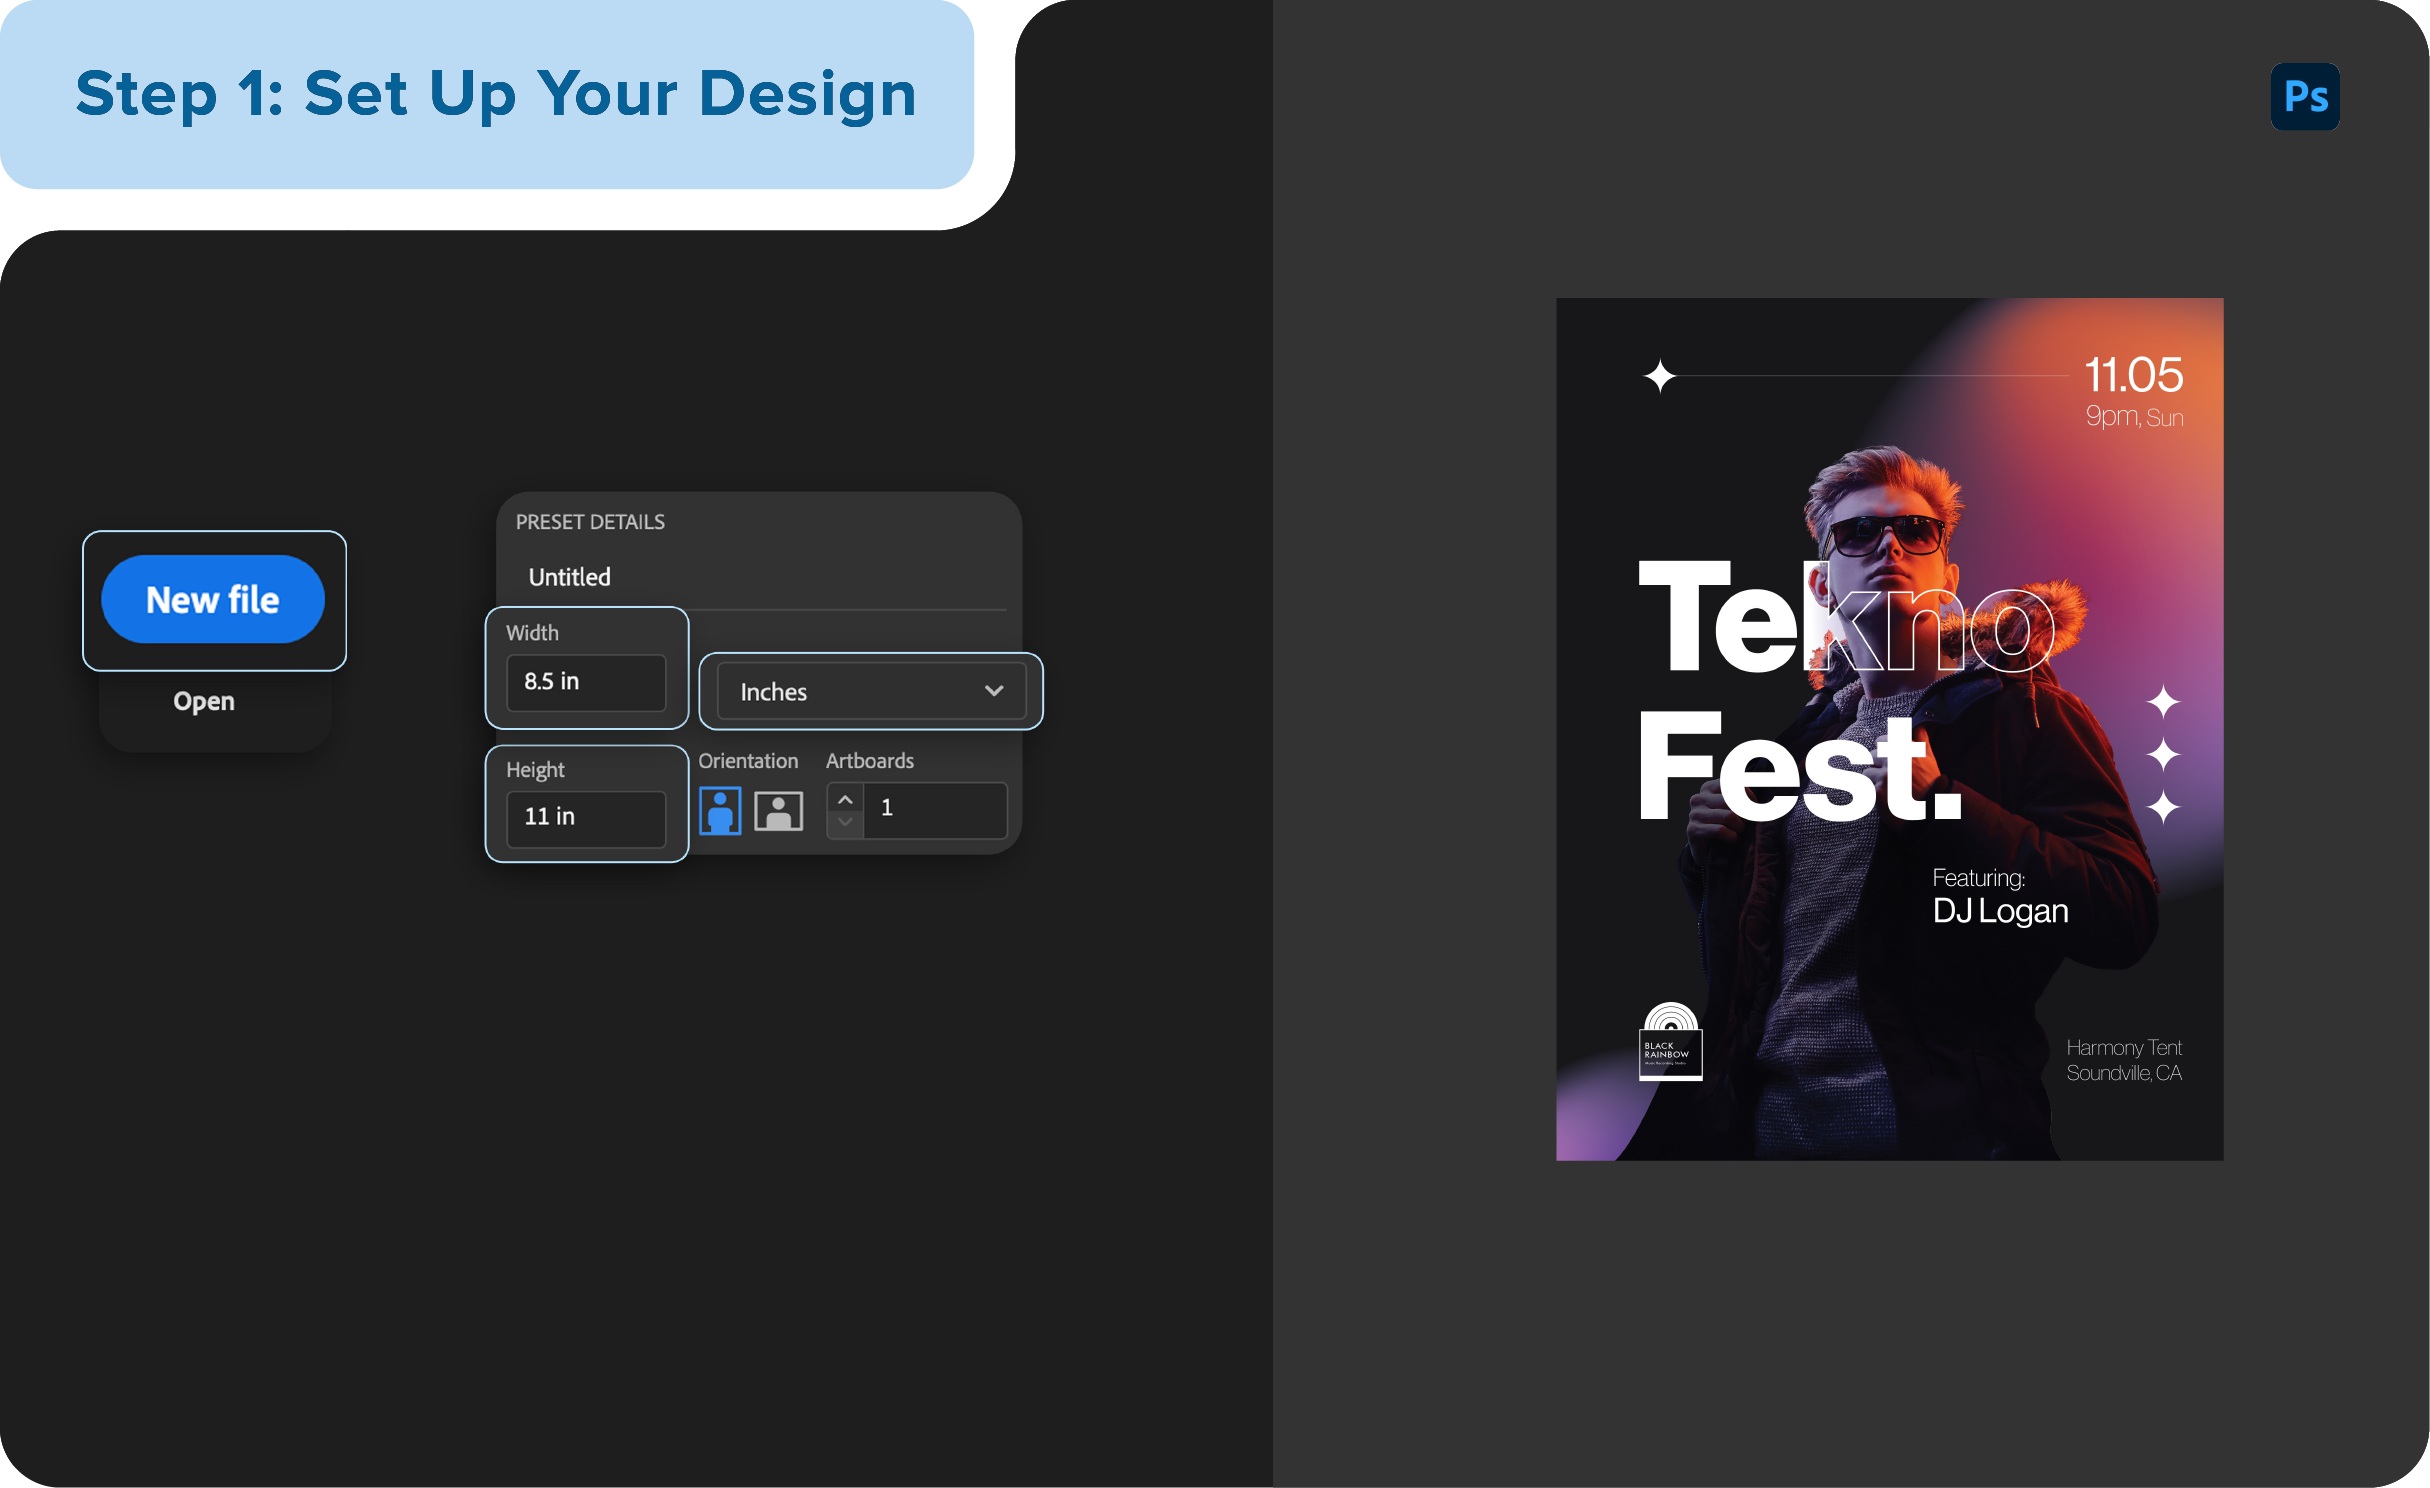
- Create a new blank canvas with the exact final dimensions of your finished design.
- Drag and drop your completed artwork into Photoshop so it fits the canvas perfectly without leaving empty gaps.
2. Add Guides for Bleed and Trim Lines
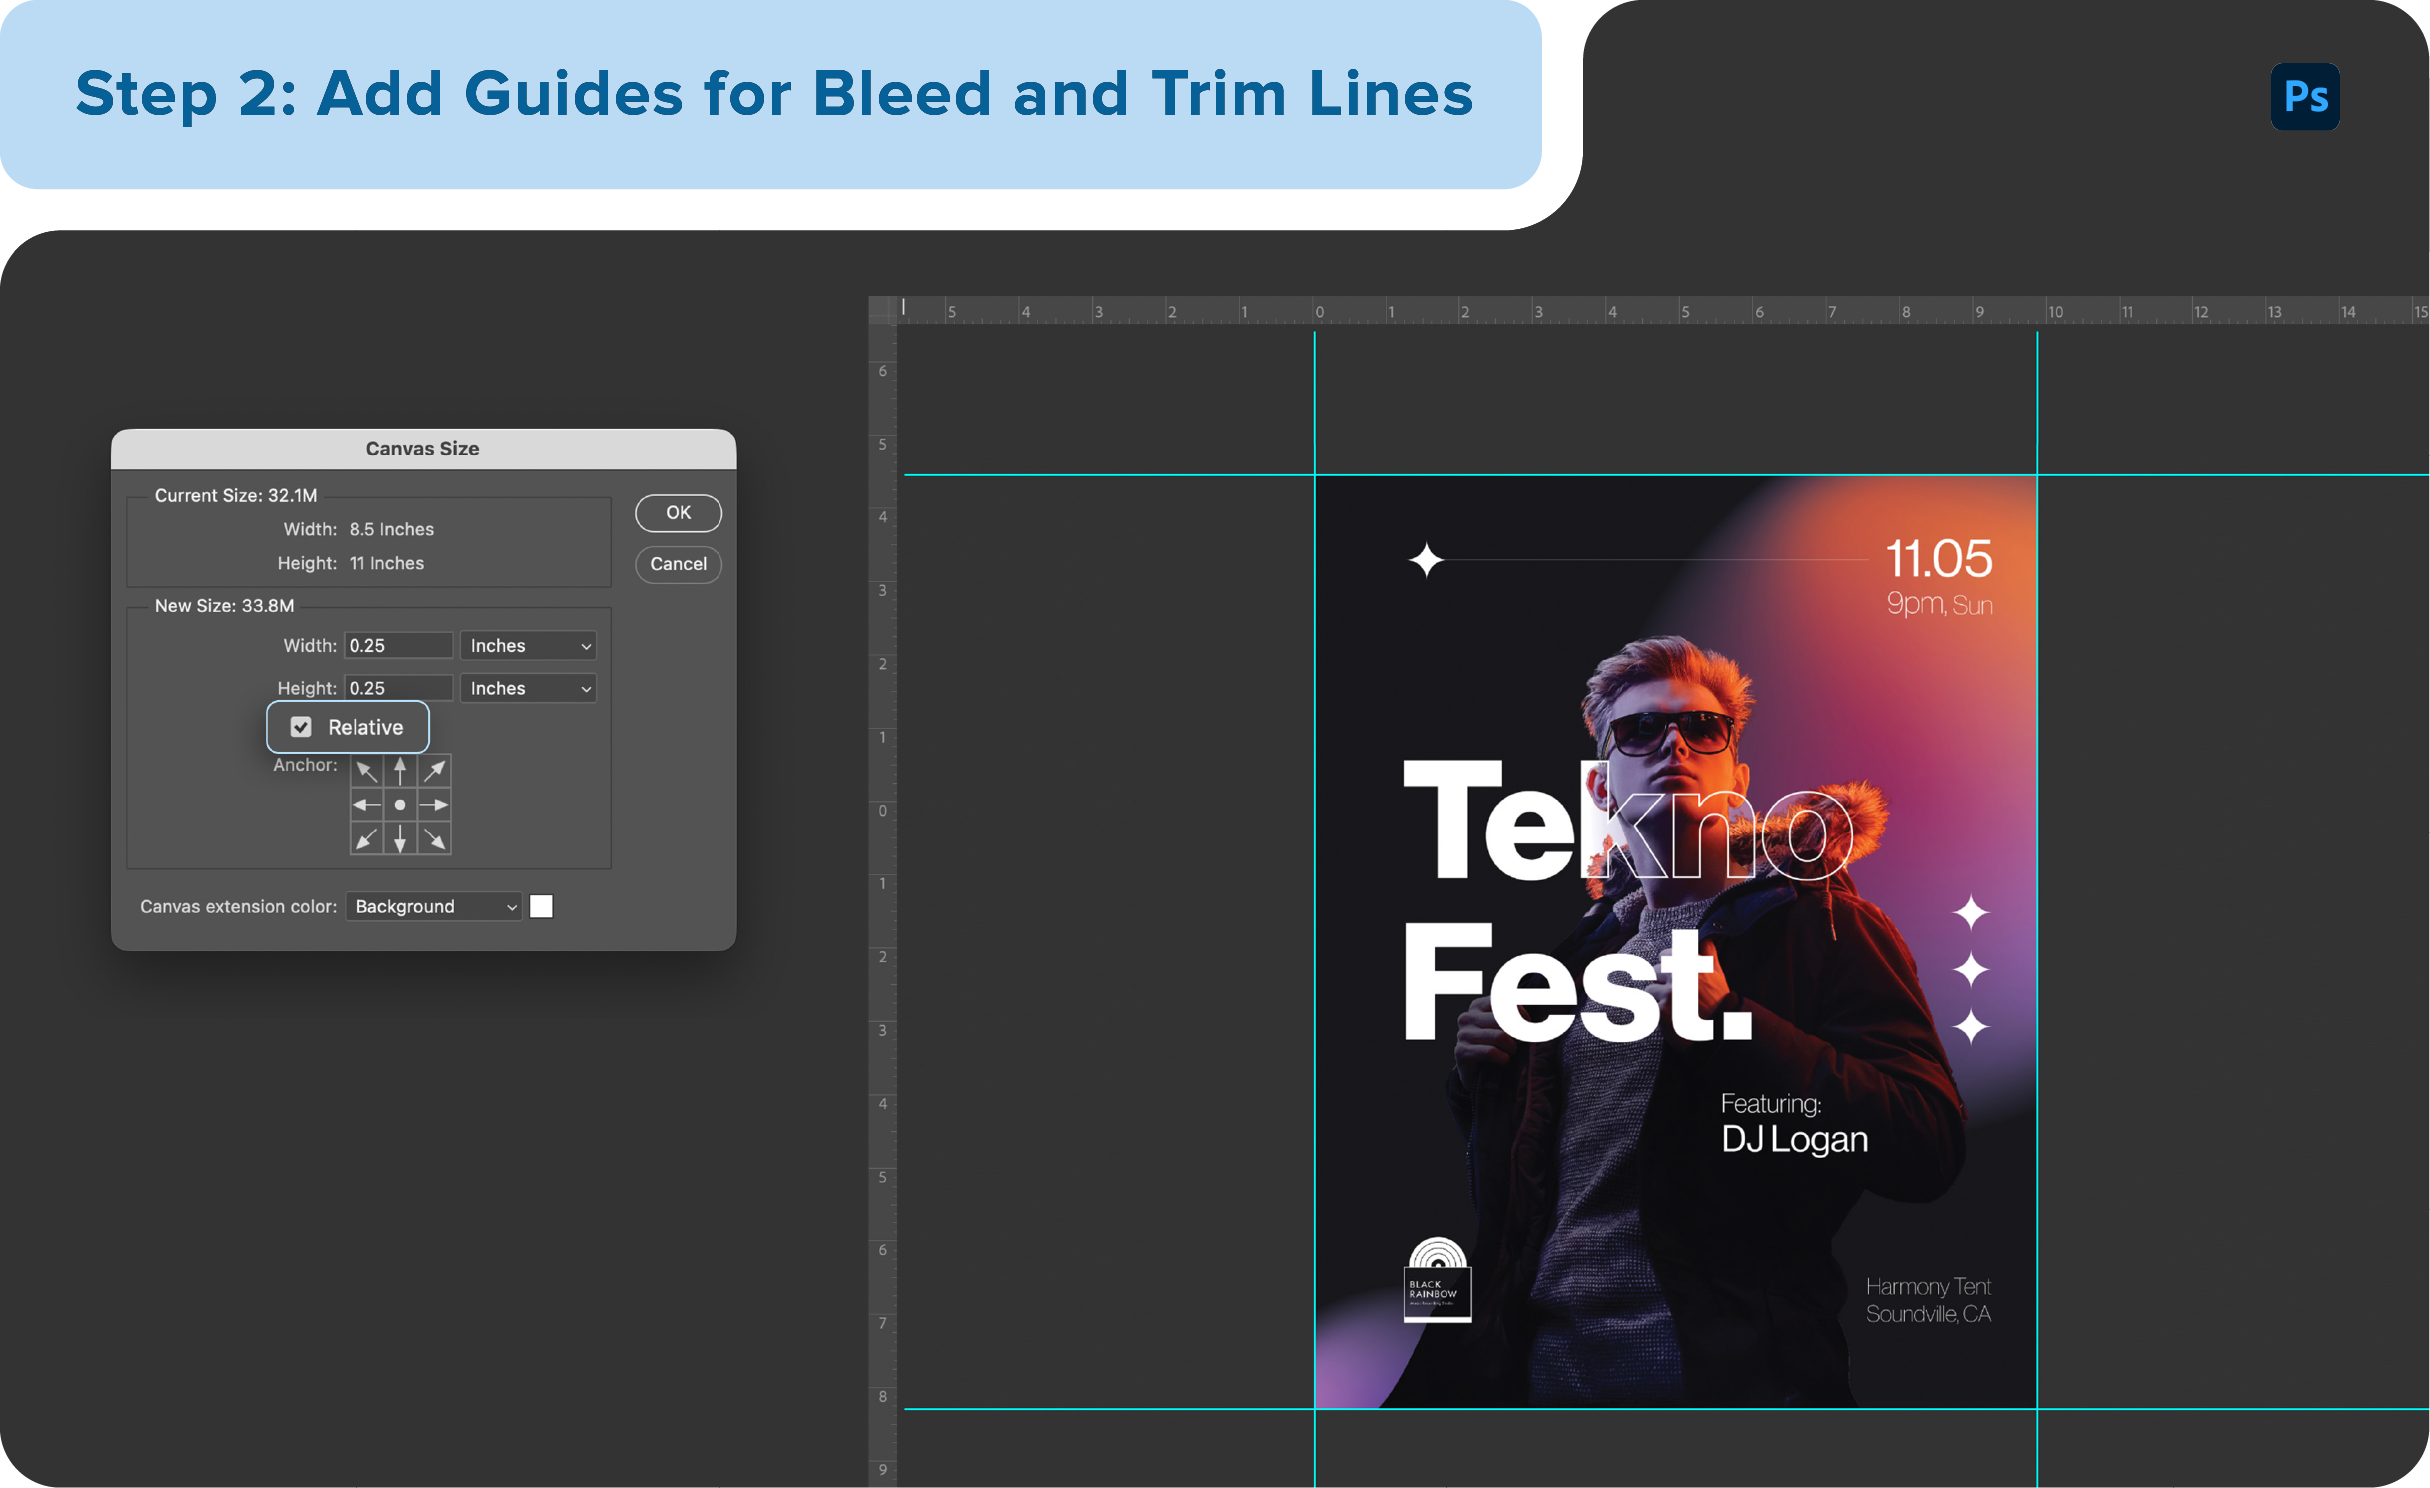
- Go to View > Rulers (or press Ctrl+R / Cmd+R) to display rulers around the canvas.
- Click and drag the guide lines from the rulers toward each edge of the canvas to mark where the trim and bleed areas will be.
3. Expand the Canvas and Adjust the Artwork
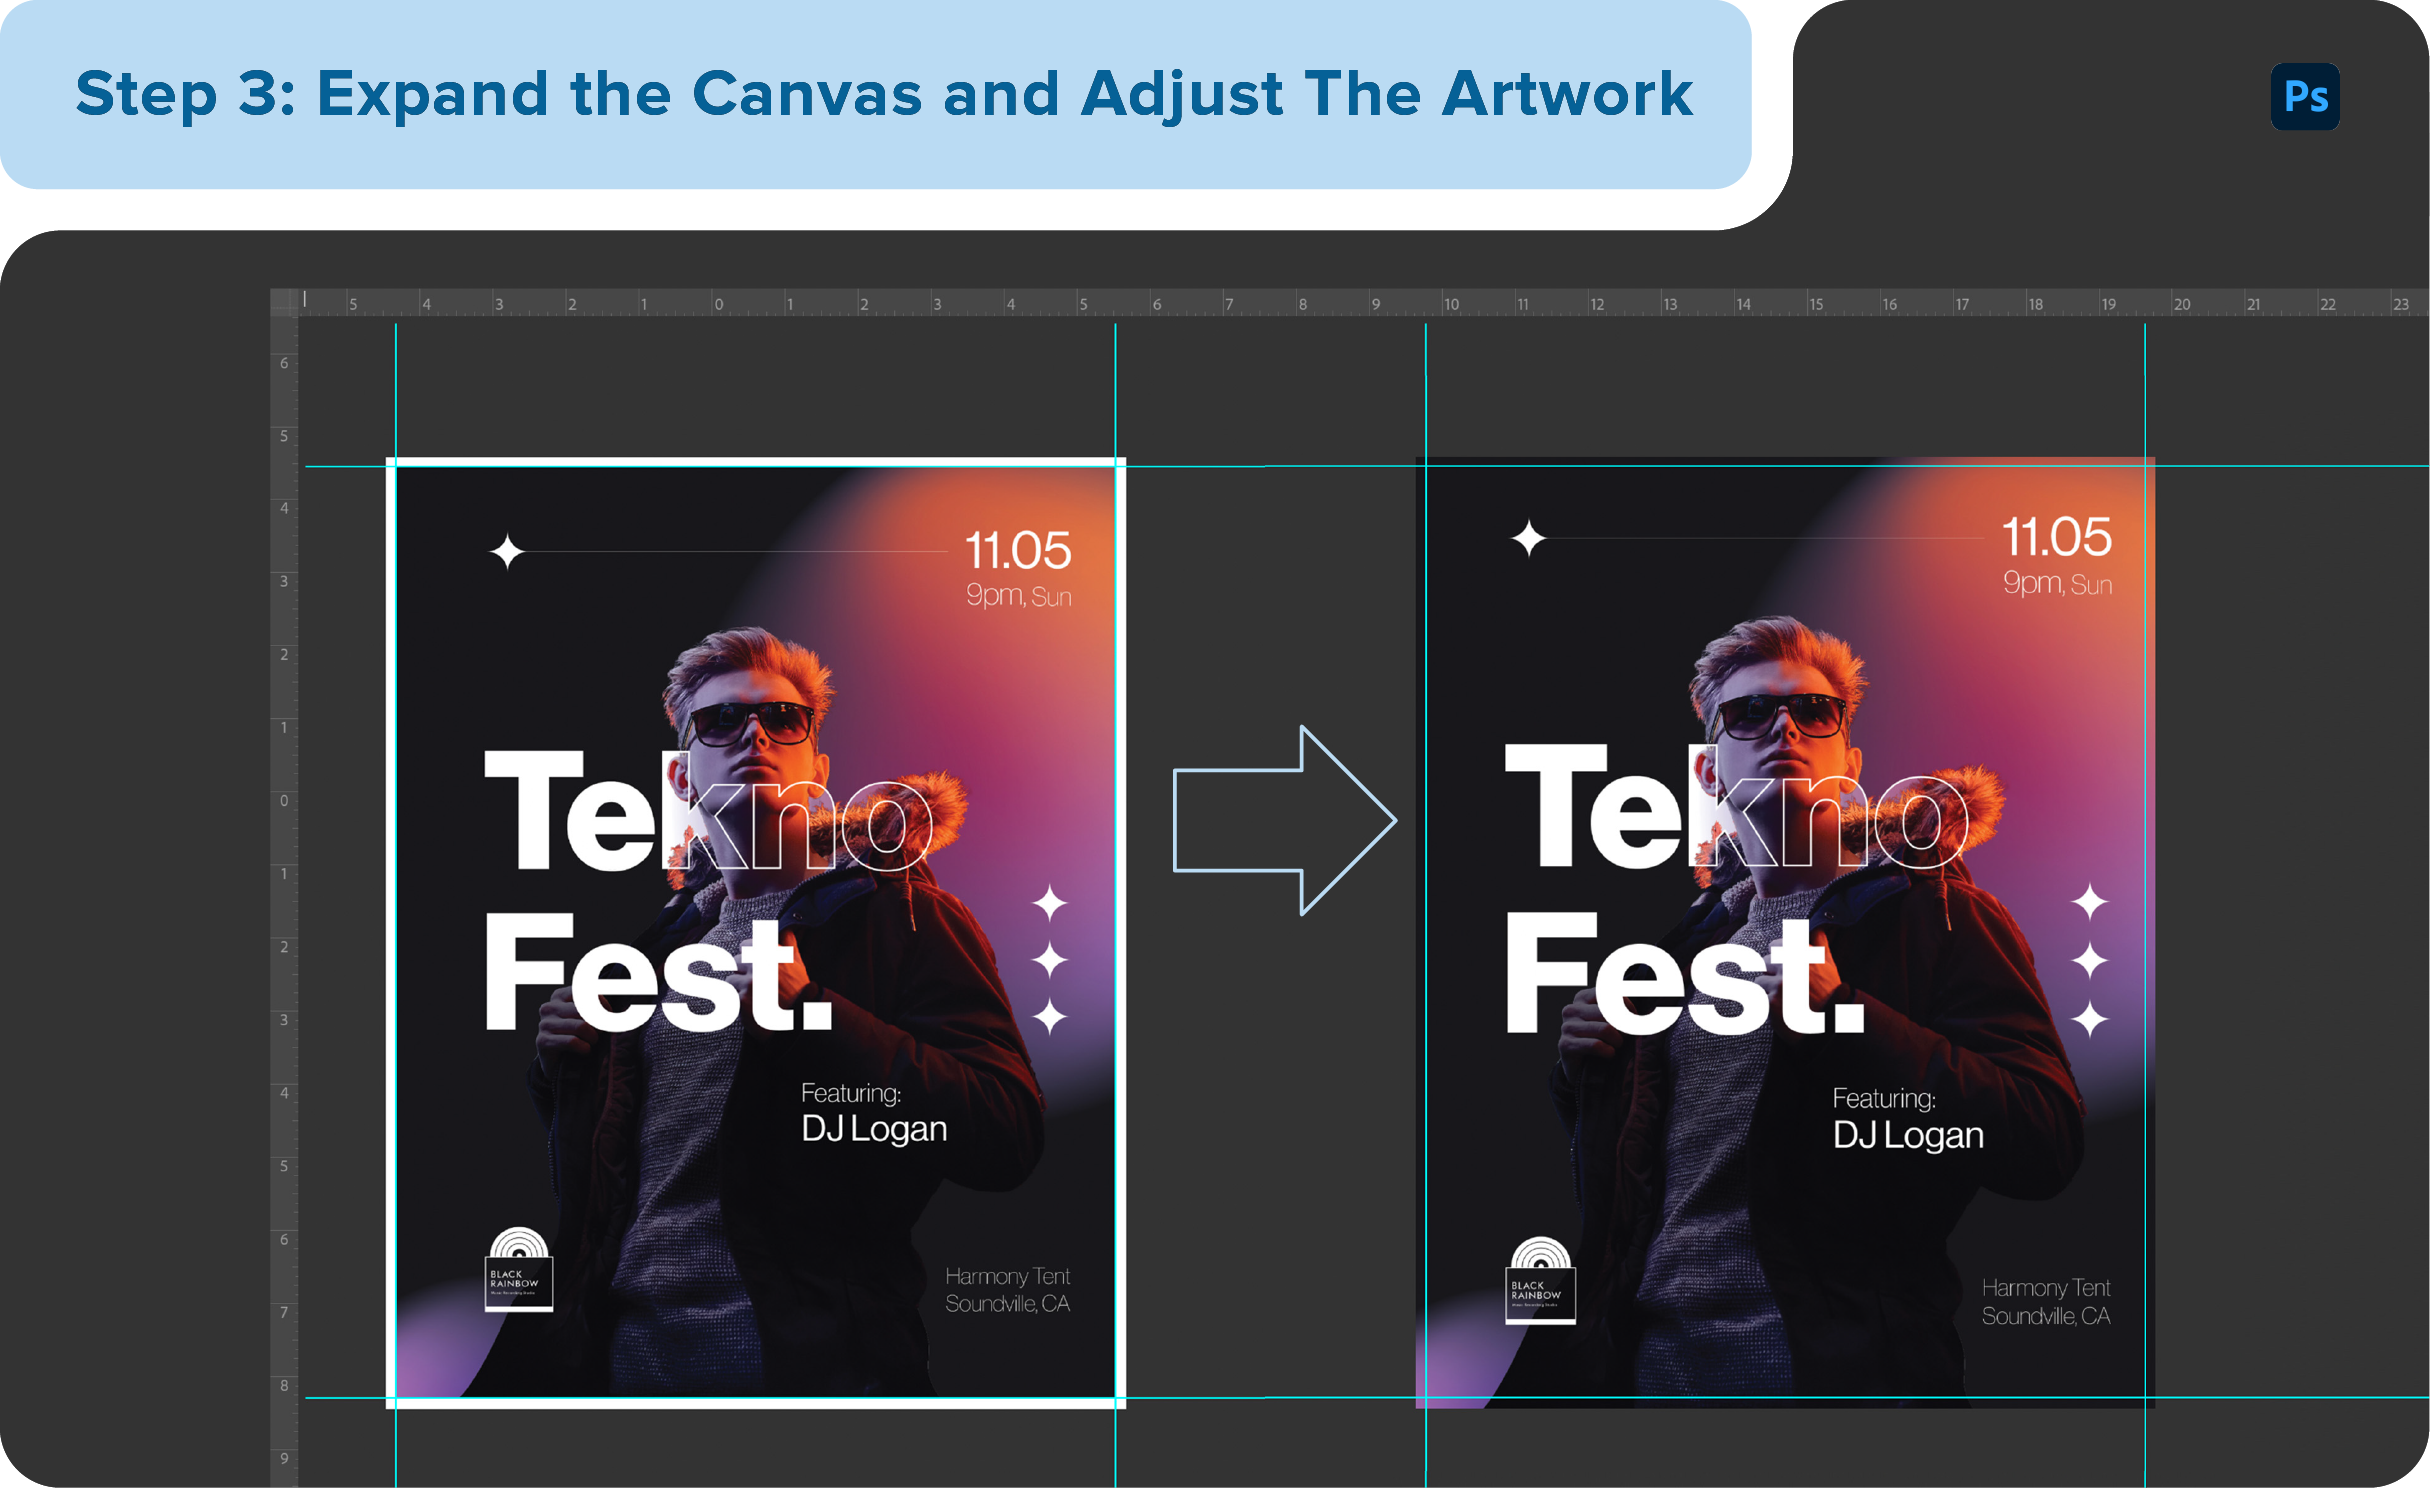
- Click Image > Canvas Size and add 0.25" to both width and height (0.125" on each side). Keep Relative checked so Photoshop automatically adds equal space all around.
- Press Ctrl+T / Cmd+T and carefully drag your background or full-bleed images so they extend to the new edges without moving the guide lines.
- Double-check that no critical text, logos, or key elements are placed near the guide lines or outside the safe zones.
4. Save Your File with Visible Bleed and Trim Marks
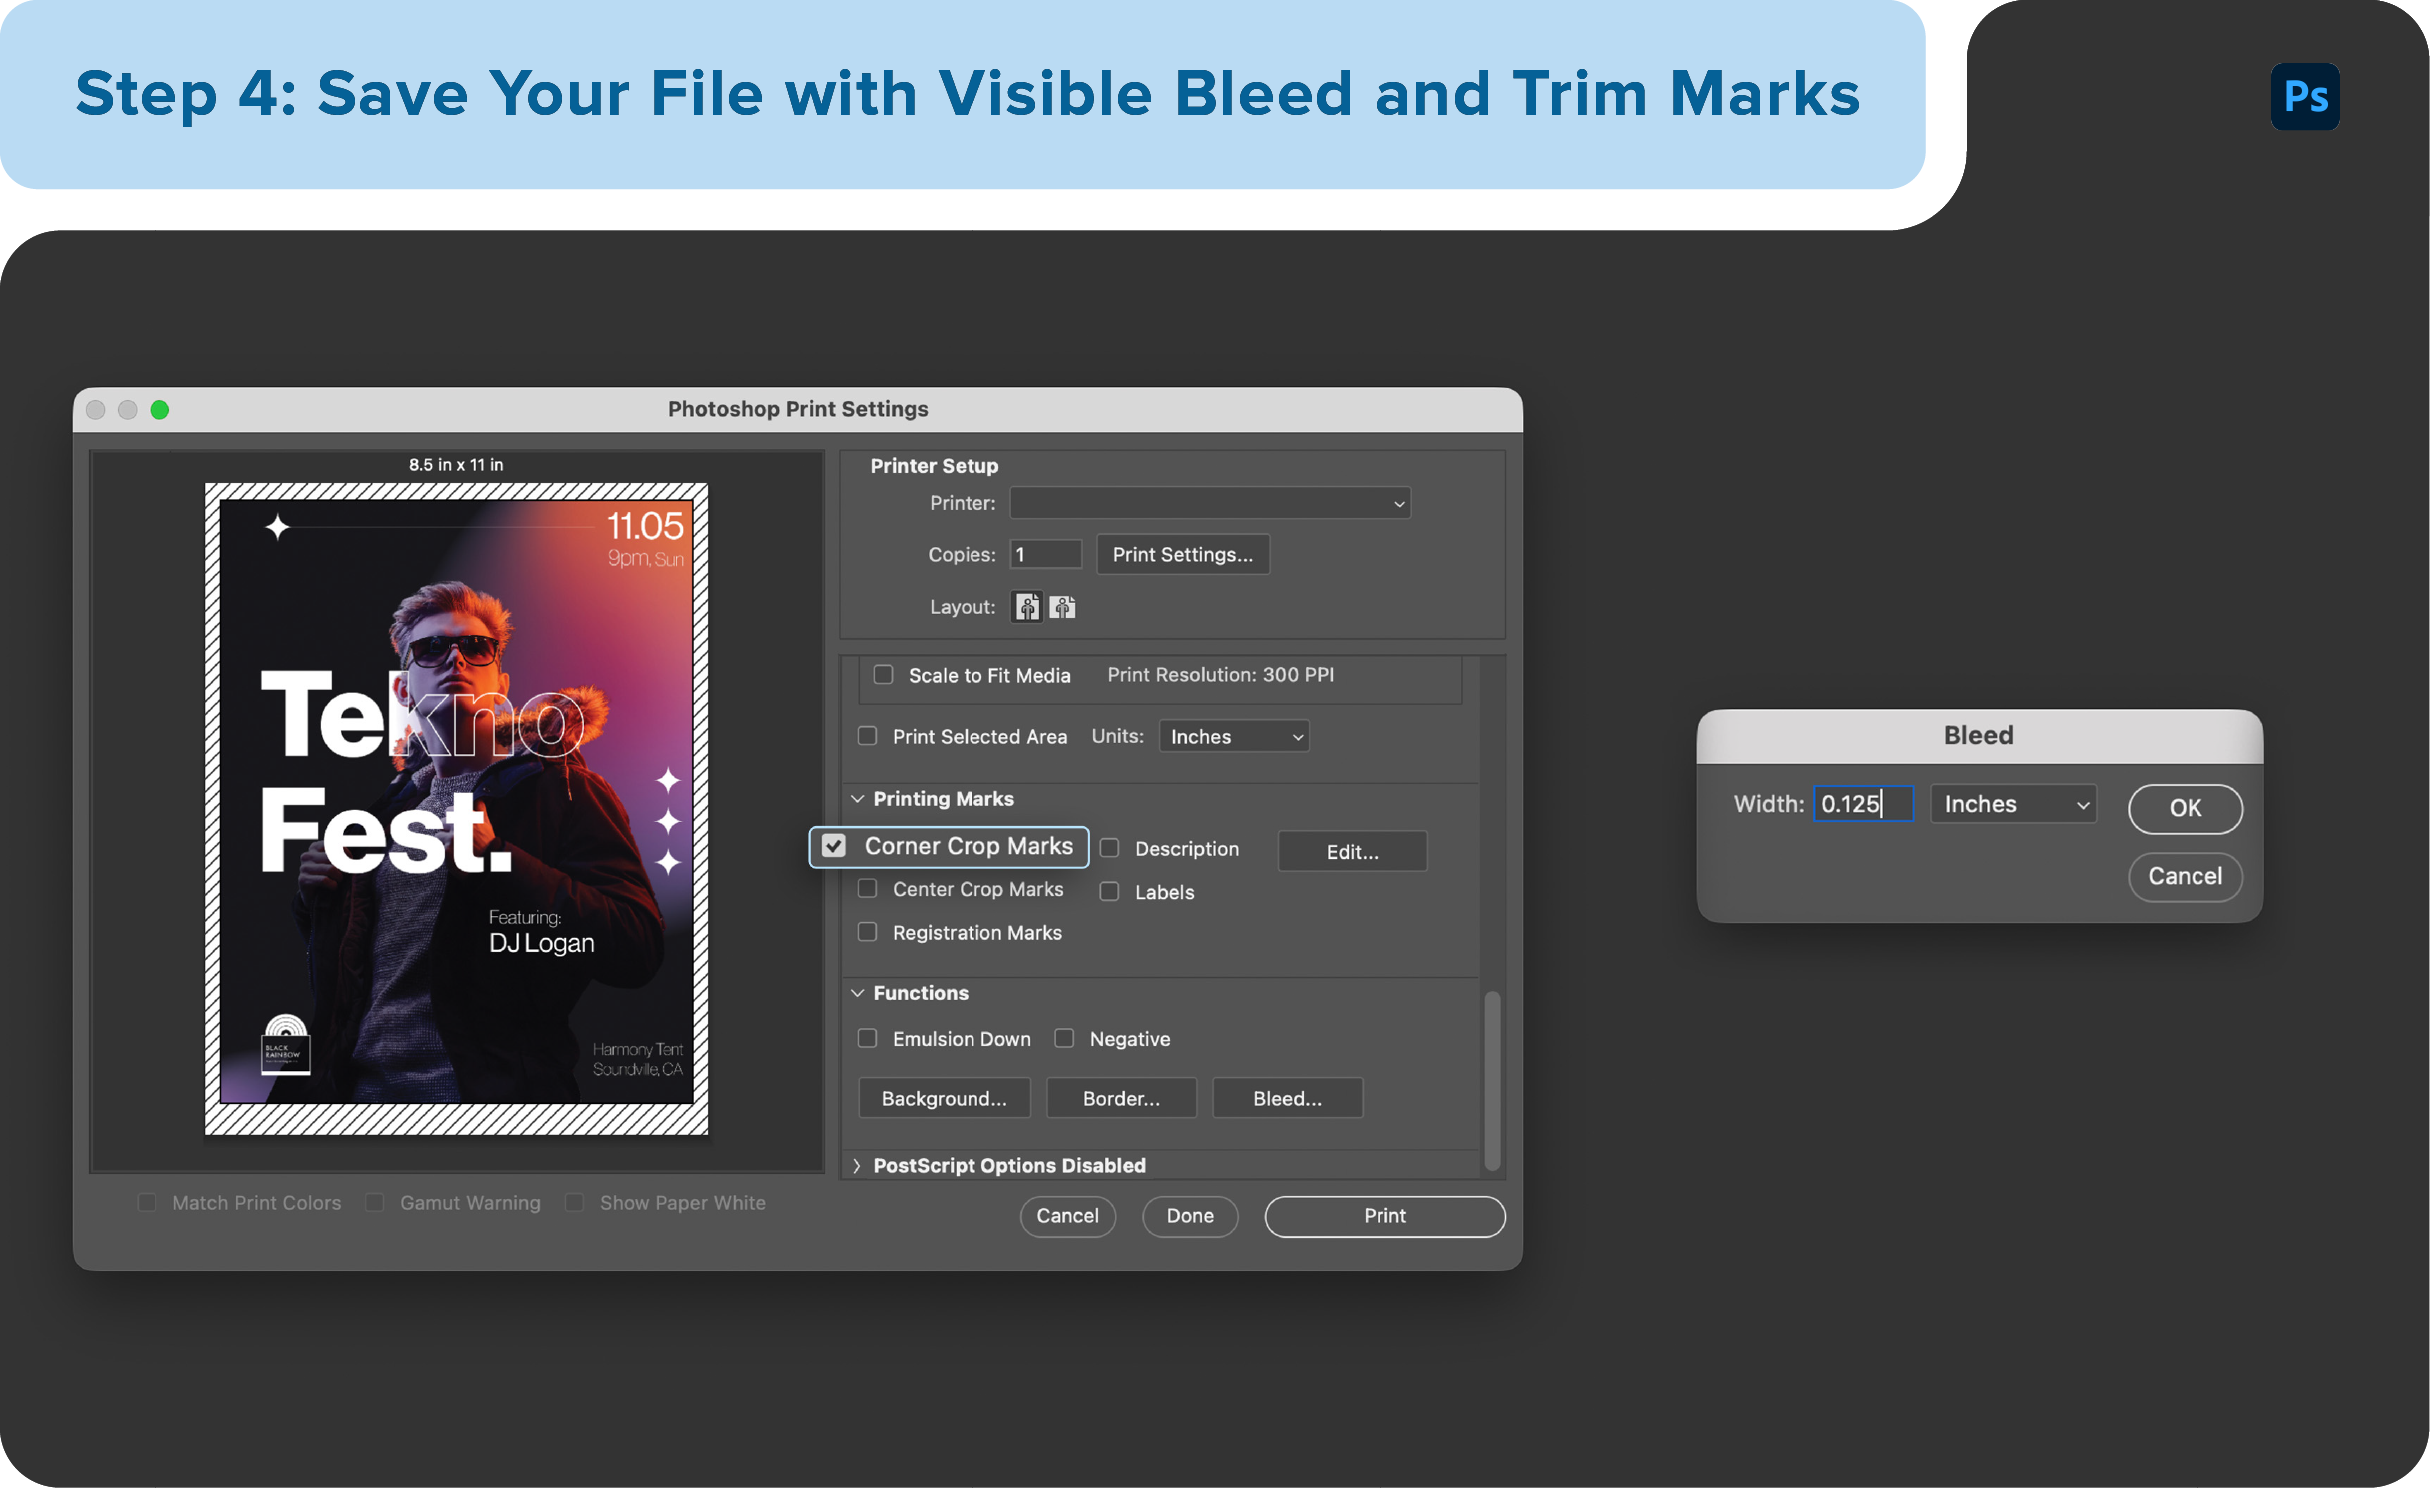
- Go to File > Print and select Microsoft Print to PDF as the printer option.
- Under Printing Marks, enable Show Corner Crop Marks. Then, in Functions, check Bleed and set it to 0.125".
- Click Print to save your design as a PDF with both bleed and trim marks clearly visible for professional printing.
- Create a new blank canvas with the exact final dimensions of your finished design.
- Drag and drop your completed artwork into Photoshop so it fits the canvas perfectly without leaving empty gaps.
2. Add Guides for Bleed and Trim Lines
- Go to View > Rulers (or press Ctrl+R / Cmd+R) to display rulers around the canvas.
- Click and drag the guide lines from the rulers toward each edge of the canvas to mark where the trim and bleed areas will be.
3. Expand the Canvas and Adjust the Artwork
- Click Image > Canvas Size and add 0.25" to both width and height (0.125" on each side). Keep Relative checked so Photoshop automatically adds equal space all around.
- Press Ctrl+T / Cmd+T and carefully drag your background or full-bleed images so they extend to the new edges without moving the guide lines.
- Double-check that no critical text, logos, or key elements are placed near the guide lines or outside the safe zones.
4. Save Your File with Visible Bleed and Trim Marks
- Go to File > Print and select Microsoft Print to PDF as the printer option.
- Under Printing Marks, enable Show Corner Crop Marks. Then, in Functions, check Bleed and set it to 0.125".
- Click Print to save your design as a PDF with both bleed and trim marks clearly visible for professional printing.
Bleed areas, trim lines, safe zones, and crop marks may seem like minor details, but they're vital in creating professional-looking prints and helping printers cut with perfect accuracy. Adding these guides to your design workflow keeps edges clean and prevents costly printing mistakes.
If you're designing your first flyer, poster, brochure, or banner, we can make the process easier for you. Signs.com offers ready-made templates with margins for every promotional print product available. Simply choose your preferred size, download the layout template, and you can start creating your attention-grabbing artwork for your business.
Related Articles
Take it From the Experts: 6 Tips on How to Design Your Banner
Best Fonts for Signs and Banners
The Best Resolution for Printing Photos, Banners, Signs and More – Signage 101
You may have certain rights with respect to the personal information we collect and process. These rights vary by state and country and depend on your residency. These rights are not absolute and we reserve all of our rights available to us at law in this regard. Please complete the below form to exercise one of your data subject rights, where applicable. We will process your request within the time provided by applicable law.