


Read More
Frosted Window Decals
Read More
-13388.jpg)

Finishing Options


 158K
158K
Store Ratings
 Verified Purchase
Verified Purchase
Verified Purchase
Verified Purchase
Verified Purchase
Verified Purchase
Verified Purchase
Verified Purchase
Verified Purchase
Verified Purchase
Verified Purchase
Verified Purchase
Verified Purchase
Verified Purchase
Verified Purchase
Verified Purchase
Verified Purchase
Verified Purchase
Verified Purchase
Verified Purchase
Verified Purchase
Verified Purchase
Verified Purchase
Verified Purchase
Verified Purchase
Verified Purchase
Verified Purchase
Verified Purchase
Verified Purchase
Verified Purchase
Verified Purchase
Verified Purchase
Verified Purchase
Verified Purchase
Verified Purchase
Verified Purchase
Verified Purchase
Verified Purchase
Verified Purchase
Verified Purchase
Verified Purchase
Verified Purchase
Verified Purchase
Verified Purchase
Verified Purchase
Verified Purchase
Verified Purchase
Verified Purchase
Verified Purchase
What Are Frosted Window Decals?

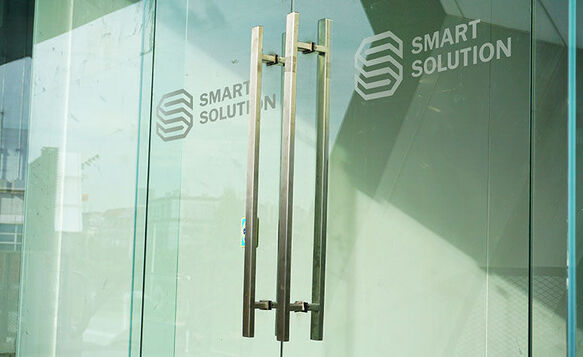
A frosted window decal is an image or graphic created from a sheet of translucent vinyl material with a "frosted" or "etched" appearance. These decals are designed to be transparent enough to let light through a window yet opaque enough to offer privacy. You can choose between a traditional frosted window decal or frosted lettering. With frosted window decals, your design will be printed with UV ink onto frosted vinyl material. Each design option displays your custom message or graphic uniquely and you can choose between standard lettering, reverse cut, or frosted designs. Custom frosted window decals provide an elegant, professional appearance at a low cost and will last up to five years with proper installation and care.
Frosted vinyl window decals are perfect for both indoor and outdoor use. They are often used to display company logos, advertise products and promotions, offer general business information, and provide privacy for company boardrooms, offices, and retail storefronts.
Why Signs.com?

Frosted Window Decal Features

Provides Privacy

Fully Customizable

Lowest Price

Professional Appearance

Safe for Outdoor Use
Types of Frosted Decals & Lettering Available
Frosted Lettering (Reverse Cut)

How It's Made

Shape
Print Surface Options

Adhesive on Back
Your lettering will adhere to the outside of the window you apply it to.

Adhesive on Front
Your lettering will adhere to the inside of the window you apply it to.
Frosted Lettering (Reverse Cut) Installation
Your frosted lettering with a reverse cut will be pre-spaced and pre-masked with transfer tape. This creates an all-in-one simple installation that allows all components of your lettering to be installed at the same time. This is a wet install that requires a water and soap-based solution to adhere the lettering to your intended glass surface. Follow the step by step instructions below or view the installation video for assistance.
Please Note: For large lettering intended to cover entire windows or large surfaces we recommend professional installation for best results.

Before beginning the installation of your frosted lettering, gather the following supplies to help with the process:
- Spray bottle
- Paper Towels
- Masking or Painters Tape
- Application Squeegee (available for purchase with order)
- Window Squeegee
- Razor Knife
- Ruler

Thoroughly clean the surface where you intend to place the frosted window lettering, removing all dust and dirt. Allow time to air dry or use a window squeegee to wipe away excess water.

Create an application solution for your decal by combining 3 drops of dish soap (not hand soap) per 1 gallon of water and place into a spray bottle.

Measure and mark your desired installation location. Hold your decal up to the window in the correct location and apply a horizontal strip of masking or painters tape to the top of the decal with the top half of the tape on the window, creating a hinge.

Hold the bottom edge of the frosted window lettering away from the window and spray the glass surface with the application solution you created in the previous step.

Begin to remove the back liner from the lettering, starting at a top corner and working your way down to an adjacent bottom corner. As you are removing the back liner, be sure to generously spray application solution on the adhesive side of the decal.

Once the back liner is removed and both the decal and glass surface are wet, use a squeegee* and apply pressure to the front of the graphic, adhering it to the window. Be sure to squeegee from left to right from the top down. If bubbles or creases begin to develop during this process, carefully lift the affected portion of the decal away from the window and repeat the application process.
*Available for purchase with your frosted lettering
Once the entire decal has been adhered to the window without major bubbles or creases, run the squeegee over the entire decal one final time to ensure the adhesive is firmly attached to the surface.

Begin to remove the premask, starting at a top corner and working your way towards the adjacent bottom corner. If any vinyl begins to peel off the window, use your squeegee to firmly adhere it back to the surface and continue peeling away the premask.

Once you have removed the entire premask, lay the removed back liner over the top of the installed lettering and apply hard pressure with the squeegee. This will help remove any air bubbles or creases that have formed during installation.

Use paper towels to clean the glass surface and to remove excess water from the edges of the lettering. It may take several days for the adhesive to fully dry and bind to the glass surface.

If your lettering goes to the edge of your window, use a razor blade and ruler to trim excess material away until the lettering is flush with the edge of the window.
Download or Print Frosted Lettering (Reverse Cut) Installation Instructions
Frosted Lettering

How It's Made

Shape

Print Surface Options
Adhesive on Back
Your lettering will adhere to the outside of the window you apply it to.
Adhesive on Front
Your lettering will adhere to the inside of the window you apply it to.
Frosted Lettering Installation
Your frosted lettering will be pre-spaced and pre-masked with transfer tape. This creates an all-in-one simple installation that allows all components of your decal to be installed at the same time. This is a wet install that requires a water and soap-based solution to adhere the decal to your intended glass surface. Follow the step by step instructions below or view the installation video for assistance.
Please Note: For large lettering intended to cover entire windows or large surfaces we recommend professional installation for best results.
Before beginning the installation of your frosted window lettering, gather the following supplies to help with the process:
- Spray bottle
- Paper Towels
- Masking or Painters Tape
- Application Squeegee (available for purchase with order)
- Window Squeegee
- Razor Knife
- Ruler
Thoroughly clean the surface where you intend to place the frosted window lettering, removing all dust and dirt. Allow time to air dry or use a window squeegee to wipe away excess water.
Create an application solution for your decal by combining 3 drops of dish soap (not hand soap) per 1 gallon of water and place into a spray bottle.
Measure and mark your desired installation location. Hold your lettering up to the window in the correct location and apply a horizontal strip of masking or painters tape to the top of the decal with the top half of the tape on the window, creating a hinge.
Hold the bottom edge of the frosted window lettering away from the window and spray the glass surface with the application solution you created in the previous step.
Begin to remove the back liner from the decal, starting at a top corner and working your way down to an adjacent bottom corner. As you are removing the back liner, be sure to generously spray application solution on the adhesive side of the decal.
Once the back liner is removed and both the decal and glass surface are wet, use a squeegee* and apply pressure to the front of the graphic, adhering it to the window. Be sure to squeegee from left to right from the top down. If bubbles or creases begin to develop during this process, carefully lift the affected portion of the decal away from the window and repeat the application process.
*Available for purchase with your frosted lettering
Once the entire decal has been adhered to the window without major bubbles or creases, run the squeegee over the entire decal one final time to ensure the adhesive is firmly attached to the surface.
Begin to remove the premask, starting at a top corner and working your way towards the adjacent bottom corner. If any vinyl begins to peel off the window, use your squeegee to firmly adhere it back to the surface and continue peeling away the premask.
Once you have removed the entire premask, lay the removed back liner over the top of the installed lettering and apply hard pressure with the squeegee. This will help remove any air bubbles or creases that have formed during installation.

Use paper towels to clean the glass surface and to remove excess water from the edges of the lettering. It may take several days for the adhesive to fully dry and bind to the glass surface.
Download or Print Frosted Lettering Installation Instructions
Frosted Window Decal

How It's Made

Shape Options
Square/Rectangle
The shape of your decal will be a standard square/rectangle cut to any custom size.

Custom
The shape of your decal will be custom to match the shape of your design.

Custom with Border
The shape of your decal will be custom with a small border around the edge of your design.
Print Surface Options
Adhesive on Back
Your lettering will adhere to the outside of the window you apply it to.
Adhesive on Front
Your lettering will adhere to the inside of the window you apply it to.
Frosted Window Decal Templates
Want original frosted window decals for your business? Signs.com will help you with the design and printing processes. You can start your decal journey with our free layout templates, which you can edit and design using our online design tool. Choose the motif that suits your business and work your artistic expression into making an original artwork that we’ll print on high-quality frosted vinyl.


How to Use the Frosted Window Decals Templates
- Choose whether you want frosted lettering, reverse cut, or frosted decal for your windows. Then, select the best design to go with your vision from our custom templates.
- Click on the template, and you'll be directed to our online design tool, where you can freely edit the existing template.
- Insert your brand logo on the template and write your company name. You can also use repeat patterns and add custom shapes to make your design more visible and appealing.
- If you're done with the edits, you can click "save and continue" and proceed with the payment or ask for a free proof and inquire about more improvements to your design. Once the design is finalized, you can confirm your approval, and we will do the rest.
Frosted Window Decal Installation
Please Note: Frosted window decals can be difficult to install. We recommend either professional installation or a thorough review of our installation instructions before attempting to install. This is a wet install that requires a water and soap-based solution to adhere the decal to your intended glass surface. The instructions below also apply to a blank piece of frosted window decal.
Before beginning the installation of your frosted window lettering, gather the following supplies to help with the process:
- Spray bottle
- Paper Towels
- Masking or Painters Tape
- Application Squeegee (available for purchase with order)
- Window Squeegee
- Razor Knife
- Ruler
Thoroughly clean the surface where you intend to place the frosted window lettering, removing all dust and dirt. Allow time to air dry or use a window squeegee to wipe away excess water.
Create an application solution for your decal by combining 3 drops of dish soap (not hand soap) per 1 gallon of water and place into a spray bottle.

Spray a generous amount of application solution to the desired glass surface or window.
Lay your frosted window decal on a flat, smooth surface and begin to remove the back liner (be sure to keep the liner nearby for a later step). As you are removing the back liner, generously apply the application solution created in the previous step to the back of the decal. You may want to apply some application solution to your hands when doing this so you do not damage the adhesive side of the decal withyour fingers. Do not submerge the decal into water in order to soak the adhesive side.

Pick up the decal by grabbing the two top corners. Be sure to keep the decal straight so that it does not krinkle when moving it to the desired surface.

Now that both the adhesive side of the decal and the glass surface are now sufficiently wet, apply your frosted window decal to the window. The application solution will allow the decal to slip and move once it is on the window. You can then slide the decal into the final position you would like it to be.

Lay the removed back liner over the face of the decal and begin to use the application squeegee to remove air bubbles/application solution from under the decal. Be sure to start in the center of the decal and press firmly to the right or left. Continue this process until you have ran the squeegee over the entire surface of the decal. For optimal results, we recommend using two people during this step, having one person hold the decal away from the glass surface as the other squeegees in a downward motion.

Use paper towels to clean the glass surface and to remove excess water from the edges of the decal. It may take several days for the adhesive to fully dry and bind to the glass surface.

If your decal goes to the edge of your window, use a razor blade and ruler to trim excess material away until the decal is flush with the edge of the window.
Download or Print Frosted Window Decal Installation Instructions PDF
Additional Specs
-
Frosted Lettering
Frosted Window Decal
-
Weight:
.07lbs per square foot (about the weight of 7 quarters)
.07lbs per square foot (about the weight of 7 quarters)
-
Thickness:
.002" (2-mil or 50 microns (about the thickness of half a sheet of copy paper)
.002" (2-mil or 50 microns (about the thickness of half a sheet of copy paper)
-
Details:
Semi-transparent, provides privacy, permanent, easy to install with transfer tape
Semi-transparent, provides privacy, permanent, installation requires water
-
Uses:
Indoor/Outdoor; Retail, home or office windows
Indoor/Outdoor; Retail, home or office windows
-
Print Method:
Cut, not printed, from vinyl sheet
4-color printing, eco-friendly, weather, fade and abrasion resistant UV ink. No white ink will be printed
-
Estimated Lifespan:
Approximately 8 years depending on climate and use
5+ years with proper placement and care
Care

Don't allow your frosted window decal or lettering to become exposed to, nor submerged in, water or excessive moisture for an extended period of time before installing. Do not power wash your decals after they are installed. Lightly clean them with a damp cloth. Remove by peeling the decal away from the window, using a window cleaner and razor blade to remove leftover residue.
Easy to Use Design Tool

Create your etched glass decal with the easiest and simplest design tool in the signage industry. Upload artwork, create objects, add text, adjust sizing, change color, and so much more!
Free Professional Design Services

Whether you need help uploading your design or are interested in creating something entirely new, our team of professional graphic designers is here to help. Nothing beats free!
Related Products


Questions and Answers
Window clings will easily adhere to windows and other smooth surfaces without any adhesive. For LED signage, I highly suggest considering our backlit decals instead. Made from 3.5 mil adhesive vinyl, backlit decals are designed to withstand exposure to heat from light sources as well as indoor and outdoor elements. Because of the flexible property of the backlit decal, you can easily apply them to windows, light box sign panels or other smooth translucent surfaces for a fantastic light up effect. Please click the link below to learn more: