


Pop Up Tents

Tell us what sign you want, how big you want it, and what you would like on it and we'll have it ready for you in no time!
No results found for "{{previous_search_keyword}}"
Tell us what you want your product to look like and our team of professional designers will bring your vision to life!
And the best part: All design fees will be fully credited to your product purchase!
 169K
169K
Store Ratings
 Verified Purchase
Verified Purchase
Verified Purchase
Verified Purchase
Verified Purchase
Verified Purchase
Verified Purchase
Verified Purchase
Verified Purchase
Verified Purchase
Verified Purchase
Verified Purchase
Verified Purchase
Verified Purchase
Verified Purchase
Verified Purchase
Verified Purchase
Verified Purchase
Verified Purchase
Verified Purchase
Verified Purchase
Verified Purchase
Verified Purchase
Verified Purchase
Verified Purchase
Verified Purchase
Verified Purchase
Verified Purchase
Verified Purchase
Verified Purchase
Verified Purchase
Verified Purchase
Verified Purchase
Verified Purchase
Verified Purchase
Verified Purchase
Verified Purchase
Verified Purchase
Verified Purchase
Verified Purchase
Verified Purchase
Verified Purchase
Verified Purchase
Verified Purchase
Verified Purchase
Verified Purchase
Verified Purchase
Verified Purchase
Verified Purchase
Verified Purchase
Verified Purchase
Verified Purchase
Verified Purchase
Verified Purchase
Verified Purchase
Verified Purchase
Verified Purchase
Verified Purchase
Verified Purchase
Verified Purchase
Verified Purchase
Verified Purchase
Verified Purchase
Verified Purchase
Verified Purchase
Verified Purchase
Verified Purchase
Verified Purchase
Verified Purchase
Everything Included With Your Tent


Premium Services at No Additional Charge


What Are Custom Pop Up Tents?
A custom pop-up tent is a 10’ x 10’ shelter consisting of a custom-printed polyester canopy and a 1.6” thick aluminum frame. The aluminum frame easily expands and retracts, allowing quick and simple setup. The canopy rests on the top of the frame, providing shade and highly visible brand exposure. Any custom image or graphic can be printed onto the canopy, making it a great solution for advertising your business or organization. Your pop-up tent can also come with additional accessories, including a premium carrying case, rope & stake kit, and a set of four sandbags to help stabilize the tent.
Custom pop-up tents can be used both indoors and outdoors. They are commonly used at trade shows, marketing events, sporting events, arts and crafts shows, and festivals. They also work great as sales booths. See the image in this section for tent terminology and definitions.
-5315.jpg)
Tent Canopy
The tent canopy is the portion of the tent that rests on top of the tent frame. It is made of a 600 denier polyester material and is waterproof and UV/weather-resistant.
Peak
The peaks are the triangular portions running up the side of the tent canopy. These are mainly used to display logos or custom graphics. There are four peaks, all of which are printable.
Valence
The valences are the rectangular portions running alongside the bottom of the tent canopy. These are mainly used to display websites, phone numbers, or other information. There are four valences, all of which are printable.
Tent Frame
The tent frame is the backbone of the tent, providing the tent’s structure and size. It is made of 1.6” (40 mm) aluminum and includes telescopic legs that allow you to adjust the height of the tent.
Downloadable Pop Up Tent Template
Tent Canopy Features

-
![]()
Full Color Digital Printing
Any design, graphic, or combination of colors can be printed onto your tent canopy. Your design will be printed on each side of the tent, allowing for 360-degree branding.
-
![]()
600 Denier Polyester Material
Each tent canopy is made with durable 600 denier polyester. This high-quality material is not easily scratched or torn and will ensure longevity for your tent.
-
![]()
Reinforced Strips
You can choose between either black or white reinforced strips to be sewn into the seams of your canopy, providing additional strength and extending its lifespan.
-
![]()
Weather Resistant and Waterproof
Designed for the outdoors, your tent canopy is coated to repel water, block out sunlight, and withstand the elements.


Tent Frame Features

-
![]()
1.6” (40mm) Heavy Duty Aluminum
The frame of your tent is made with 1.6” aluminum, providing durability while being light enough to carry around with ease.
-
![]()
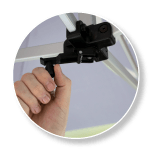
Adjustable Crank
The interior crank allows you to adjust the top of the tent, helping you to straighten out the attached canopy.
-
![]()
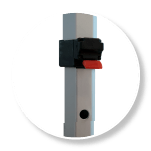
Telescopic Legs
Easily switch between four different heights for your tent. It’s as simple as push, slide, and click.
-
![]()
Easy Setup and Takedown
The frame of your tent has been engineered to incorporate a folding mechanism that allows it to be set up and taken down in one straight motion. See setup instructions for more information.
-
![]()
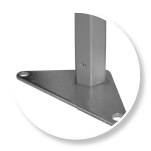
Stabilizing Footplates
Foot plates are welded to the bottom of each tent leg, providing additional stability and giving you the option of securing your tent to the ground with metal stakes*. *included with order


Tent Accessories
Premium Carrying Case
(free with tent purchase)
Rubber wheels and multiple handles for easy transportation
Compartment to carry hardware & accessories
Easily holds tent frame & canopy
Rope & Stake Kit
(free with tent purchase)
Includes four 8” stakes that can be inserted into footplates on tent legs
Includes four 11.5’ nylon ropes to help hold the tent down in windy weather
Kit carrying case helps keep track of pieces

Sandbags (4 piece set)
(available for purchase)
Each bag holds up to 19 lbs of sand
Keeps your tent in place during windy weather
Easy to fill and attach to tent legs
Popular Pop Up Tents Templates


Pop-Up Tent Online Templates
- Browse our template catalog and choose a design template. This will redirect you to our user-friendly design tool.
- Keep the existing design or tweak it — add your brand logo, throw in some shapes, or choose a new background color.
- Replace the placeholder text with your company information, event details, or anything else you want to showcase.
- Enter the size and quantity of your order in the 'Product Setup' tab. The tool will automatically calculate the total cost based on your input.
- All set? You can save your design for later or proceed to checkout.
Tent Frame
-
Weight:
43 lbs
-
Size:
120"w x 120"d x 124.5"h (smallest)
-
Thickness:
120"w x 120"d x 137"h (largest)
-
Details:
1.6" (40mm) aluminum
-
Uses:
Expandable and retractable, telescopic legs, interior crank, welded footplates, easy setup and take down
-
Estimated Lifespan:
Indoor/Outdoor. Trade shows, marketing events, sales booths, sporting events, business events, fairs, festivals
-
Weight:
1-3 years* (see FAQ for lifespan details)
-
Size:
8 lbs
-
Thickness:
120"w x 120"d x 82"h (smallest)
-
Details:
600 denier/ 6oz polyester
-
Uses:
Waterproof, UV resistant, weather resistant, scratch resistant, easily attaches to tent frame using velcro
-
Print Method:
Indoor/Outdoor. Trade shows, marketing events, sales booths, sporting events, business events, fairs, festivals
-
Estimated Lifespan:
Four color process dye sublimation, eco-friendly, weather, fade and abrasion resistant ink
Set Up Your Tent In Less Than 5 Minutes
Setting up your custom event tent is a very simple and straightforward process. Still, we recommend that you use the following instructions to ensure proper setup. While it is possible to set up your tent by yourself, we recommend having at least two people to assist you to ensure that it is installed properly and correctly. If you would like to keep a copy of setup instructions with your tent, you can download and print the setup instructions PDF here.


Slightly expand the tent to the point where you can grab ahold of the interior bars. Utilizing two people, stand across from each other and begin to expand the tent by holding onto the center of the hardware while stepping back. Be sure to avoid the scissor sections of the frame as it unfolds, and it may become a pinching hazard. Continue expanding until the tent is about 5 feet wide.

Place the canopy on top of the frame, aligning the corners and using the Velcro to fasten the canopy to the frame.

Each person will then grab a tent leg, lift, and step backwards to continue expanding the tent. Alternate between legs until the tent has expanded to its full 10-feet length. When the tent is fully expanded, lock it into place by sliding up the locking mechanism at the top of each leg until it clicks into place.

Next, tighten the tent canopy by rotating the crank in the center of the tent counterclockwise (when looking down at the crank, clockwise if you are looking up at it). Continue rotating until the center pole has reached its maximum height, making the canopy tight.

Raise the tent by stepping on one of the footplates and raising the leg of the tent until you hear it click into place. Repeat this process on all four legs of the tent ensuring they all click into an equivalent height setting.

You may adjust the height of the tent by pressing down on the red switch on the leg’s locking mechanism and sliding up or down until the leg clicks into place. There are four different height settings for your tent.
Download or Print Pop Up Tent Setup Instructions PDF
Care and Storage
If you need to clean your tent canopy, we recommend using warm water, mild soap, and a soft brush. Do not machine-wash the canopy. As for the tent frame, you can use a damp cleaning cloth to remove dirt and scuff marks.

When taking down the tent, start by lowering each tent leg to the lowest height by pressing in the red switch in the middle of each leg and pushing all the way down. Next, press the red switch on the top of each leg and push down. This will unlock the tent. Start retracting the tent by using two people to lift opposing legs and take steps forward. Once the tent is about five feet wide stop retracting and remove the canopy from the frame. Once the canopy is removed, continue to retract the tent frame until it is fully collapsed.
Store the tent frame and canopy in a cool, dry place. Do not keep the canopy on the tent frame when storing, as this may cause snags or tears.
Pop Up Tent Resources


Chat with us, contact us, or give us a call at 1-888-222-4929. We’re here to help!
General
At this time, the only size we offer for our custom pop up tents is 10' x 10'. This is the industry standard size for a pop up tent and is ideal for trade shows, marketing events, sporting events, or any other indoor or outdoor event where you wish to establish a branded presence. When assembled, the tent is 10' wide, 10' deep, and can range from 10.38' - 11.42" tall (depending on tent crank and leg adjustment).
The tent frame is made from heavy duty 1.6" (40mm) aluminum metal designed to withstand repeated use in outdoor applications. At the bottom of each leg is a welded foot plate made to provide added stability. The interior lattice of the frame provides additional strength and support to the tent and allows a simple setup and takedown.
Knowing pop up tents are mainly used at outdoor events, we have been sure to make our pop up tents as weather resistant and waterproof as possible. The coated 600 denier canopy has been designed to repel water/moisture and will not fade when exposed to sunlight. The tent frame, made of 1.6" (40mm) aluminum, will be able to withstand windy conditions with the use of ropes and ground stakes (included in order) and leg sandbags (available for purchase). If you are experiencing inclement or severe weather with high-speed winds, we do recommend taking down the tent to avoid any damage. Further, if retractable banners are purchased as a separate but related product they are not suitable for anything but calm conditions and nice weather.
Design & Production
There are three options you have when it comes to designing your custom tent. The first option is to use our free design services. The first thing you will need to do is fill out a free design services request form. This form will allow you to specify what you need and how you would like it to look. Once you have filled out the form, you will be personally contacted by one of our professional graphic designers within one business day. They will then work with you one-on-one to create the perfect design for your 10’x10’ tent. The second option you have is to upload your own custom design. To do so, we recommend starting by downloading the custom pop up tent design template. Once you have downloaded the template, you can add your custom design to the template and then upload the file to our website. When uploading your file, please be sure to follow all artwork requirements. The third option is to design your custom pop up tent using our online design tool. This will allow you to add text, change fonts, adjust colors, upload images, and so much more directly on our website.
Components & Accessories
Each pop up tent order includes 1 custom full color tent canopy, 1 10' x10' aluminum tent frame, 1 free premium carrying case, and 1 set of ropes and ground stakes. Once you have completed your order it will be produced the same day and shipped out the next business day.
The premium carrying case is 11" wide and 64" tall. It easily fits the tent frame in the main portion of the case and contains an additional graphics/accessories compartment that is large enough to fit the tent canopy. You may also use the compartment to carry your tent accessories, such as the rope and stake kit or unfilled sandbags.
The premium carrying bag is portable and has rubber wheels that allow you to easily transport your custom pop up tent. When filled with the tent frame, the bag is 64" tall and 11" wide, making it too large to be a carry on item when flying in a plane. We recommend checking in the carrying case with your airline when travelling via plane.
Setup, Installation, & Care
Yes. You are able to adjust your tent to four different heights using the telescopic legs. You can do this by pressing in the red switch on each tent leg and raising/lowering the leg until you hear it click into place. The lowest height setting will make your tent 10.38’ tall and the highest setting will make your tent 11.42’ tall. You can also adjust the interior height of the tent by cranking the handle located in the center of the tent.