

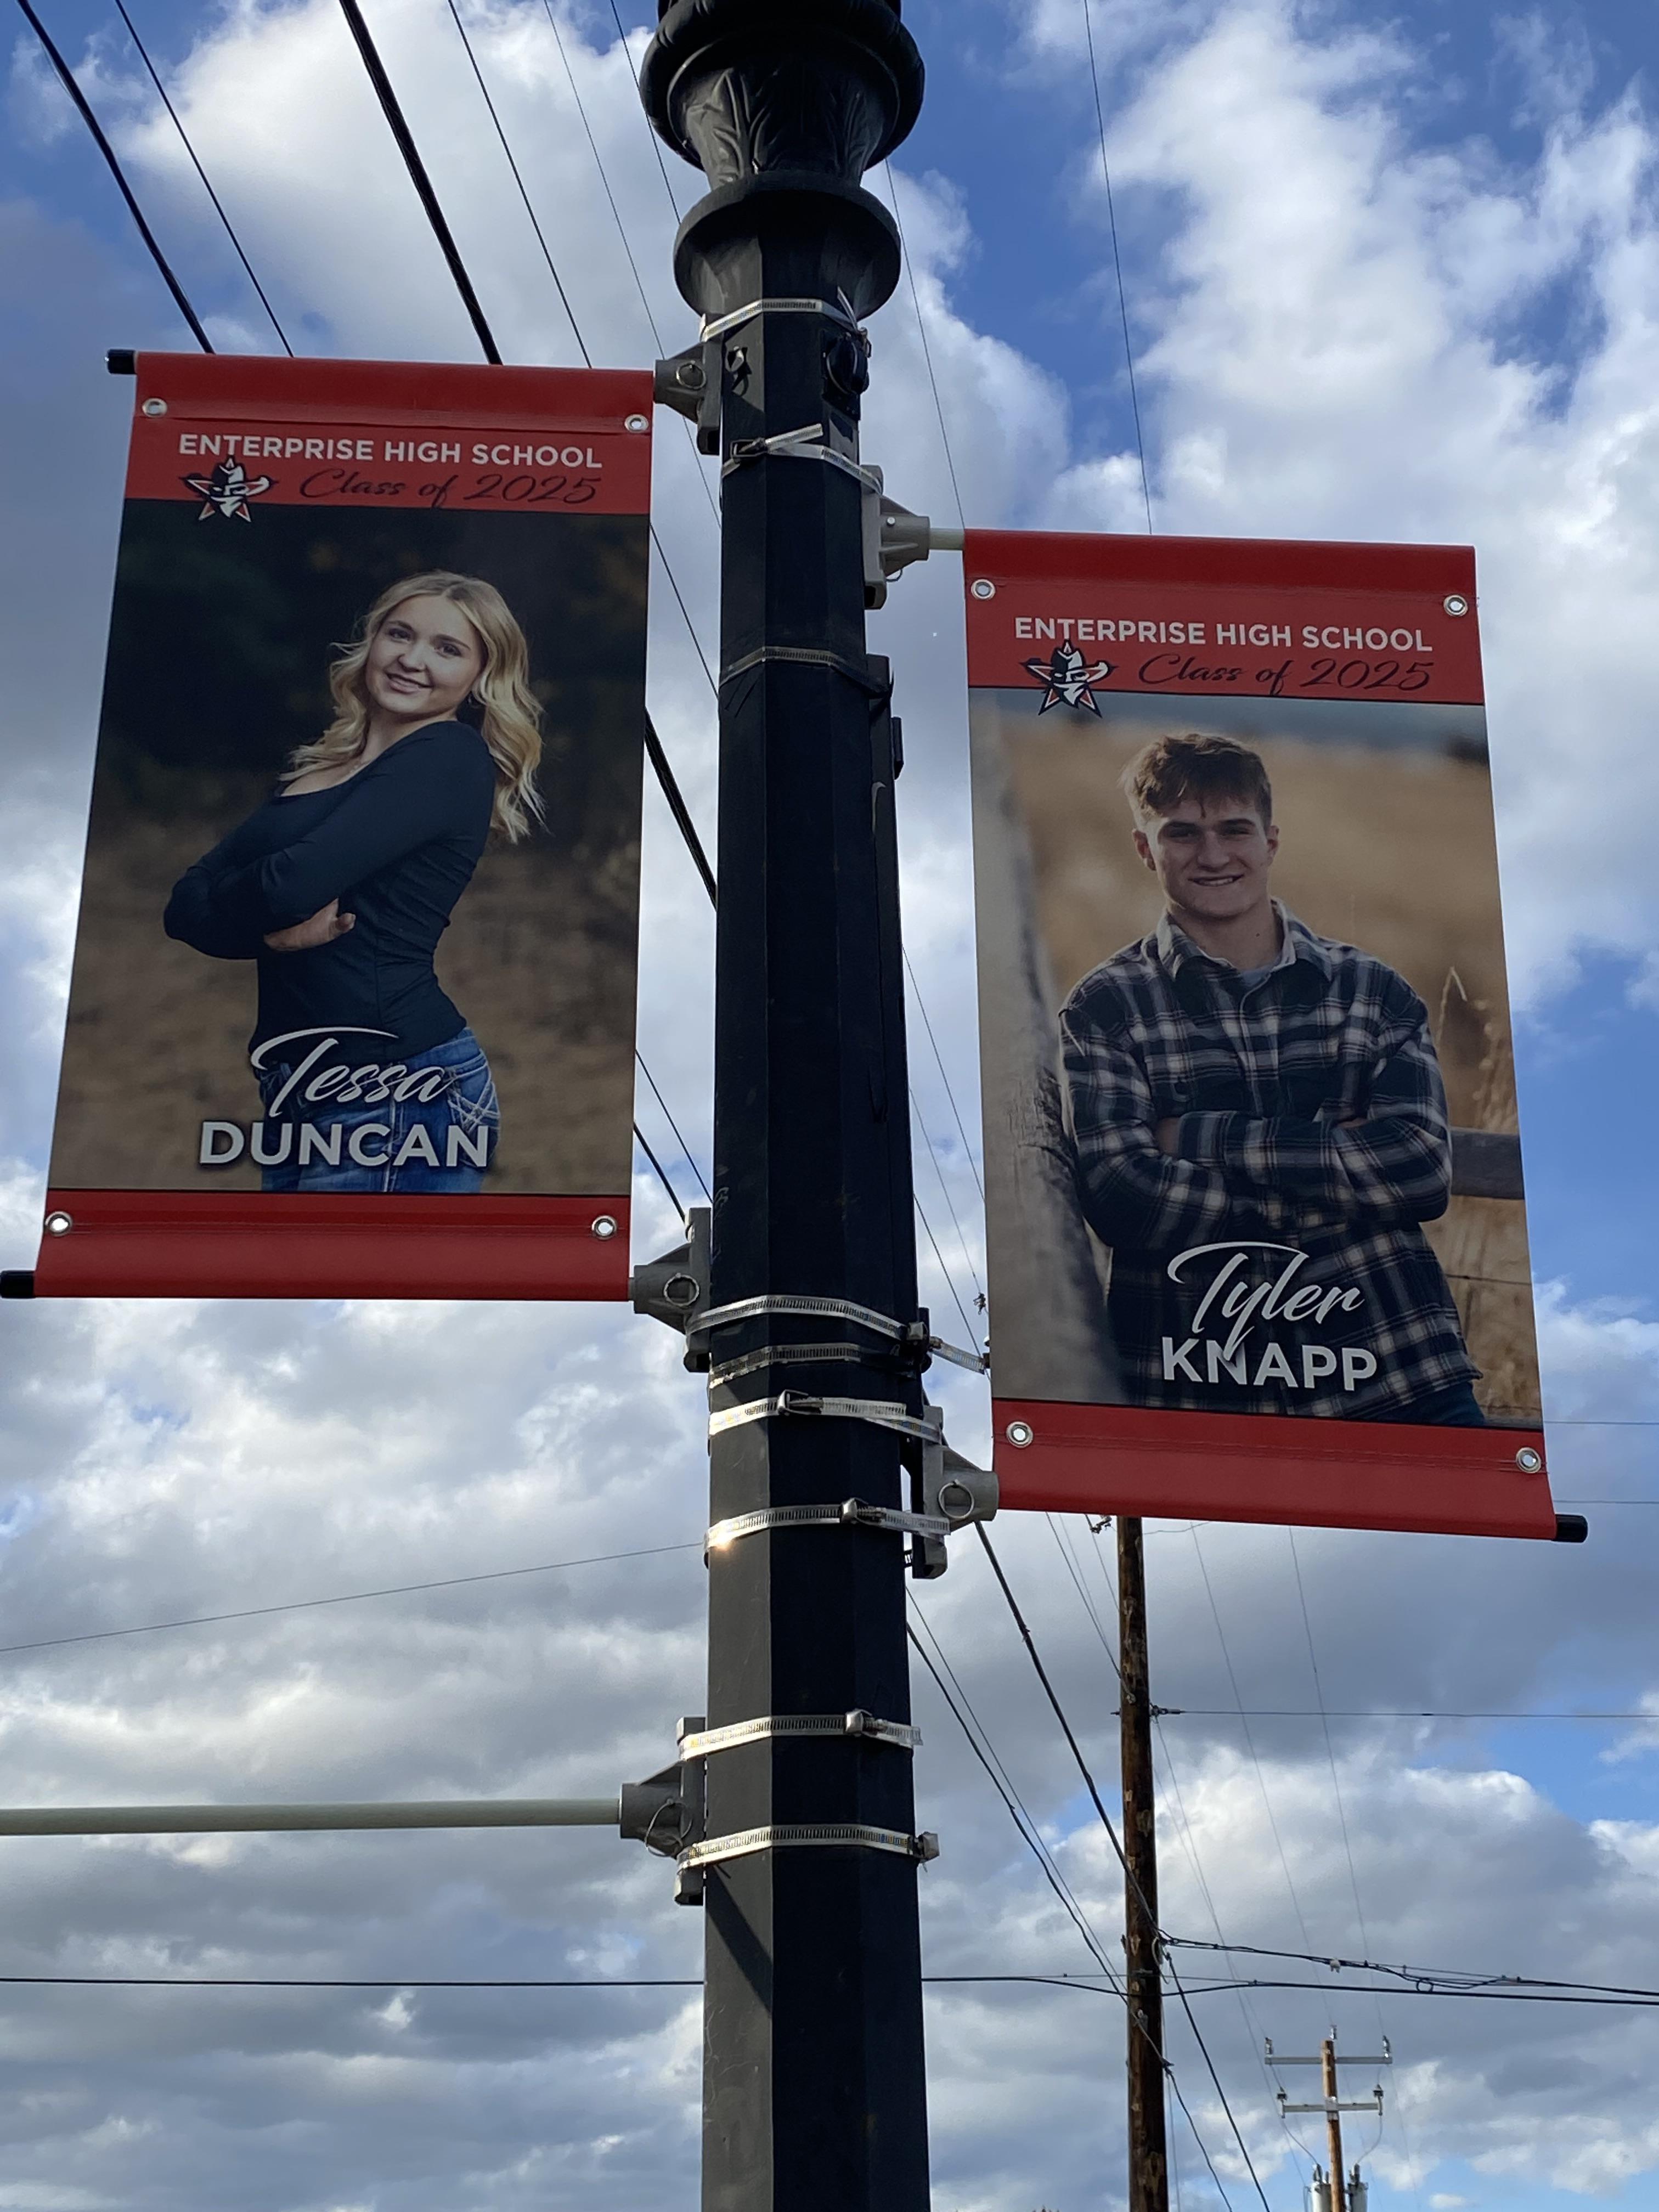
Pole Banners

Tell us what sign you want, how big you want it, and what you would like on it and we'll have it ready for you in no time!
No results found for "{{previous_search_keyword}}"
Tell us what you want your product to look like and our team of professional designers will bring your vision to life!
And the best part: All design fees will be fully credited to your product purchase!
 179K
179K
Store Ratings
 Verified Purchase
Verified Purchase
Verified Purchase
Verified Purchase
Verified Purchase
Verified Purchase
Verified Purchase
Verified Purchase
Verified Purchase
Verified Purchase
Verified Purchase
Verified Purchase
Verified Purchase
Verified Purchase
Verified Purchase
Verified Purchase
Verified Purchase
Verified Purchase
Verified Purchase
Verified Purchase
Verified Purchase
Verified Purchase
Verified Purchase
Verified Purchase
Verified Purchase
Verified Purchase
Verified Purchase
Verified Purchase
Verified Purchase
Verified Purchase
Verified Purchase
Verified Purchase
Verified Purchase
Verified Purchase
Verified Purchase
Verified Purchase
Verified Purchase
Verified Purchase
Verified Purchase
Verified Purchase
Verified Purchase
Verified Purchase
Verified Purchase
Verified Purchase
Verified Purchase
Verified Purchase
Verified Purchase
Verified Purchase
Verified Purchase
Verified Purchase
Verified Purchase
Verified Purchase
Verified Purchase
Verified Purchase
Verified Purchase
Verified Purchase
Verified Purchase
Verified Purchase
Verified Purchase
Verified Purchase
Verified Purchase
Verified Purchase
Verified Purchase
Verified Purchase
Verified Purchase
Verified Purchase
Verified Purchase
Verified Purchase
Verified Purchase

Need help with your pole banner? We offer FREE DESIGN SERVICES!
What are Pole Banners?
You typically see custom pole banners displayed between two poles on lamp or light posts along main roads, boulevards, and avenues in cities and in campuses. They’re made of sturdy, waterproof, and UV-safe 18 oz. vinyl that ensures your design lasts outdoors. Your display stays clear and visible under all weather conditions. It’s best to display street pole banners for your seasonal promotions of events like city celebrations, the 4th of July, parades, Thanksgiving, and the holidays.
100% Customizable
Pole banners are 100% customizable, so you can get the exact colors and design you want. Take advantage of our free design services if you need help creating the perfect look.
Made from 18 oz vinyl, these banners result in high resolution, waterproof, and UV safe graphics that are perfect for all seasons of outdoor usage.


Multiple Sizes Available
We offer our pole banners in three different widths, 18", 24", and 30" with heights available every 6 inches from 24" to 96". Please contact us if you need a custom height between 24" and 96".
You can also order two pole banners and hardware kits for a dual banner look on a single pole.
Hemmed Pole Pockets
Weather Resistant
Grommets


To allow for separate banner purchases the hardware kit is an additional option for banners with 2" pole pockets. 3" and 4" pole pocket banners do not include the option of a hardware kit at this time but can be purchased as stand-alone banners.
Pole Pocket Sizing Chart
The standard banner with 2" pole pockets will accommodate poles up to 1 1/4" in diameter. If you have the hardware already installed and only need banners with larger pole pockets, we also offer 3" and 4" pole pockets. The pole diameters accommodated by these larger pole pockets are summarized in the table.

Installation
Additional Specs
-
Weight
.09 lbs. per square foot (18 oz. vinyl)
-
Thickness
.0156 inches (about the thickness of 4 sheets of copy paper, based on 18 oz vinyl)
-
Uses
Outdoor, Indoor, Street Poles, Lamp/Light Posts, Cities, Schools, Colleges, Holidays, Parades, Rodeos, Tourism Promotion, Museums, Festivals, Car Dealership, etc.
-
Print Method
Full Color, Digital
-
Estimated Lifespan
3+ years based on weather exposure
How to Use Pole Banners Templates
Pressed for time or out of ideas for your pole banner designs? Choose from the ready-made templates on our site. After selecting your preferred look, you can edit the text and change the colors on the Online Design tool. You can also view the proof on your browser before submitting the revised template for production.

Dual Banners
Looking for more than one banner for a dual banner look? Simply customize your banner and make sure to select a quantity of two. You'll then have a banner for both sides of your pole. Please note that this is currently only possible with our 2" pole pocket banner as 3" and 4" pole pocket banners do not currently come with a hardware kit. If you have existing hardware and simply need banners, regardless of the pole pocket size, simply order two banners of whichever size you need.
Why Signs.com?


Chat with us, contact us, or give us a call at 1-888-222-4929. We’re here to help!
Product Specs
Our pole banners are made from 18 oz. vinyl. Vinyl is the best material for outdoor pole banners due to its durability. We don’t offer any other materials for custom pole banners.
All our pole banners are printed double sided as this is the most effective way to deliver your message. We do not offer single sided pole banners.
We don’t offer custom dimensions, but you can choose from widths of 18”, 24”, and 30” with lengths that go up to 96”.
There is no difference between the previously listed banners and pole banners. All these names are used interchangeably. If you’re still not sure, don’t hesitate to contact us to make sure what we offer is what you need.
We print our pole banners using a four-color digital printing method. This process results in a waterproof and UV-safe graphic.
We offer our pole banners with three different widths: 18”, 24”, and 30”. For each of these widths, we offer lengths every six inches from 24” to 96” long (i.e., 18” x 24” to 18” x 96”, 24” x 24” to 24” x 96”, 30” x 24” to 30” x 96”).
The minimum size is 18” x 24” and the maximum size is 30” x 96”.
The most common sizes for pole banners are 18” x 36”, 24” x 36”, and 30” x 36”.
Yes, although the widths we allow are only 18”, 24”, and 30”. We also offer additional lengths other than the default of every six inches. We offer lengths every whole inch between 24” and 96”. If you need a custom length between 24” and 96”, please contact us.
We offer two-inch pole pockets on our pole banners that fit hardware arm poles up to 1.25” in diameter. We also offer pole banners with three- and four-inch pockets. Three-inch pockets allow for hardware arms measuring 1 1/4” to 1 13/16” in diameter. Four-inch pockets allow for hardware arms at 1 13/16” to 2 7/16” in diameter. For banners with three- or four-inch pockets, hardware is currently unavailable.
Our pole banners are standard cut to a rectangular shape. We currently don’t offer halo, contour, or any other cuts for pole banners.
Our pole banners are double-sided and printed on a single piece of banner material. This is known as single-ply printing. We also produce each pole banner with a pole pocket, with a default size of two inches. These pole pockets are hemmed two, three, or four inches from the top of the banner, depending on the pole pocket size you order. The result is pole pockets with two horizontal hem or stitch lines.
Our pole banners have a matte vinyl finish. This finish is waterproof and UV safe, which protects the banner outdoors.
We include four brass grommets on each pole banner. These grommets are included at no additional cost and located above or under the pole pockets’ four corners. Grommets let you hang the banners with zip ties or similar fasteners. Note that the grommet positions aren’t customizable.
We offer the hardware or pole banner kit as an additional option to the banner in the event that you don’t have pre-existing hardware or need a banner at a different length than your pre-existing hardware. Thus, if you are looking for a graphic without the optional hardware you may order a banner as a standalone item. We do not currently offer only the hardware or kit without a banner.
Lastly, only the banners with 2” pole pockets are available to be ordered with hardware or a kit. Banners with 3” or 4” pole pockets can not have hardware shipped with them at this time.
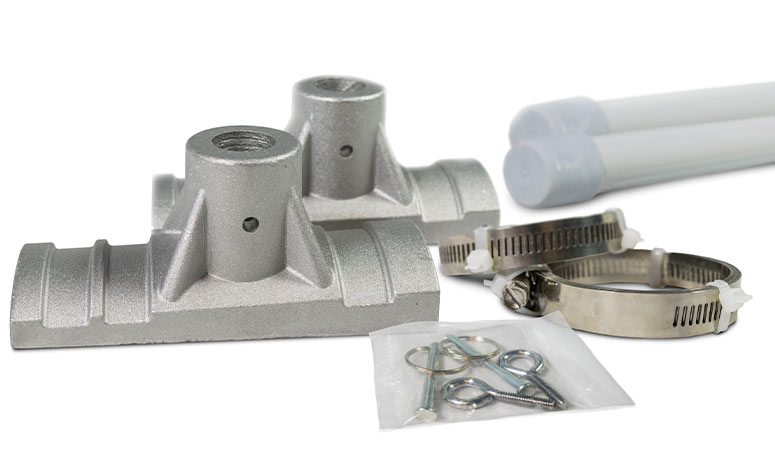
Our hardware kit is available as an add-on with pole banners. If you want to order with the hardware kit, only banners with 2” pole pockets are available. Banners with 3” or 4” pole pockets cannot have hardware shipped with them at this time. The hardware kit contains two fiberglass arms, two cast metal mounting brackets, four steel bands, and accessories (2 threaded screws and 2 pins with key rings).
Use the steel bands in the hardware kit to mount the brackets when securing hardware to a pole or post. These steel bands extend in length to 47”, which means the circumference or perimeter of the desired install pole must be less than 47”. If you meet this restriction, then there are no restrictions in where you mount the bracket and install the pole banner.
No. Currently we are unable to offer only hardware or the kit as a standalone purchase. The hardware or kit is only available as an option when purchasing 2” pole pocket banners.
Our pole banners are printed within the area of your selected size. If you want a banner measuring 18” x 36”, you will be able to print your graphic within an 18”x36” area. This area includes both top and bottom pole pockets and should be factored into your design. If you don’t want to print your design on either of the pole pockets, add two inches from both the top and bottom of the pole banner.
We currently don’t offer color matching for our pole banners.
- To upload your artwork or design simply, go to our design tool and click the upload button.
- Select your design file from your device. It should be in any of the following formats:.ai, .eps, .svg, .pdf, .jpeg, .jpg, .png, .gif, .bmp, .tiff, and .tif. We recommend you upload a vector artwork on the design tool.
- When uploading your file, apply a .25” on all sides. Our design tool's maximum file upload size is 25MB. For files larger than 25MB, you can use a low-resolution image to place your order and then upload the higher-resolution file to our file uploader. Don’t forget to leave a comment on the checkout page about your future action.
- At post-checkout, simply fill out the form on that page with your name, email, order number, and any comments regarding your file.
- After filling out this information, click the “Next” button and “Click or Drop Here” button to add a file from your device. Click the “Finished Uploading” button to finalize your file upload. After you’ve completed the file submission, we will make sure to use the higher resolution file for your custom sign.
Absolutely! We’d love to help you get the perfect design for your banner. We are proud of our design services and the best part is they are completely FREE.
Usage
Some common uses for pole banners are signs on light poles or lamp posts along main roads, streets, boulevards, and city avenues. They’re also commonly used to advertise at car dealerships and promote events, celebrations, and anniversaries for municipalities or college campuses. You also see them used for seasonal promos during the summer and winter holidays.
The only way you can feature two graphics on the same hardware arm is having a double-sided banner. You cannot have two separate banners slid onto the poles and hardware kits. That’s why we recommend selecting the “2 sides different” option when designing your banners online.
Yes, you can display the custom pole banners indoors and outdoors. The grommets let you secure the banner with zip ties in case of moderate winds. While weather conditions and general climate will affect the lifespan of your banners, they are produced to withstand prolonged outdoor use. The biggest potential problem for your banners is extreme weather. If such weather is imminent, we recommend removing your banners until the weather passes.
For maximum stability, we recommend installing your pole banner on a curved surface. However, customers have successfully installed pole banners onto square poles and other flat surfaces.
Since our banners are UV safe, they are resistant to fading under direct sunlight. However, over an extended period in UV light, they will show signs of wear and tear. Thanks to our digital printing method, however, your graphics will not wear off.
We don’t offer our pole banners with wind slits. While there may be some benefit of doing so, the wind slits also make your banner less architecturally sound, more prone to ripping and tearing, and create less visibility on your graphics.
Absolutely! Pole banners and their hardware are reusable. When not on display, be sure to clean them off, and store them rolled up, inside a hard container, or anywhere where no objects rest on top of them. We recommend storing them in a dry environment and away from items that may scratch or damage the banner material. Pole banners are usually intended for short-term or one-time use. In case you want to use them again, review your design for specific dates or times that may prevent you from displaying them again.
Since these banners are exposed to the elements more than some of our other products, they typically have a shorter lifespan. But with proper installation and care, you should be able to use them for two or more years.
Installation & Care
Follow the steps below for proper installation of your pole banner to the hardware:
- Enlist the help of another individual to install the hardware. Start with measuring the length of your banner and placing the mounting brackets against the post or pole. There should be a proper distance between the brackets based on your banner’s length.
- Fasten the mounts to the pole with the four steel bands. You’ll use two steel bands per mounting bracket.
- Once the brackets are fixed to the pole, you can insert each of the fiberglass arms in, one per bracket. To secure the fiberglass arms to the mounts, you will use the threaded screws, one per bracket. The pin with key ring will be inserted into the other hole on the mounting bracket and is used to attach a zip tie from the keyring to the grommet on your banner.
- After installing the hardware, you may start to slide the pole banner onto each of the extended fiberglass arms, sliding both the top and bottom portions of the banner onto the arms at the same time until the arms are completely covered by the graphic.
- To secure your banner to the hardware, fasten with zip-ties (optional) through each of the grommets on the graphic’s side of the hardware and loop the zip-ties through the pin’s keyring. Fastening the graphic to the hardware will improve the banner’s resistance to wind and keep it in place during windy conditions.
You can display two banners on the same pole or post. In order to achieve this look, you’ll need to order two pole banners and two sets of hardware. If you want the same graphic for each, you can simply add hardware as an option and change your quantity of banners to two before checkout.
You’ll install both sets of hardware but use a single steel band for mounting the top and bottom sets of mounts. Doing so will leave you with four extra bands once the installation is complete. This is only possible with 2” pole pocket banners as the 3” and 4” pole pocket banners are not sold with the optional hardware kit.
To remove your pole banner from hardware, reverse the steps of installation:
- Begin by removing any zip or cable ties, loosening the threaded screw, and sliding the banner off each of the fiberglass arms.
- To store the graphic, you should start by thoroughly cleaning it with a damp cloth. You may use a mixture of warm water and dish soap to create a cleaning solution for the cloth.
- After cleaning the banner and allowing it to air dry or wiping it with a non-abrasive cloth, roll the banner up and place it in a dry, cool place away from any direct sunlight or weather exposure.
Wrinkles may occur during shipment and storage. To remove any wrinkles, unroll the banner and place it flat on a table outdoors on a warm sunny day. A few hours under the sun should ease any light wrinkles out of the material. Installing them and having them sit in the sun should do the same.