


.jpg)


.jpg)

Opaque Window Decals

Tell us what sign you want, how big you want it, and what you would like on it and we'll have it ready for you in no time!
No results found for "{{previous_search_keyword}}"
Tell us what you want your product to look like and our team of professional designers will bring your vision to life!
And the best part: All design fees will be fully credited to your product purchase!
 173K
173K
Store Ratings
 Verified Purchase
Verified Purchase
Verified Purchase
Verified Purchase
Verified Purchase
Verified Purchase
Verified Purchase
Verified Purchase
Verified Purchase
Verified Purchase
Verified Purchase
Verified Purchase
Verified Purchase
Verified Purchase
Verified Purchase
Verified Purchase
Verified Purchase
Verified Purchase
Verified Purchase
Verified Purchase
Verified Purchase
Verified Purchase
Verified Purchase
Verified Purchase
Verified Purchase
Verified Purchase
Verified Purchase
Verified Purchase
Verified Purchase
Verified Purchase
Verified Purchase
Verified Purchase
Verified Purchase
Verified Purchase
Verified Purchase
Verified Purchase
Verified Purchase
Verified Purchase
Verified Purchase
Verified Purchase
Verified Purchase
Verified Purchase
Verified Purchase
Verified Purchase
Verified Purchase
Verified Purchase
Verified Purchase
Verified Purchase
Verified Purchase
Verified Purchase
Verified Purchase
Verified Purchase
Verified Purchase
Verified Purchase
Verified Purchase
Verified Purchase
Verified Purchase
Verified Purchase
Verified Purchase
Verified Purchase
Verified Purchase
Verified Purchase
Verified Purchase
Verified Purchase
Verified Purchase
Verified Purchase
Verified Purchase
Verified Purchase
Verified Purchase

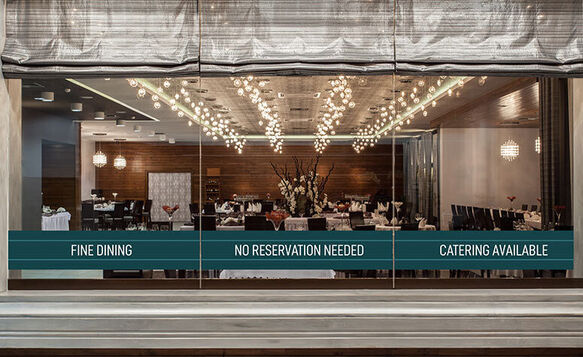
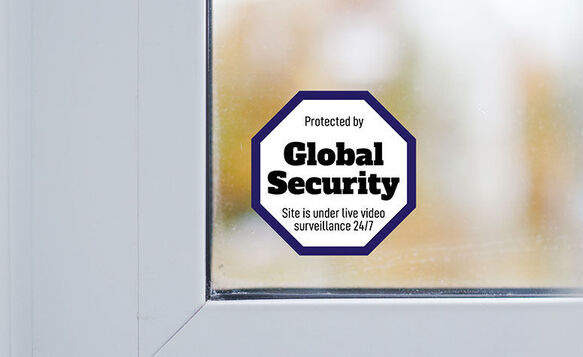
What Are Opaque Window Decals?
Opaque window decals are adhesive decals you can apply on any window, glass door, or other smooth surfaces. These semi-permanent decals can be printed in nearly any size and can be applied on windows on your own — no professional assistance required! Opaque window decals last for years with proper care and can easily be removed when your store ready for a new look.
Opaque window decals work wonderfully for posting store hours or advertising a logo or brand in a window. They can also be cut to the exact outline of the design by selecting Custom from the shape options, or you can have a border added around the outline of your design by selecting Custom with Border.
Opaque Window Decal Features


Inside or Outside Surface Application
Standard and inside glass options allow you to place your decal inside or outside of your storefront window or door.

Easy to Install
Install your opaque window decal in minutes even without professional help. Installation instructions are included with every order so you can put it up on your own or with your team. You can also read a detailed guide below to help you with the process.

Full Color Printing
Your design will be printed on premium white adhesive vinyl in full color using the best printing technologies available. The result is a vibrant design that can be displayed proudly on any smooth, non-porous surface.

Custom Cut Options
Multiple shape options available including square/rectangle, rounded corners (¼” & 1”), circle/oval, custom, and custom with border.

Printed to Last
The combination of durable 3 mil vinyl and 4-color UV ink make your opaque window decals weather-resistant and fade-resistant. With proper care, your decal can last for over five years
Popular Opaque Window Decals Templates
Opaque window decals are made to stand out, so make use of vibrant colors and eye-catching images with your design. You can use our free design templates to start your window decal journey.
Some popular templates combine taglines, logos, and brand names, while others provide key information like store hours, contact details, and services offered. Choose the best layout template for your business and work on your design until it's ready for printing.


How to Use the Opaque Window Decals Templates
- Select the decal template of your choice and click on it. Signs.com's online design tool will open, and then you can start editing the existing template.
- Try modifying the size and shapes of the template's images and texts according to your design preferences. You can also type and save messages on the layout.
- Add images to the template. You can either upload your original artwork or click on the "Images" tab on the left side of the design tool to search for and insert free stock images into your decal.
- Once you're done, click "Save and Continue," and you'll be redirected to the payments page. Proceed with the payment and wait for your order to be finalized. You can also request a free proof of your design afterward.


Additional Specs
-
Weight
.09 lbs per square foot (about the weight of 9 quarters)
-
Thickness
3 mil (.003") About the same thickness of a sheet of copy paper
-
Details
Semi-permanent white vinyl, versatile, bubble-free finish
-
Uses
Indoor/Outdoor. Retail, home or office windows
-
Print Method
Four color process, eco-friendly, weather, fade and abrasion resistant UV ink
-
Estimated Lifespan
5+ years with proper placement and care
-
Common Sizes
12"x12", 24"x12", 2'x2', 4'x4', 3'x5'
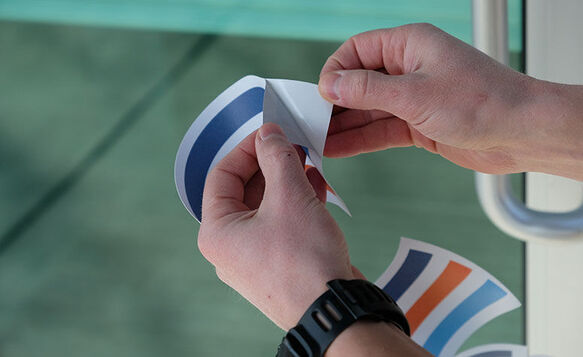
Simple Installation with No Professional Help Required
The following instructions are to help you have a successful, timely install of your opaque window decal. The installation is a simple process and requires no professional help. We recommend installing your decal in an environment that is dry with a temperature above 40 degrees Fahrenheit.

Begin by cleaning the desired window or surface with window cleaner or light soap with water, removing all dust and dirt particles. If dust and dirt is not fully removed from the surface this may cause small air bubbles in your decal and prevent it from adhering properly. After cleaning the surface, either allow time for the surface to air dry or remove excess water with a rubber squeegee.

Lay out your opaque window decal on the window with the backing still on and make sure it is aligned properly.

While holding up the decal where you want it to go, use a dry erase or washable marker to mark where your decal will be applied. Double check your alignment to make sure the opaque window decal is where you want it to be.

Gently remove the backing by peeling the decal away from a corner. If you’re having difficulty, a piece of scotch tape placed on the backing can help create a tab for you to grip and peel away the decal. Avoid doing this step in windy conditions so that the adhesive side of the decal does not fold and stick to itself.

Carefully place the decal onto the window or desired surface. Use your alignment marks made in step 3. We recommend holding the decal upright with two hands near the top and placing only the top edge to the surface first, then use your hands to guide the decal on a little at a time. At this point only apply the decal lightly. If you need to reposition or adjust the decal you should be able to slowly and carefully peel the decal away from the surface and reposition it before the adhesive fully sets in.

Once the decal is in place, use a squeegee* to remove air bubbles and small pockets. When using the squeegee, start in the center of the decal and move in a straight line to the right and left side of the decal—then move up and down working out any pockets or bubbles. Continue this process until you have run the squeegee over the entire decal. You’ll want to use some steady pressure with the squeegee to work out the pockets. You may place the back liner on top of your decal during this process to avoid damage to the decal. Once your decal has been fully squeegeed, you will not be able to reposition your decal.
*Available as an additional purchase.
**Note: If you are installing an “inside glass” opaque window decal, use a wet installation method: Mix 3 drops of household dish soap to 1 gallon of water. Use a spray bottle to gently spray that solution onto the adhesive side (printed side for inside glass) of your decal as well as the application surface. Place the decal onto the window and move it around while it is still “wet” to the desired position. Finally, use a squeegee to remove all bubbles and excess water. Dry to finish.
Download or Print Opaque Window Decal Installation Instructions PDF
Care
Although we recommend using soapy water to help install your decal, don't allow it to become exposed to water or excessive moisture for an extended period of time before installing. You may wash the window that has the decal applied, but do not power wash your decal after it is installed. When cleaning the decal we recommend using a damp, non-abrasive cloth. If you need to remove your opaque window decal, peel it away from the window, then use a straight edge and window cleaner to remove any excess adhesive residue.

All Window Decals
We offer several different window decal types to ensure you are able to get the decal that best meets your needs. Create a consistent look and make your business stand out by incorporating several different types of decals on your storefront, windows, or glass doors.


Why Signs.com?

Chat with us, contact us, or give us a call at 1-888-222-4929. We’re here to help!
Product Specs
No. Even if you print nothing on your decal it will be opaque in nature. The default material is white. Thus, there is no way to use an opaque window decal in a location that requires transparency. If transparency is needed, both our clear and perforated window decals will work.
Yes, we offer a number of different decals. Clear and perforated decals offer transparency and reverse print as options, we also offer three different types of vehicle decals and wall decals for interior use. And, our interior floor decal that is great for convention centers, retail shops and more.
The terms are often used interchangeably. For a more detailed breakdown see our window decals page or our blog post in which we discuss different types of window signs. Just keep in mind that by asking for a “window sticker” that the decal you get will be semi- permanent and will not be able to be repositioned and used in more than one location after the initial installation.
Regardless of the end use of your decal we can cut it to shape. We can do this in two different ways. The first is to cut it to the exact perimeter of your design. This shape option is known as "Custom" (previously known as, or sometimes referred to as contour cut). The second way is to cut it to shape but leave a small border around the entire edge of your sign. This is called "Custom with Border" (previously known as or sometimes referred to as halo cut). These two options are available for any window decal but should be used with discretion when complex designs are involved. For complex designs we recommend a simple rectangle or square shaped decal.
Individual letters that can be applied to windows are actually a different product entirely. This product is called cut vinyl or vinyl lettering. Visit our vinyl lettering page for more information on this product
Usage
Due to the opacity of this type of window decal it will affect the transparency of your storefront or glass surface upon which it is placed. Even unprinted decals will obscure the light and visibility offered through an uncovered window. Thus, for darker rooms or areas, or even those that must have transparency through the window(s), we recommend a clear or perforated decal. As noted above more can be read about these types of decals on our window decals page. Alternatively, large opaque decals can obscure the visibility into a room in which some privacy is needed or wanted while still effectively using the window for messaging or otherwise.
Our opaque window decal does not stick well to fiberglass. We recommend using it on glass or a similar surface. If you're looking for a decal specifically for fiberglass, we recommend using our permanent decal.