.jpg)


.jpg)

.jpg)


.jpg)

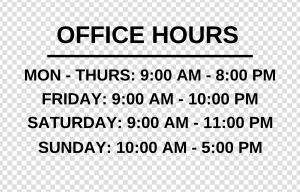
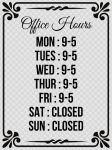
Clear Window Decals

Tell us what sign you want, how big you want it, and what you would like on it and we'll have it ready for you in no time!
No results found for "{{previous_search_keyword}}"
Tell us what you want your product to look like and our team of professional designers will bring your vision to life!
And the best part: All design fees will be fully credited to your product purchase!
 178K
178K
Store Ratings
 Verified Purchase
Verified Purchase
Verified Purchase
Verified Purchase
Verified Purchase
Verified Purchase
Verified Purchase
Verified Purchase
Verified Purchase
Verified Purchase
Verified Purchase
Verified Purchase
Verified Purchase
Verified Purchase
Verified Purchase
Verified Purchase
Verified Purchase
Verified Purchase
Verified Purchase
Verified Purchase
Verified Purchase
Verified Purchase
Verified Purchase
Verified Purchase
Verified Purchase
Verified Purchase
Verified Purchase
Verified Purchase
Verified Purchase
Verified Purchase
Verified Purchase
Verified Purchase
Verified Purchase
Verified Purchase
Verified Purchase
Verified Purchase
Verified Purchase
Verified Purchase
Verified Purchase
Verified Purchase
Verified Purchase
Verified Purchase
Verified Purchase
Verified Purchase
Verified Purchase
Verified Purchase
Verified Purchase
Verified Purchase
Verified Purchase
Verified Purchase
Verified Purchase
Verified Purchase
Verified Purchase
Verified Purchase
Verified Purchase
Verified Purchase
Verified Purchase
Verified Purchase
Verified Purchase
Verified Purchase
Verified Purchase
Verified Purchase
Verified Purchase
Verified Purchase
Verified Purchase
Verified Purchase
Verified Purchase
Verified Purchase
Verified Purchase
Why Signs.com?


What Are Clear Window Decals?
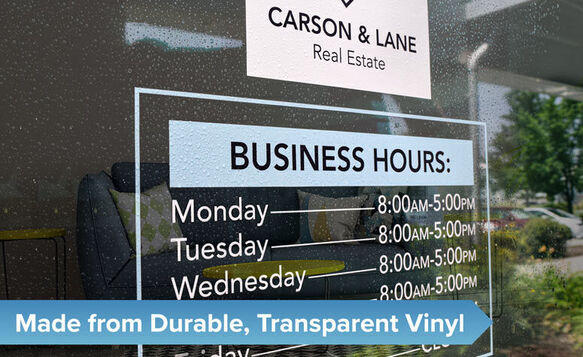
A clear window decal is an image or graphic that is printed directly onto a sheet of transparent 3 mil vinyl material. These decals are transparent anywhere that does not contain your design, allowing you to display your logo or message on your window, glass door, or storefront without entirely obstructing your view.
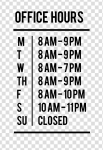
Clear vinyl window decals are intended for both indoor and outdoor use. The ideal surface they are meant to be used on is glass, but they may also be used on electronic equipment, refrigerators, aluminum, stainless steel, plastics, or laminated surfaces. These decals are commonly used for business/storefront advertising, retail locations, displaying store hours, window decor, product promotion, window signage, and office branding.
Clear Window Decals vs Vinyl Lettering

Clear Window Decals

Vinyl Lettering
Clear window decals can have a very similar appearance to vinyl lettering when applied. However, they are entirely different products. With vinyl lettering, your design is cut to shape from a solid-colored sheet of vinyl instead of being printed. With clear window decals, your design is printed onto a sheet of transparent vinyl, allowing you to use a wide variety of colors, gradients, etc.

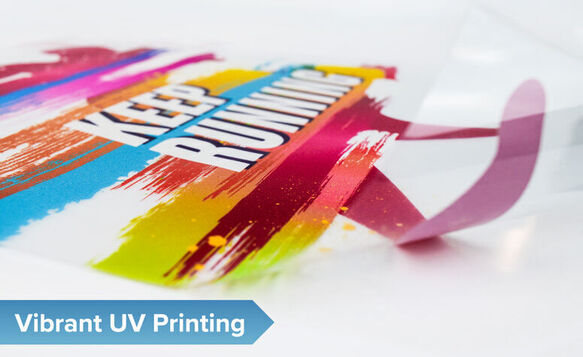
Advanced White-Ink Printing Method
We use a two-step printing process to create your custom transparent window decal. This involves printing a layer of white ink followed by a layer of colored ink. This "spot white ink" is only printed where your design is printed to add contrast and vibrancy to your design while retaining the overall transparency of the decal.
Please note that your decal will only be transparent in areas that do not include your design. We recommend using files that have a transparent background such as PNG when uploading your design. Need design help? Learn about our free design services.
Key Features of Clear Window Decals

-
Vibrant Colors
Your image or graphic will be printed onto clear vinyl using world-class printers with an advanced white-ink process, ensuring that your decal will have the most vibrant and bold colors possible.
![Clear Vehicle Decal Checklist Icon]()
-
For Indoor and Outdoor Use
Clear window decals are designed to be used both indoors and outdoors. The most common use for these decals is to display information on storefront windows.
![Clear Vehicle Decal - Indoor Outdoor Icon]()
-
Installation Instructions Included
Every order includes a set of simple installation instructions, ensuring a fast and effective install for your decal.
![Weatherproof Icon]()
-
Transparent Background
The transparent background of your decal allows you to display your design without entirely blocking visibility through your window or glass door.
![Transparent Icon]()
-
Weather Resistant and Waterproof
Your decal is made with durable vinyl material and will stand up to rain, sunshine, and other elements with a lifespan of approximately three years.
![CutLines Icon]()


Clear Window Decals Customization Options
SIZE

Choose from a wide range of custom sizes, the smallest being 4" x 4" and the largest being 48" x 96".
SHAPE
Square/Rectangle

Your decal will be cut as a standard rectangle at the size you have selected.
Custom with Border

Your decal will be cut to a custom shape with a border of material around the edge of the design.
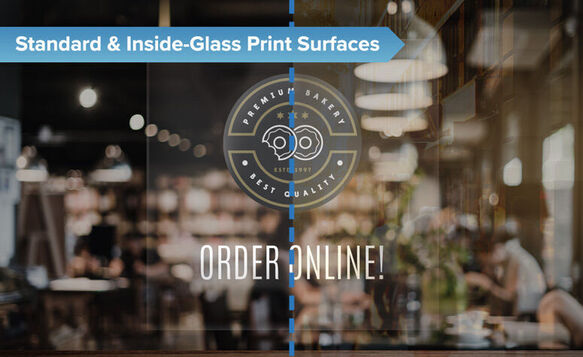
PRINT SURFACE
Adhesive on Back
("Standard")

Your decal will adhere to the outside of the window.
Adhesive on Front
("Inside Glass")

Your decal will adhere to the inside of the window.
Customize Your Clear Window Decals With Free Templates


How to Use Clear Window Decals Templates
At Signs.com, we make sure that your custom decal needs are covered whether you’re just beginning to learn design or already are a pro. We created a selection of customizable templates so you can try your hand at designing your own clear window decal.
- Choose a template you like from this page. You will be redirected to our online designer tool when you click on a template. You can also type your preferred product into the search bar to see the full gallery of available templates.
- It’s time to get creative! Add your preferred text and business logo. You can also modify the elements you see on the template such as fonts, colors, and background options. We provided tools like ruler, bleed, and grid to help you ensure that your design is of the correct alignment.
Our online design tool is also file-friendly. If you have an existing design and you just need us to print it for you, click “Upload” on the left side of the page. We accept a variety of file types including AI, EPS, PSD, PDF, JPEG, JPG, PNG, GIF, BMP, TIFF and TIF. - Our “View Proof” option allows you to double-check your design for printing and make sure all words are spelled correctly. When you’re satisfied with your design, you can click “Save & Continue” and be redirected to checkout. Otherwise, click “Save” if you plan to check your work later.
What's the Difference Between Indoor and Outdoor Decal?
Our indoor and outdoor decals are made to last a long time but we recommend using them in areas they're made for so you can maximize their lifespan.
Indoor clear window decals are great for indoor signs like offices, stores, and even homes. They're made with high-quality adhesive that's suitable and strong enough for indoor use.
Outdoor clear window decals, on the other hand, are created with a more resilient adhesive to make it weather-proof and withstand the elements. UV inhibitors are also built into each decal so it doesn't fade even with constant exposure to sunlight. This decal type is perfect for exterior glass surfaces such as windows of cars, stores, and buildings
Knowing where you’ll use them and choosing the suitable type will help you make the most out of your clear window decals.
Additional Specs
-
Weight
.05lbs per square foot (about the weight of 9 quarters)
-
Thickness
.003" (about the same thickness as a sheet of copy paper)
-
Details
Repositionable, low tac, transparent vinyl decal that is easy to install without bubbling when installed wet. Works indoors and outdoors on surfaces including glass, aluminum, stainless steel, plastics and laminated surfaces.
-
Uses
Indoor/Outdoor. Retail, home, storefront, or office windows
-
Print Method
Four color process, eco-friendly, weather, fade and abrasion resistant UV ink
-
Estimated Lifespan
3+ years with proper placement and care
Easy to Use
Design Tool

Create your custom transparent window decal with the easiest and simplest design tool in the signage industry. Upload images, create objects, add text, adjust sizing, change color, and so much more!
Start Designing
Free Professional
Design Services

Whether you need help uploading your design or are interested in creating something entirely new, our team of professional graphic designers is here to help. Nothing beats free!
Get Design Help NowSimple Installation with No Professional Help Required
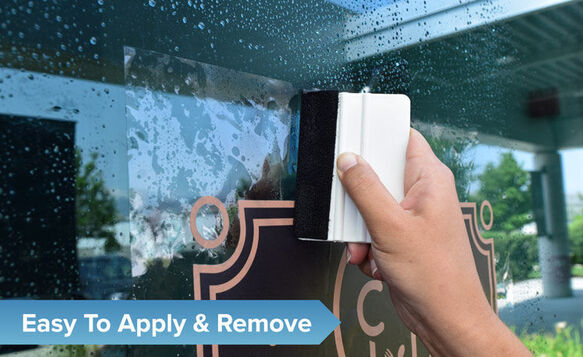
The following installation instructions will help you with a quick and easy installation of your custom clear window decal. Instructions will also be included with your order, and you are free to refer to this page, download a PDF of the instructions, or view our instructional video for assistance. If you are installing a large decal we recommend having at least one other person assist you.
- Spray bottle
- Paper Towels
- Application Squeegee (available for purchase with order)
- Window Squeegee
Begin by thoroughly cleaning the window or glass surface you intend to use for your decal. After cleaning, use a window squeegee to remove excess water or allow appropriate time for the window to air dry.
Create a decal application solution by combining 3 drops of dish soap or detergent (not hand soap) per 1 gallon of water and place into a spray bottle.
Lay your transparent window decal on a flat, smooth surface and begin to remove the black liner. The backing is a frosted, semi-transparent material that can be difficult to remove due to its thin properties. If you are having difficulty, try applying a small piece of tape to the corner of the backing and use that to help you peel it away from the decal.
As you are removing the backing, generously apply the application solution to the back of the decal. Next, spray a generous amount of application solution to the desired surface, making sure both the adhesive side of the decal and the glass surface are now sufficiently wet. Do not submerge the decal into water in an attempt to soak the adhesive side.
You can now apply your clear window decal to the desired window or glass surface. The application solution will allow the decal to slip and move once it is on the window. Use this to your advantage by sliding the decal into its final position.
Once the decal is in its final position, place the removed backing over the face of your decal and use the application squeegee to remove air bubbles/application solution from under the decal. When doing so, start in the center of the decal and press firmly to the right or left edge. Continue this process until you have run the squeegee over the entire surface of the decal.
Use paper towels to clean the glass surface and to remove excess water from the edges of the decal. It may take several days for the adhesive to fully dry and bind to the glass surface.
Download or Print Clear Window Decal Installation Instructions PDF
.jpg)
How to Care for Clear Window Decals
Although we recommend using soapy water to help install your decal, do not expose it to water or excessive moisture for an extended period prior to installation. Once you’ve installed the decal, you may wash the window where it is applied, but we do not recommend power the surface as doing so may ruin the adhesive. You can also clean the decal using a damp, non-abrasive cloth.
Please note that our clear window decals may be removed and repositioned several times. You can take it off the surface by peeling the decal away from the window and reapplying using the same installation guide above.
Additional Window Decals

Chat with us, contact us, or give us a call at 1-888-222-4929. We’re here to help!
Product Specs
Our custom window decals are made of a 3 mil optically clear vinyl with a proprietary adhesion technology designed for both interior and exterior applications. The film comes with a frosted backing that can be peeled off. This material is optically clear once installed. It is a durable window decal option that works with almost any temperature, easy to install, repositionable, and leaves no adhesive residue upon removal.
The clear area is indicated by the gray and white checkered pattern on our design tool. If you want any part of your sign to have a clear background, this pattern must be visible on your proof.
When you select “Clear Window Decal” on our design tool, the background will automatically switch to the gray and white checkered pattern to indicate that you are designing on a clear background. If you upload a JPG file with a white background, it is the white part of the image that will be printed. We recommend that you upload your file in PNG format to ensure that the transparent area is preserved during printing. If you need help, please fill out our free design request form.
Yes. We also offer opaque window decals and perforated window decals. Additionally, we offer a static cling that uses static electricity to adhere to your window. A more detailed explanation of the differences and advantages/disadvantages of these decals can be found here: Window Signage Options.
Window decals and stickers are often used interchangeably when describing semi-permanent vinyl with an adhesive backing, but they’re not exactly the same. Semi-permanent means you can peel them away easily right after application but re-applying them again may be difficult if not impossible after they’ve been in place regardless of duration. Once they’ve been set on a surface, you will not be able to reposition them. This applies to both our opaque and perforated window decals.
This is not the case for our clear window decals as they have proprietary adhesion technology without stickiness. The clear window decals can be removed, repositioned, and even reused if stored properly. "Window graphic" is similar to "window sticker" but often needs to be specified. Regardless of the term, it is important to indicate whether you want an adhesive or a cling-based window graphic when placing an order.
Our window decals are razor thin—about 3 mil or .003”. The easiest way to visualize this thickness is to say that it is just thinner than a normal piece of paper. This extremely thin solution provides an aesthetically pleasing window sign that is simultaneously clear, durable yet easily repositionable.
Our window decals are water-resistant and weatherproof, and they are designed for both indoor and outdoor use. However, exposure to extreme elements over a long period of time can eventually reduce the quality of your decal. While a decal placed on the interior of a window will last longer than one placed outside, both placements are within the intended usages of the sign.
Yes, your window decal can be cut to any shape you want. We typically don’t recommend cutting to any shape though because the clear part of the decal is extremely clear making it unnecessary in most cases to cut to shape. However, by selecting the Custom with Border shape option on the design tool (this allows for a small border around the edge of the cut) you can customize window decals to any shape or size. Additional shape options to choose from for your clear window decal include Square/Rectangle, Rounded Corners (¼” or 1” radius), and Circle/Oval.
If you are looking for individually cut vinyl letters for your storefront or home windows, you are most likely looking for cut vinyl lettering which is a different product entirely. You can learn more about it through here.
Due to the size of the printers we use, the smallest window decal we can do is 3”x 3”. On the maximum end of the scale, you cannot create a window decal that has both dimensions over 52”. Assuming that one of your dimensions is under 52”, we can print your custom decal design regardless of the dimension of the other end. If you need something larger than 58”, you may need to cut your image into two or more pieces and then install them side-by-side.
We print everything in full color which means there will be no additional cost when printing designs with multiple color values. The total cost of your decal will depend on the size of the sign, how many you purchase, and shipping fees and taxes wherever applicable. Bulk discounts are valid for any quantity of two decals or more if they are of the same design.
Usage
No. The installation and removal of your decal should not hurt nor damage your window. The only way the window might be damaged is if you use using a metal squeegee during installation such that it scratches the window. You can help avoid this by availing our felt-tipped squeegee with your purchase for a small added charge.
Clear window decals have a variety of uses, the most common being for storefronts of big and small businesses. These decals are perfect for advertising sales, seasonal promotions, branding, and store hours advisory. Decals can also be used to note warning signs, compliance signs such as displaying building codes, surveillance notices, QR codes and many more.
In addition, clear window decals are great for settings whose interiors are glass centric like conference rooms, reception areas, etc. They can also be used in residential areas for anything from “no soliciting” signs to “beware of dog” type signs.
The clear window decal will be completely transparent on areas that it is not printed. If the surface area of your decal is completely covered, you shouldn’t see any transparent portions of the decal. Keep in mind though that even a fully printed decal will still allow some light through. Vision may be fractionally obscured but it will not be as opaque as an actual opaque decal. To achieve one-way visibility, select our perforated window decals.
Yes. For inside placement and outside visibility, you need to select “Inside Glass” when you place an order. We’ll reverse-print your sign so that you can adhere it to the inside of the window but have people see your sign as they approach your business or home. This is also possible with our clear window clings.
Our clear window decals are designed for and best when used on smooth glass surfaces. They are also perfectly suitable for laminated surfaces, plastics, stainless steel, aluminum, and electronics such as TV screens, tablets, and computer monitors. Please note that clear window decals will not work on concrete of any type, textured surfaces, and drywall.
Our clear window decal does not stick well to fiberglass. We recommend using it on glass or a similar smooth surface. If you're looking for a decal specifically for fiberglass, we recommend using our permanent decal.
Yes, can use clear window decals on your car windows. In fact, they can be great for advertising especially if you want to make it work as a moving business card when you drive anywhere. Please note though that our clear window decals can last about three years only. If you’re looking for something that lasts longer, you can check out our permanent decals.
Installation & Care
Yes, our clear window decal has a frosted backing on it. The easiest way to remove this is to slightly bend the decal at a corner much like you would with a sticker. If this doesn’t work, you can use a small piece of tape as shown in this video.
Installation of your clear decal only takes two steps. First, clean the window and allow the surface to dry before installing the decal.
The second step involves a little prep prior to the actual installation. Add a drop or two of dish soap to a spray bottle filled with warm water and shake well. After removing the decal’s protective backing, spray the non-printed side of the decal as well as the window itself generously with the water-soap mixture. Wetting the decal and the window will provide you some wiggle room while installing the decal to the window. Be careful not to submerge the decal in water as this can affect its ability to adhere to your window. Once the decal is placed on the window use a flat edge or a squeegee to remove as much liquid as you can. We recommend that you use a rubber or felt-tipped squeegee to prevent puncturing the decal. Allow the decal to air-dry after installation.
Installation of the smaller window decals can be done by one person. For larger decals, however, we recommend that at least two people do it. Doing so will prevent the decal from sticking to itself during the process and makes for a much easier squeegee process and overall application of the decal. If the decal sticks to itself nonetheless, it will be easier for two people to pull it apart as opposed to when there’s only one person doing the installation.
If you wish to take down and store your decal, it is best to store it using the original backing. This will protect the sticky side from collecting dust, debris, or other particles that may reduce the decal’s ability to stick to when you’re ready to use it again. If you need to store them for a while (i.e., under one year), store the backing of the decal at room temperature in a non-humid setting.
Cleaning your decal regularly will help keep it looking bright and clear and you can do this by wiping it with a damp cloth.
Our custom window decals can be removed by simply peeling it away from the window or surface where it is applied. Because of our custom window decal's proprietary adhesion technology, you do not need to worry about it leaving any residue on your window.
Yes, washing your windows should not adversely impact your sign. The only exception to this is using any kind of power washer or spray gun directly on the decal as pressure washers can damage the decal and cause it to fall off the window.