


Clear Vehicle Decals

Tell us what sign you want, how big you want it, and what you would like on it and we'll have it ready for you in no time!
No results found for "{{previous_search_keyword}}"
Tell us what you want your product to look like and our team of professional designers will bring your vision to life!
And the best part: All design fees will be fully credited to your product purchase!
 177K
177K
Store Ratings
 Verified Purchase
Verified Purchase
Verified Purchase
Verified Purchase
Verified Purchase
Verified Purchase
Verified Purchase
Verified Purchase
Verified Purchase
Verified Purchase
Verified Purchase
Verified Purchase
Verified Purchase
Verified Purchase
Verified Purchase
Verified Purchase
Verified Purchase
Verified Purchase
Verified Purchase
Verified Purchase
Verified Purchase
Verified Purchase
Verified Purchase
Verified Purchase
Verified Purchase
Verified Purchase
Verified Purchase
Verified Purchase
Verified Purchase
Verified Purchase
Verified Purchase
Verified Purchase
Verified Purchase
Verified Purchase
Verified Purchase
Verified Purchase
Verified Purchase
Verified Purchase
Verified Purchase
Verified Purchase
Verified Purchase
Verified Purchase
Verified Purchase
Verified Purchase
Verified Purchase
Verified Purchase
Verified Purchase
Verified Purchase
Verified Purchase
Verified Purchase
Verified Purchase
Verified Purchase
Verified Purchase
Verified Purchase
Verified Purchase
Verified Purchase
Verified Purchase
Verified Purchase
Verified Purchase
Verified Purchase
Verified Purchase
Verified Purchase
Verified Purchase
Verified Purchase
Verified Purchase
Verified Purchase
Verified Purchase
Verified Purchase
Verified Purchase
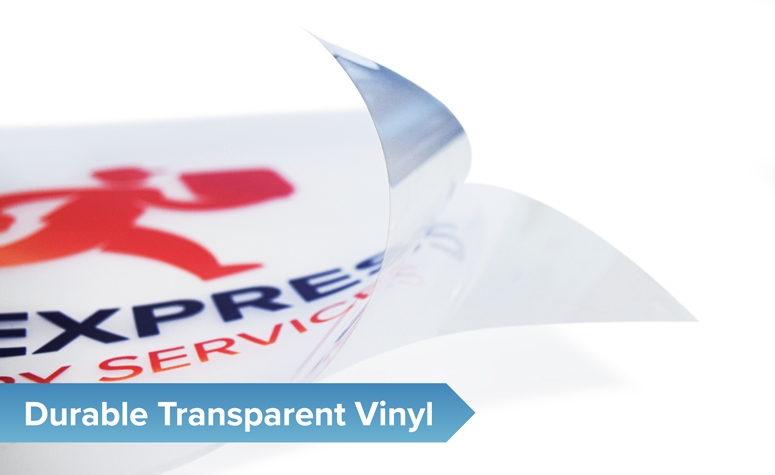
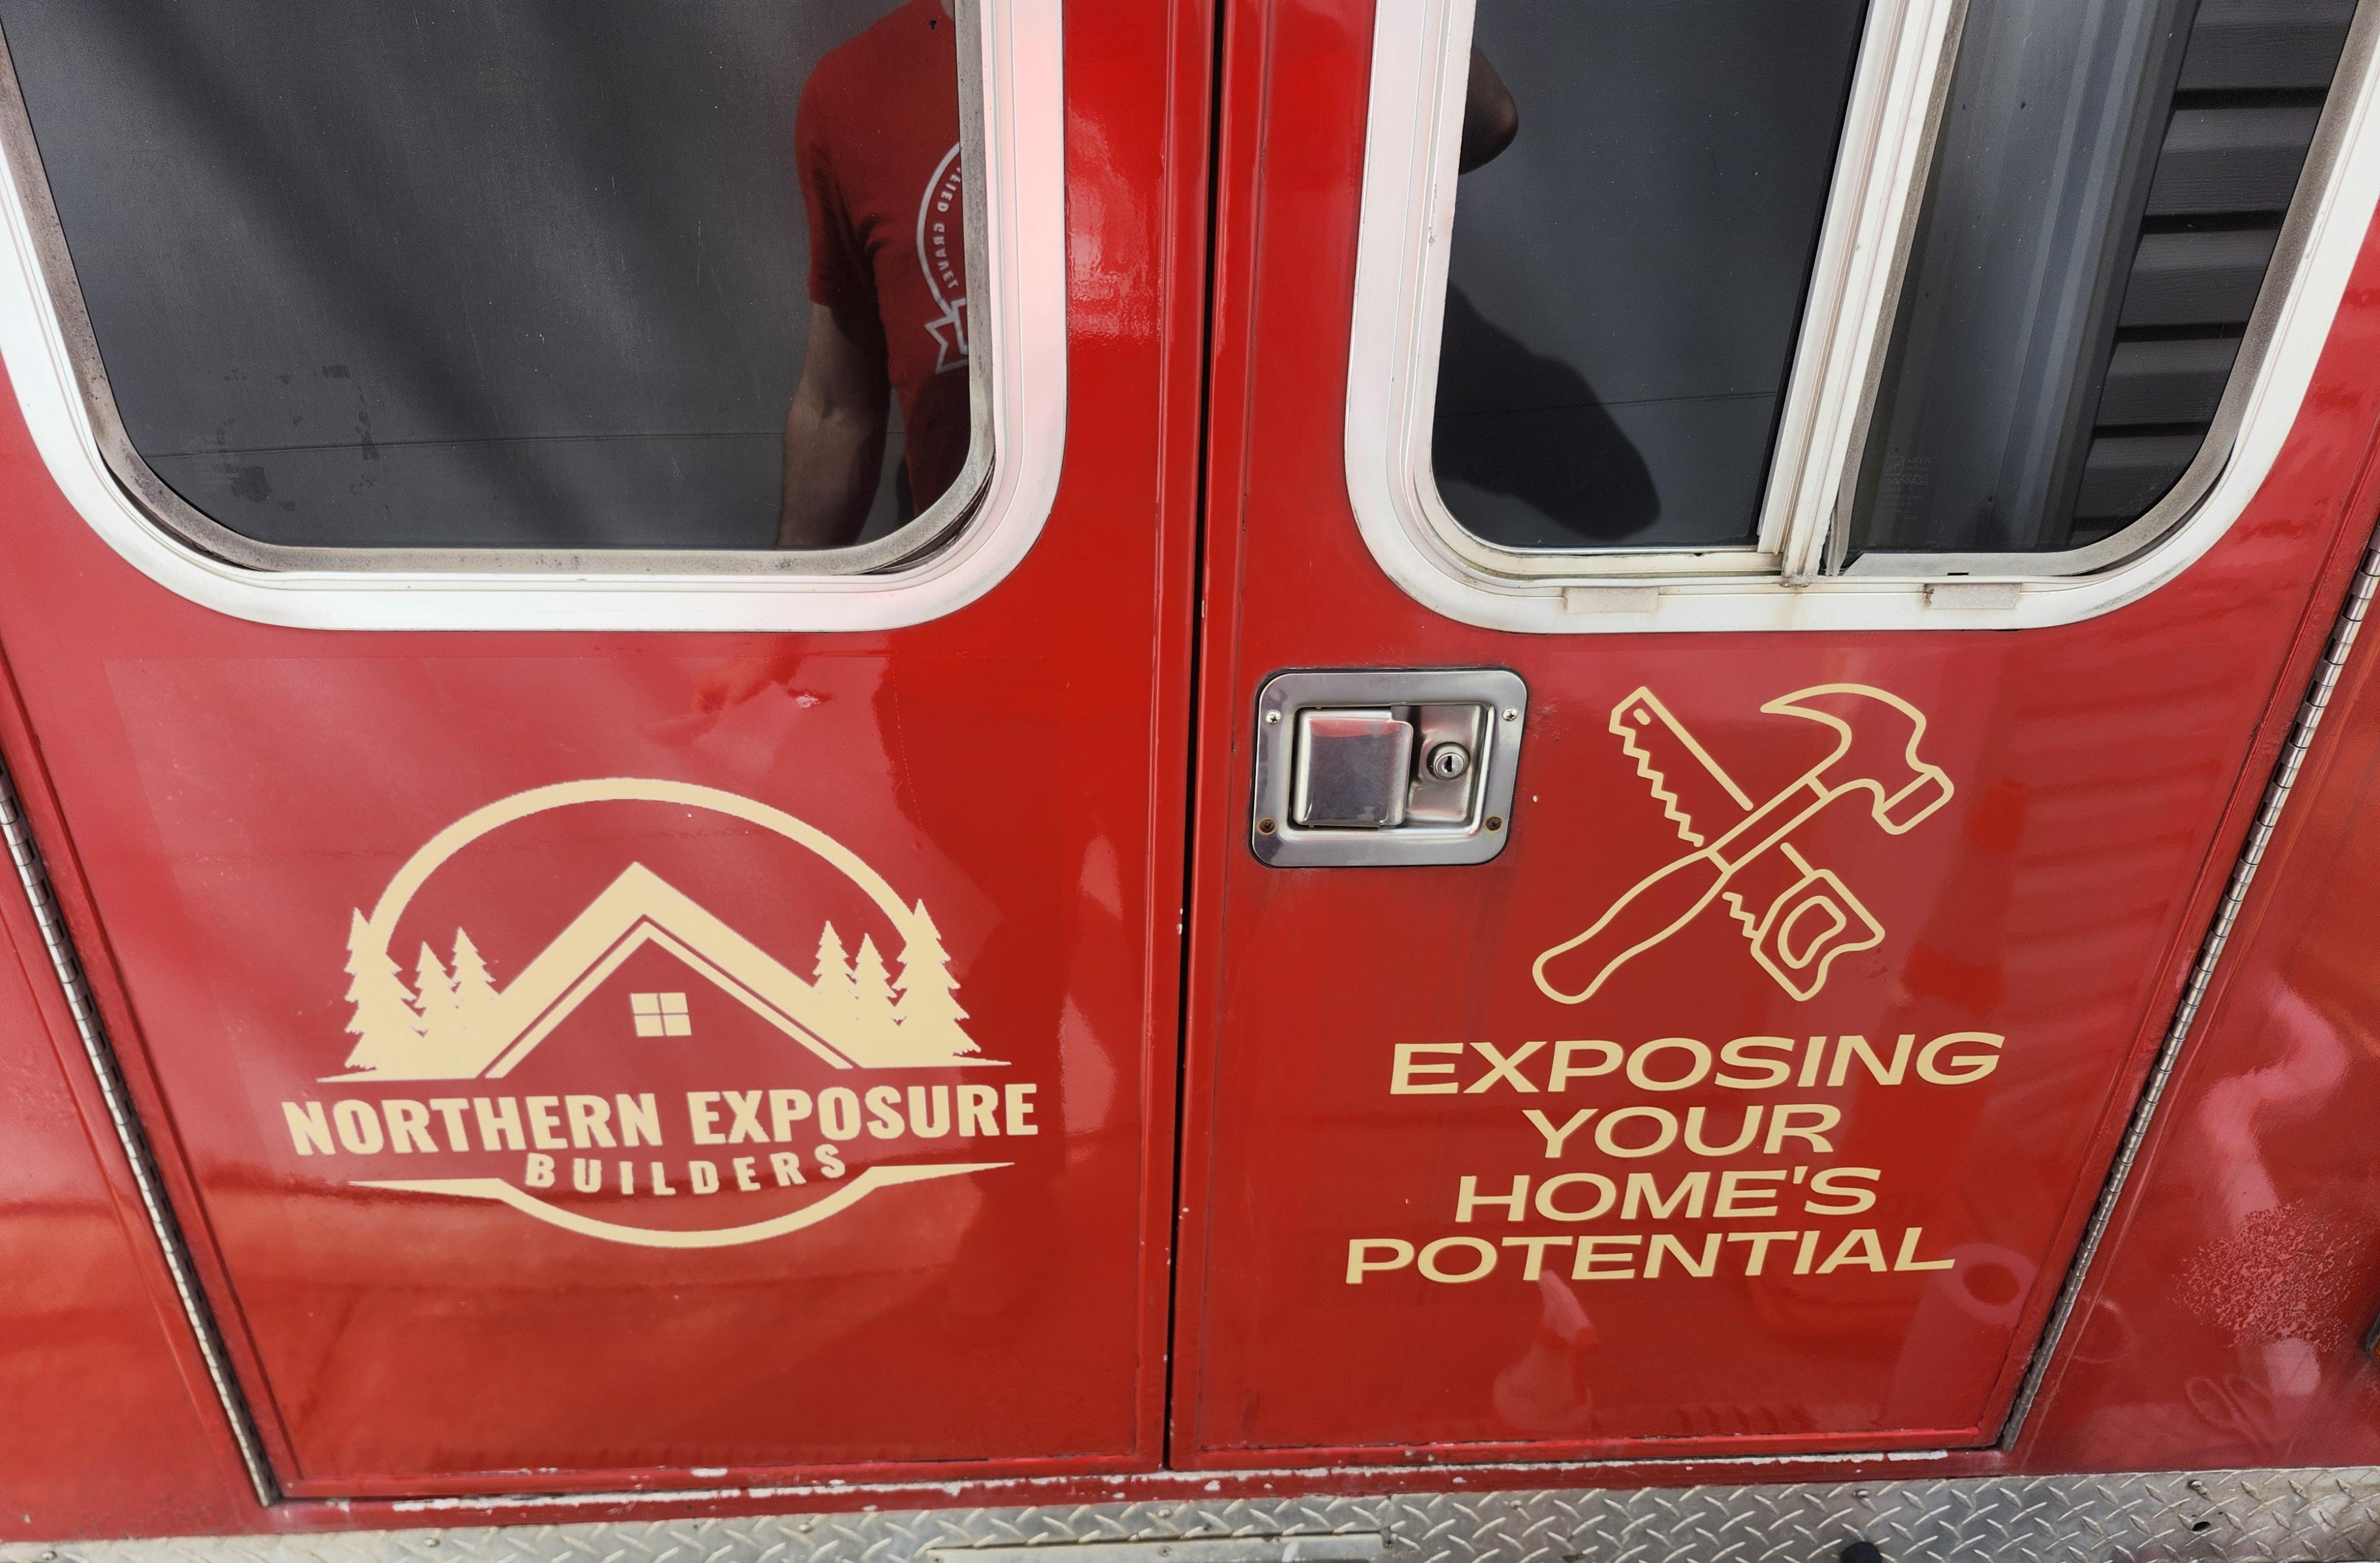
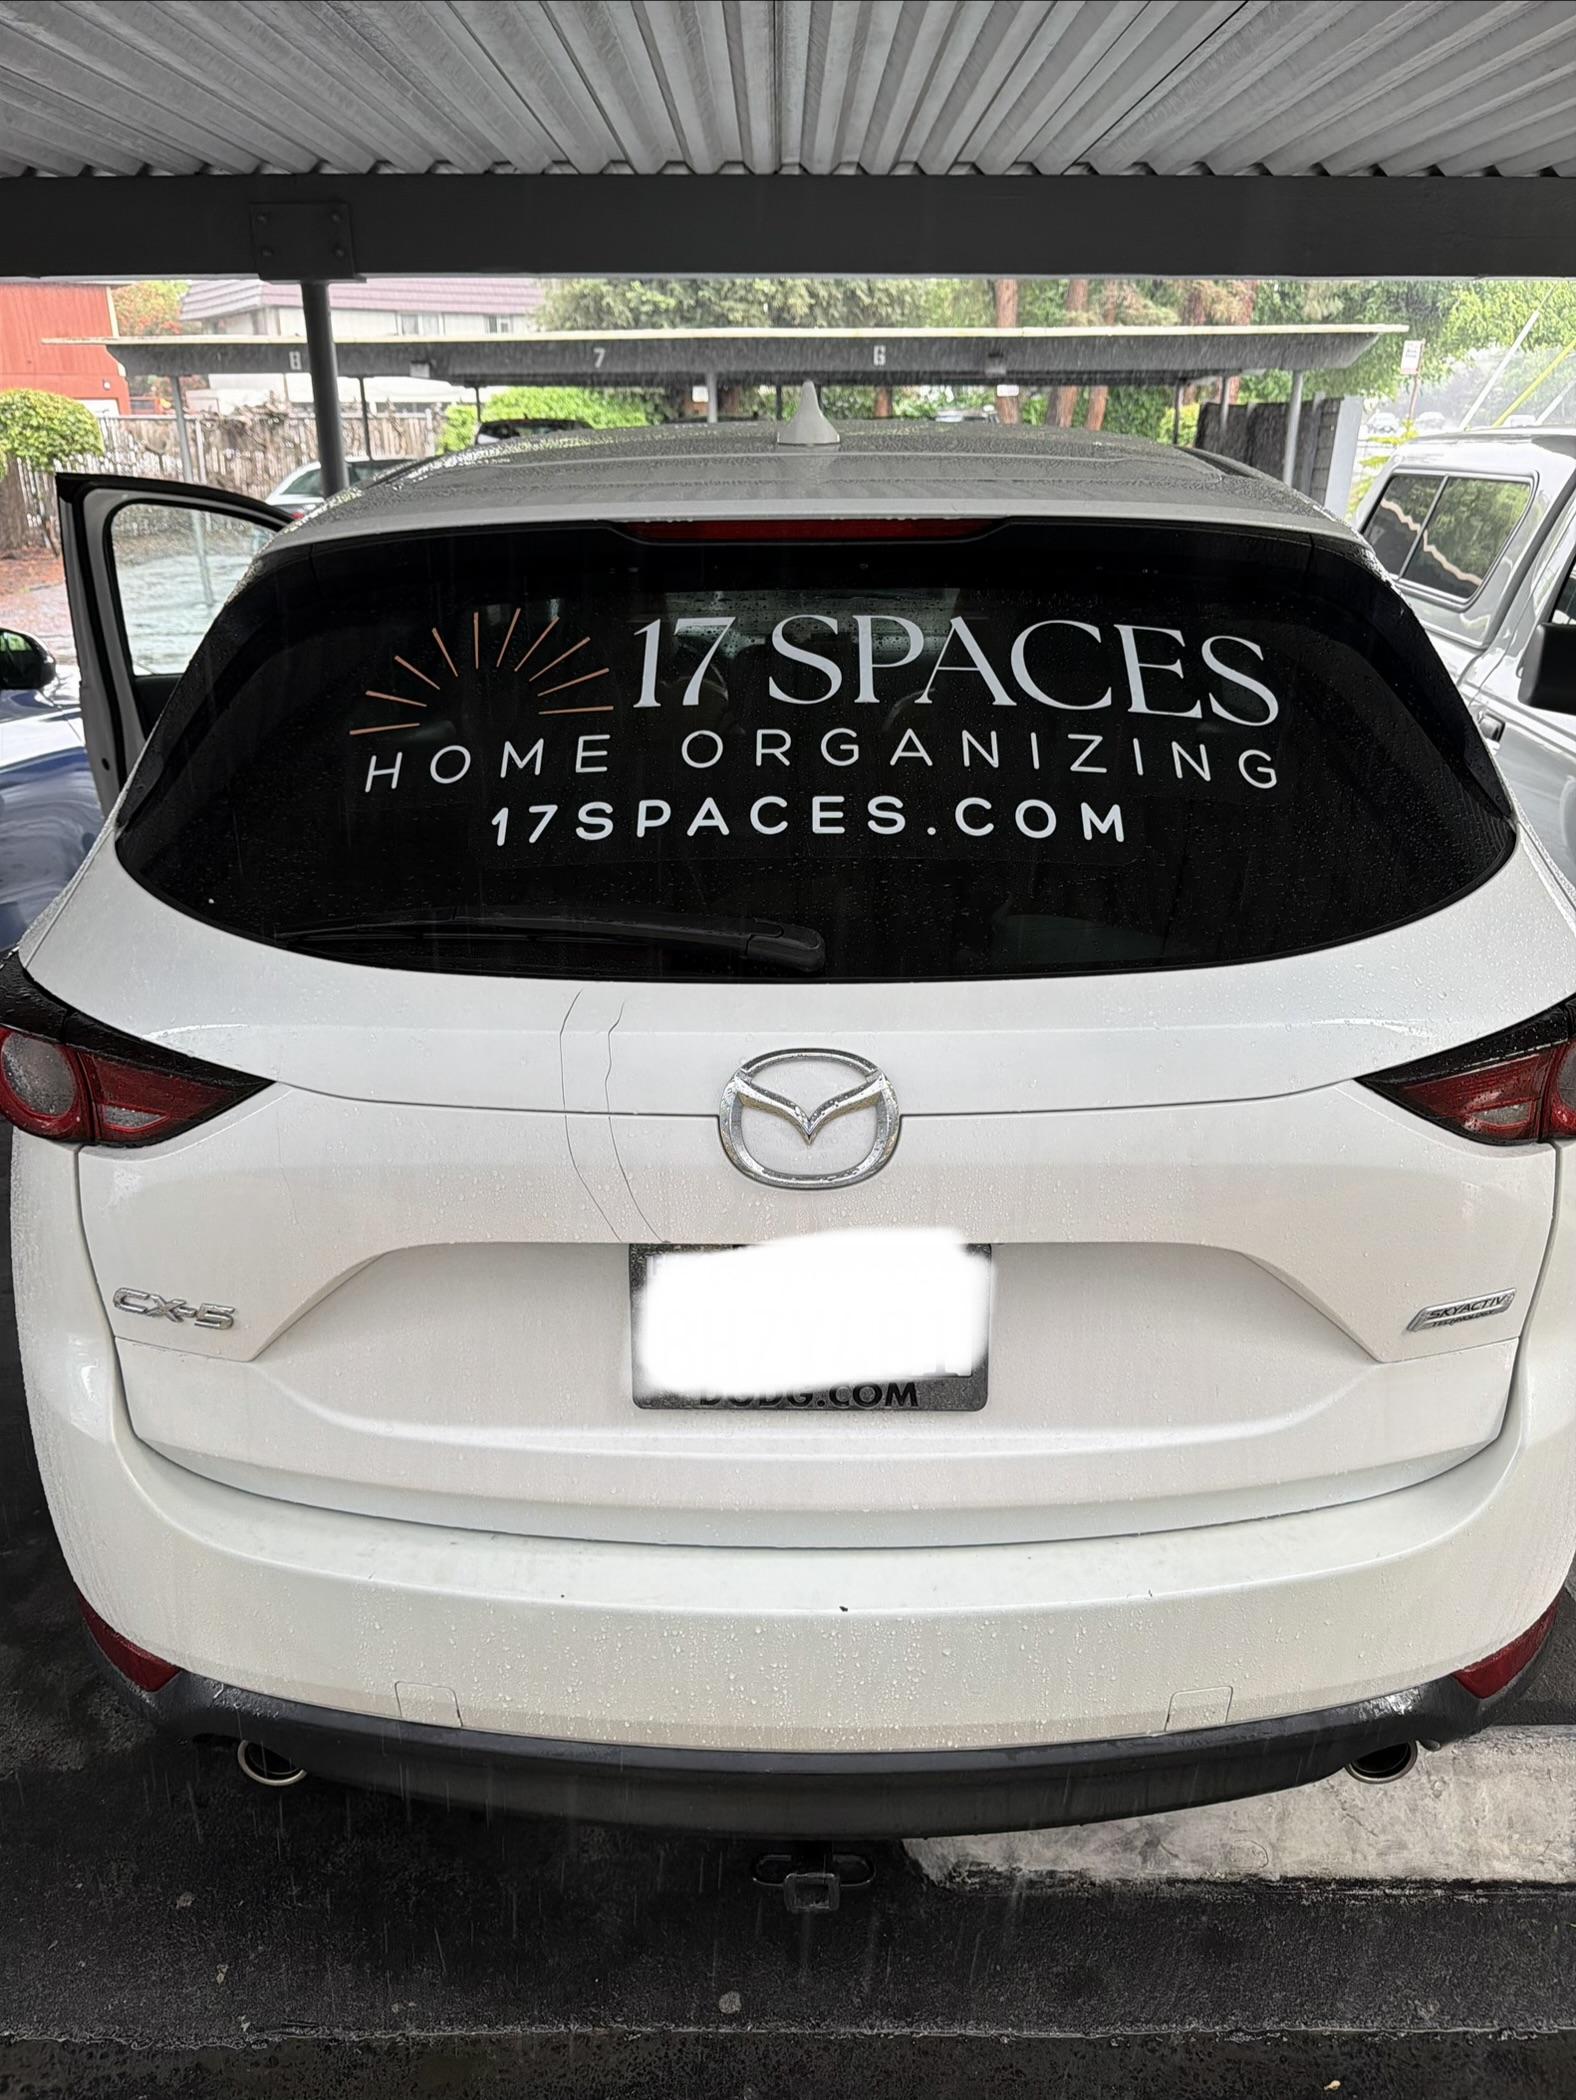
Clear Vehicle Decals That Look Great on Any Vehicle Part
Whether you want to display your advertisement, business information, a quotation, or express your personality, our clear vehicle decals can be perfectly applied on any area of your vehicle – yes, even inside! Our car decals are designed not to damage any surface, so they’re safe to be placed on the body, windows, or doors of a car. These are also made of a durable and waterproof material, so car washes and windshield wipers will never be a problem.

Why Signs.com?


What Are Clear Car Decals?
A clear car decal is an image or graphic printed directly onto transparent vinyl material. This allows the background of the decal to be see-through where not printed, making this a great option to use on car windows without obstructing your view. Clear car decals can be placed on either the outside or inside of your vehicle’s window and can also be applied to the sides, doors, and body without damaging paint.
Custom clear vehicle decals are generally used to advertise one’s business or products on cars, trucks, vans, jeeps, motorcycles, or any other vehicle. They are also great for showing off sports teams, logos, personal designs, and more.
Clear Vinyl Car Decal Features

-
Easy to Install:
Install your clear vinyl car decal in minutes without the need of professional help. Installation instructions are included with every order or can be found below, helping you know exactly what to do.
![Clear Vehicle Decal Checklist Icon]()
-
For Use On Inside or Outside of Window
Standard and inside glass options available, allowing you to place your decal on either the inside or outside of your vehicle’s window.
![Clear Vehicle Decal - Indoor Outdoor Icon]()
-
UV Resistant and Waterproof:
Made with durable 3 mil vinyl and water/weather/UV resistant ink, your clear decal is made to withstand even the harshest weather conditions for over five years.
![Weatherproof Icon]()
-
Transparent Background:
Your design will be printed onto a sheet of transparent vinyl material using an advanced white ink printing process. This allows the background of the decal to be see-through from both sides where not printed, providing visibility through your vehicle’s windows.
![Transparent Icon]()
-
Cut-to-Shape Options:
Standard and halo cut options available, allowing you to customize the shape of your vehicle decal.
![CutLines Icon]()


Additional Specs
-
Weight
.05lbs per square foot (about the weight of 9 quarters)
-
Thickness
.003" (about the same thickness as a sheet of copy paper)
-
Details
Transparent where not printed, waterproof, easy to install, durable, removable and repositionable
-
Uses
Indoor/Outdoor. Vehicle windows or doors, business advertising
-
Print Method
Four color white ink process, eco-friendly, weather, fade and abrasion resistant UV ink
-
Estimated Lifespan
3+ years with proper placement and care
Popular Clear Vehicle Decals Templates


How to Use Clear Vehicle Decals Templates
If you prefer to create your own clear vehicle decals, we have free design templates you can use. Our design templates are beginner-friendly and easy to edit – no graphic design experience needed! Plus, our intuitive online design tool makes customizing templates easy.
To get started, choose a template you like in the available options. Once you click your chosen template, it will automatically direct you to our online design tool. You can also manually search for a design by typing a keyword on the search bar. If you’re looking for a specific design, you can filter the search results and click on any of the categories on the left side.
When you choose a design template, it gives you opportunities to customize the design any way you want. You can change the font, experiment with colors, upload images, or add a logo and text. If you have your own design available with you, simply upload the file.
To avoid print production mistakes, make sure to double-check your design before printing. You can do this by clicking “View Proof.“ From there, you can review your design, and save your work as a draft by clicking “Save,” or select “Save & Continue” if you want to proceed to checkout.
How to Install Clear Car Decals
The following instructions are to help you have a successful, timely install of your custom car window decal. The installation is a simple process and requires no professional help. We recommend installing your decal in an environment with a temperature above 40 degrees Fahrenheit.
Clear car decals use a wet installation method, so you will need to begin by creating an application solution (approximately 3 drops of dishwashing liquid to 1 gallon of warm water) which you will eventually apply to the desired surface and the adhesive side of the decal.
Clean the desired surface (either the window or body of your vehicle) with soap and water, removing all dust and dirt particles. If dust and dirt is not fully removed from the surface this may cause small air bubbles in your decal and prevent it from adhering properly. After cleaning the surface, either allow time for the surface to air dry or remove excess water with a rubber squeegee.
Thoroughly soak the desired surface with the application solution created in Step 1.
Lay your clear vehicle decal on a flat, smooth surface and begin to remove the back liner. As you are removing the back liner, generously apply application solution to the back of the decal.
Take the decal and place it onto your desired surface with the wet adhesive side against the application surface. You may lift the decal to remove large bubbles or wrinkles when applying.
The application solution on both the application surface and the adhesive side of the decal will allow you to slide the decal into the correct position.
Use a squeegee* to remove air bubbles and excess application solution
from underneath the decal. When using the squeegee, start in the
center of the decal and squeegee in a straight line to the right and
left side of the decal. Continue this process until you have ran the
squeegee over the entire decal. Feel free to press hard when using the
squeegee to ensure the removal of excess water. You may place the back
liner on top of your decal during this process to avoid damage to the
decal. Once squeegeed, you will not be able to reposition your decal.
*Available as an additional purchase
Use a paper towel to wipe excess water away from the edges of the decal. Allow up to 24 hours for the decal to dry before driving.
Download or Print Clear Car Decal Installation Instructions PDF

Care & Removal
Like all car and truck window decals, wash your clear decal regularly to maintain appearance and longevity. These decals are safe for most car washes. However, do not apply high pressure water for long periods of time to avoid having the decal start peeling. To remove the decal, simply peel back a corner using a razor blade and then pull the remaining decal away from the window. You can also use the razor blade to remove any remaining adhesive residue. Be careful not to scratch the installation surface if sharp objects are used during removal.
Easy to Use
Design Tool

Create your custom vinyl car decal with the easiest and simplest design tool in the signage industry. Upload images, create objects, add text, adjust sizing, change color, and so much more!
Check It Out
Free Professional
Design Services

Whether you need help uploading your design or are interested in creating something entirely new, our team of professional graphic designers is here to help. Nothing beats free!
Learn MoreImage Gallery
All Car and Vehicle Decals

Lettering
No background, letters and objects cut to exact shape
Clear
Clear background, any color combination available

Opaque
White background, any color combination available

Perforated
Perforated material, best for covering entire windows
Permanent Decal
White background, designed for permanent use
Chat with us, contact us, or give us a call at 1-888-222-4929. We’re here to help!
Product Specs
Clear is indicated by the gray and white checkered area on our design tool. If you want any part of your custom car decal to be clear, that background must be visible on your proof. When you select “Clear Car Decal” in our design tool the background will automatically switch to the gray and white checkered background to indicate that you are designing on a clear background. If you have uploaded a JPG file to the site with a white background, we will print the white of that background. If you want that to be clear instead, please upload a PNG with transparency or a vector file with transparency.
Your car decal is made from a clear vinyl material. Thus, any area(s) your graphic isn’t showing and the checkered background is visible will be clear. So the portion of your decal that will be transparent will largely depend on what you are printing. For those seeking to print over the entire surface area and yet retain visibility we recommend our perforated car decals. These decals offer one way visibility regardless of how much of the surface area is printed. Please keep this in mind when using clear car decals that have a design that covers the entire surface area.
We offer two other types of car decals. Perforated car decals, as alluded to above, offer one way visibility and are the ideal car decal for a graphic that will cover an entire window. These are most often used for rear window decals. Opaque vehicle decals are completely opaque regardless of what is printed on them due to the opaque nature of the vinyl itself. These are best used in situations where visibility is not a primary concern, such as the sides of vehicles rather than on the windows. More information for both of these types of decals is found by clicking on the links within this paragraph.
Generally speaking, the terms "car decals," "car stickers," and "car graphics" are interchangeable. All of these are strong adhesive graphics that can be placed on a wide variety of vehicles including trucks, boats, cars, tractors and more. While most car decals, including our perforated and opaque decals, include some kind of adhesive backing, our clear car decals do not use an adhesive backing. Instead, these decals use a proprietary adhesion that makes them repositionable yet durable enough to be used in almost any temperature and situation.
Also of note, all of our car decals (clear, opaque and perforated) are a different product from what is known as vinyl lettering. This means that these car decals will come in one continuous piece with your decal printed on it. Even a design featuring a word will have a backing to it. These can be cut to shape as explained below, but we do not recommend attempting to cut out individual letters. If you are looking for car decals that feature individual letters or designs please our vinyl lettering product page.
As explained above, if you are looking for individual letters or designs then please visit our vinyl lettering page. Otherwise, you may choose a simple square/rectangle with or without rounded corners. The rounded corners can be 1/4" or 1". You can also have your sign cut in the shape of a circle or oval. In addition to these options, you may choose 'custom with border' (commonly known as halo cut), which is where we will cut the decal to your design with a border around the outer edge.
No. Our vinyl car decals will actually work on a wide variety of vehicles. Whether it is a car, truck, motorcycle, boat, tractor, forklift or something else you should be able to use the decal. The important thing to keep in mind is that the surface needs to be clean and nonporous for the decal to work. Also, for tractors, forklifts and other manufacturing settings we also offer a high adhesive decal. This decal has a much stronger adhesive and should be used only for permanent uses.
You can apply the clear vehicle decals using a wet installation method. Before applying the decal on the car, make sure that the surface you will install the decal on is free from any dust or dirt. You can do this by cleaning it with soap and water and then giving it time to completely dry. To start, create an application solution (about 3 drops of dishwashing liquid to 1 gallon of warm water) that you will put on the car surface and adhesive side of the decal.
Peel away the back liner, and spray the application solution on to the back of the decal. Use a squeegee to firmly press the decal, and remove air bubbles and excess water. Let the decal dry for up to 24 hours before driving.
Yes, we do. We recommend installing your clear vehicle decal above 40°F.
No. The letters in our clear vehicle decals are not individually cut or printed.
Yes, our clear vehicle decals are suitable for outdoor use. Made from UV-resistant and waterproof material, these decals can withstand heat, rain, and harsh weather conditions.
No, it will not. The material is designed specifically not to damage car paint and windows, so the decal is safe to apply and remove.
Yes, our clear vehicle decals can be repositioned.
To remove the decal, peel back a corner using a razor blade and pull the remaining decal away.
Usage
Yes, just like our normal window decals you are able to place your clear car decal on the inside of your window and have it be visible to someone outside your car if you select the “Inside Glass” option.
For clear car decals this is absolutely an option. If you’d like to position your car decal on the inside of your window to be seen by passersby, then simply select the “Inside Glass” option during the designing and ordering process. The decal will then have the graphic printed on the backside of the sign with the ability for the front side of the decal to adhere to the inside of your window. However, please be aware that most cars have tinted windows which may severely obstruct the visibility of your sign. The best test is to print out your graphic on a piece of paper and tape it to the inside of your car. If you can see it clearly, then the “Inside Glass” option should work for you.
Our clear vehicle decal does not stick well to fiberglass. We recommend using it on glass or a similar surface. If you're looking for a decal specifically for fiberglass, we recommend using our permanent decal.
Installation & Care
Yes. Despite not having a “sticky” side, the side that will adhere to your window will be protected by an extremely thin frosted backer. Once this backing is removed you will be ready to install your car decal. If the backing is proving difficult to remove, simply place a piece of scotch tape halfway on the sign and then use the tape to slowly peel away the backing as shown in this video.