
.jpg)


.jpg)

.jpg)


.jpg)

Perforated Window Decals
Select One of the Following

Let Us Design For You
Tell us what sign you want, how big you want it, and what you would like on it and we'll have it ready for you in no time!
OR
Design Online
No results found for "{{previous_search_keyword}}"
Get it Professionally Designed
Tell us what you want your product to look like and our team of professional designers will bring your vision to life!
And the best part: All design fees will be fully credited to your product purchase!
 165K
165K
Store Ratings
 Verified Purchase
Verified Purchase
Verified Purchase
Verified Purchase
Verified Purchase
Verified Purchase
Verified Purchase
Verified Purchase
Verified Purchase
Verified Purchase
Verified Purchase
Verified Purchase
Verified Purchase
Verified Purchase
Verified Purchase
Verified Purchase
Verified Purchase
Verified Purchase
Verified Purchase
Verified Purchase
Verified Purchase
Verified Purchase
Verified Purchase
Verified Purchase
Verified Purchase
Verified Purchase
Verified Purchase
Verified Purchase
Verified Purchase
Verified Purchase
Verified Purchase
Verified Purchase
Verified Purchase
Verified Purchase
Verified Purchase
Verified Purchase
Verified Purchase
Verified Purchase
Verified Purchase
Verified Purchase
Verified Purchase
Verified Purchase
Verified Purchase
Verified Purchase
Verified Purchase
Verified Purchase
Verified Purchase
Verified Purchase
Verified Purchase
Verified Purchase
Verified Purchase
Verified Purchase
Verified Purchase
Verified Purchase
Verified Purchase
Verified Purchase
Verified Purchase
Verified Purchase
Verified Purchase
Verified Purchase
Verified Purchase
Verified Purchase
Verified Purchase
Verified Purchase
Verified Purchase
Verified Purchase
Verified Purchase
Verified Purchase
Verified Purchase
Why Signs.com?


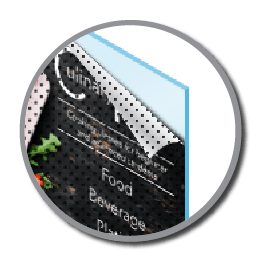
What Are Perforated Window Decals?
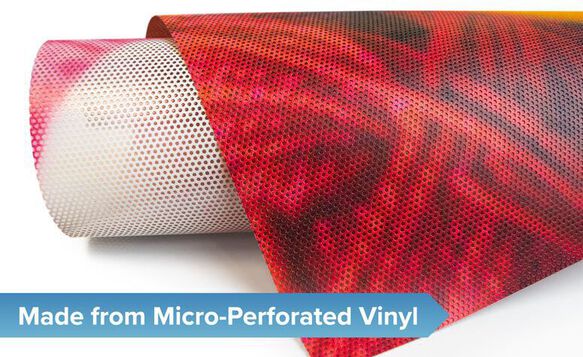
A perforated window decal is an image or graphic printed directly onto perforated, adhesive vinyl material. These decals feature one-way vision, allowing you to see outside the window inside your store but not from the out-side looking in. This is possible by puncturing 50% of the vinyl material with tiny holes called micropunctures. These micropunctures are small enough for the decal to maintain a high-quality image on one side yet be see-through on the other.
These decals are designed for indoor and outdoor use. The most common uses include business/storefront advertising, window decor, product promotion, window signage, and branding. Mainly used to cover entire windows, they also deflect sunlight and provide shade and privacy.
Perforated Window Decal Features

-
Easy to Install:
No professional installation required. Install your decal in minutes using our step-by-step installation instructions provided with every order.
![Clear Vehicle Decal Checklist Icon]()
-
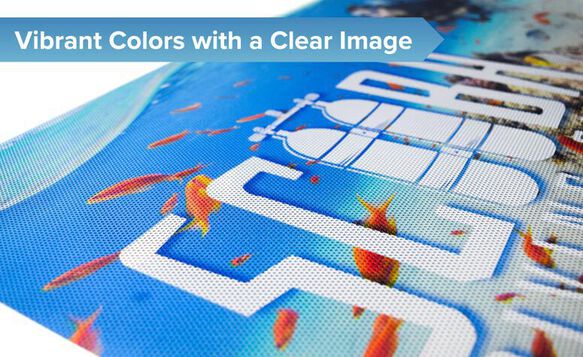
Vibrant/High Quality Colors:
Your image or graphic will be printed onto perforated vinyl using world-class printers with an advanced four-color process, ensuring that your decal will have the most vibrant and clear colors possible.
![Clear Vehicle Decal - Indoor Outdoor Icon]()
-
Adheres to Outside of Window:
Placing your perforated window decal on the outside of the window allows maximum visibility, preventing the decal from being covered up by window glare or tint.
![Weatherproof Icon]()
-
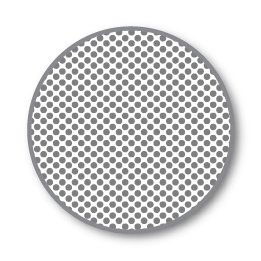
50/50 Micro-perforated pattern:
50% of your decal will consist of solid vinyl material, and the other 50% will consist of micro punctures. This allows one side of the graphic to appear opaque and the other side to appear see-through.
![Transparent Icon]()
-
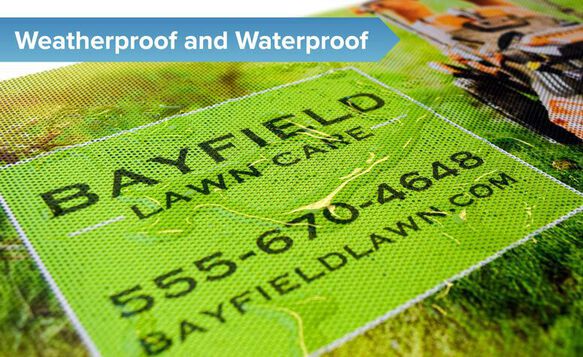
Weatherproof and Waterproof
Perfect for outdoor use, your perforated window sign is made with durable vinyl and will withstand rain, sun, and other elements; it has a lifespan of 3+ years. The optional laminate provides extra protection against exposure.
![CutLines Icon]()


Additional Specs
-
Weight
.09lbs per square foot (about the weight of 9 quarters)
-
Thickness
.016" (about the thickness of 4 sheets of copy paper)
-
Details
Perforated, long lasting, good privacy, easy installation and removal
-
Uses
Indoor/Outdoor. Retail, home, storefront, or office windows
-
Print Method
Four color process, eco-friendly, weather, fade and abrasion resistant UV ink
-
Estimated Lifespan
3+ years with proper placement and care
Easy to Use
Design Tool

Create your custom perforated window decal with the easiest and simplest design tool in the signage industry. Upload images, create objects, add text, adjust sizing, change color, and so much more!
Check It Out
Free Professional
Design Services

Whether you need help uploading your design or are interested in creating something entirely new, our team of professional graphic designers is here to help. Nothing beats free!
Learn MoreSimple Installation with No Professional Help Required
The following installation instructions will help you with a quick and easy installation of your perforated window decal. Instructions will also be included with your order, and you are free to refer to this page or download a PDF of the instructions for assistance. If you are installing a large decal we recommend having at least one other person assist you.

Clean your window, removing all dirt and grime from the surface.

Lay out your decal on the window with the backing still on and make sure it is aligned properly.

Make markings on the window with a washable marker. Be sure to double check your alignment to make sure the perforated window decal is where you want it to be.

Pull the graphic away from the window and remove the backing, exposing the black adhesive side of the decal. If the backing appears to be tearing when removing it, this may be because you are not removing all layers of the backing. When removing the backing, you should be able to see the back of the decal, which is black.

Align your decal to the markings made previously and begin to apply to the window. This will be a dry install, so do not use any water on the application surface or the adhesive side of the decal. Use a squeegee* or flat edge when applying, starting from the center and working your way outward towards the corner of the decal.
*Available for purchase with perforated window decal

Once you have applied the entire perforated decal to your window, remove the excess material around the edges using a razor blade.
Download or Print Perforated Window Decal Installation Instructions PDF
.jpg)
Care
If possible, hand wash your custom decals with a damp cloth, avoiding pressure washers that can cause peeling. To remove, gently peel from the top down, then remove any leftover adhesive with soapy water or adhesive remover and a razor blade.
Selecting the Best Size and Design for Your Decal
1. If you are wanting to cover an entire window with your perforated window decal start by measuring the largest width and height to ensure your graphic will cover all areas of the window.

2. Order your graphic 1” wider than the width of your window and 1” higher than the height of your window to allow room for trimming. For example, if your window is 50” x 20” order a 51” x 21” decal.

3. When designing your custom decal, place your design/image/graphic in the center of the decal to make sure no part of the main design will be cut off when trimming.


4. To maximize the visibility of your decal, be sure to use a high contrast between backgrounds and lettering, objects, and images in your design. Generally speaking, dark lettering/objects/images with a light background installed on a dark surface tend to work best. Please note that your decal may appear washed out or allow two way visibility if it is dark outside and the lights are on inside.

-6709.png)
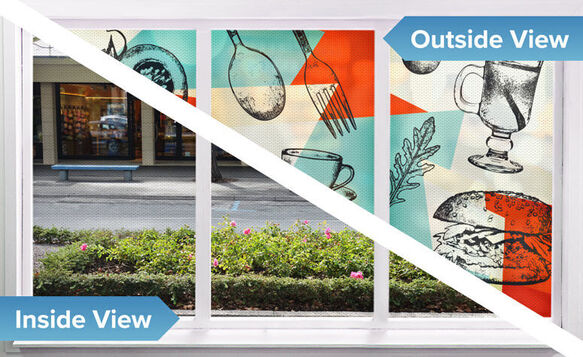
One-Way Vision
The most unique feature of perforated window decals and signs is their ability to provide one-way vision. The micropunctures in the material allow a vibrant image or graphic to be displayed on the outside of the window yet allow you to see through the decal from the inside. This is great for advertising promotions, sales, and products all while maintaining privacy and shade from the sun. Please note that the one-way vision of perforated decals can be negated when the interior setting is brighter than the exterior setting such as a well-lit store at nighttime. This is true of any perforated or one-way vision decal.

Piece Multiple Decals Together to Create Stunning, Large Displays

1. Measure Your Full Window
Measure the full size (height and width) of your windows in inches. Do not include in your calculations the rubber and/or metal on the outside edges of the window. i.e. the exterior or outermost rubber/metal of the entire window.

2. Measure Each Window Individually
Measure the full size (height and width) of each window in inches. Do not include in your calculations the rubber and/or metal by the glass panes of the window. i.e. the interior rubber/metal panes of the windows.

3. Fill Out Free Design Services Form
Fill out the form on our Free Design Services page, providing the measurements of your windows and a file or idea of the image/graphic you would like to use. You will then be contacted by one of our professional graphic designers within 24 hours, who will work with you personally for free to get you exactly what you need for your new multi-panel window display.
Popular Perforated Window Decal Templates
Ordering custom window decals starts with your design. At Signs.com you can upload your original perforated window decals artwork and we’ll print them on high-quality vinyl to decorate your storefront window. We also offer a selection of customizable templates you can use as the basis for your window decal. Simply choose among our popular design templates, modify them to your liking, and hit send so we could start the printing.


How to Use the Perforated Window Decals Templates
- Click on the image template of your choice above, you’ll then go to our online design tool where you can modify the design further.
- Add your business name and other information you want displayed on your decal (such as opening hours, taglines, USPs, and contact information). You can also modify the colors, fonts, and images on the template.
- If you are satisfied with your design, hit “Save and Continue” and you’ll be redirected to our payments page. Proceed with the payment and if everything checks out, then it’s off to the printers!
All Window Decals

Vinyl Lettering
No background, letters and objects cut to exact shape
Clear
Clear background, any color combination available

Opaque
White background, any color combination available

Perforated
Perforated material, best for covering entire windows
Frosted
Frosted background, multiple design options available


Frequently Asked Questions
Don't see what you're looking for?
Chat with us, contact us, or give us a call at 1-888-222-4929. We’re here to help!
Product Specs
What material is your perforated window decal made out of?
How do I know where my perforated decal will be transparent or allow one-way visibility?
Perforated window decals are the ultimate solution for those seeking one-way visibility on windows by using a decal or window graphic. As mentioned above, the perforated decal is made up of tiny micropunctures across the entire surface area of the decal. These micropunctures allow for one way visibility even when your decal covers the entire surface area of a window.
This one way visibility will be for store or homeowners looking from the inside to the outside of the store. For customers or patrons approaching the store or window they will see the design printed on the decal but will not be able to see through it. While there may be some ability to see in despite the decal, this is largely dictated by the situation and what is printed. Customers approaching a store front at night and looking into a lit store will be able to see more than during daytime hours. Further, a large decal with a design that features dark colors and covers the majority of the surface area will be much less transparent than a smaller design or lighter colors.
Regardless of the slight variations in visibility, design, and situation custom perforated window decals are an excellent option for storefront advertising that obscures the inside of the store and entices customers to come in while advertising a beautiful graphic!
How big is each micropuncture?
Do you offer other types of decals?
Yes. We offer a wide variety of window signage solutions, including other types of window decals.
First, we offer custom window clings. Static clings are a great alternative to the semi-permanent window decals we offer as they can be applied and removed as many times as you might need. They “cling” to a window rather than use an adhesive.
Additionally, we offer several different types of custom window decals. Clear window decals are transparent wherever they aren’t printed and can be placed on the inside or outside of your window. Placing it on the inside so customers can see it from the outside is called “inside glass” or “reverse print” and is a great advantage for stores or homes located in harsh climates. Opaque window decals offer a fully opaque window sign regardless of where it is printed. An “inside glass” option is not possible with opaque window decals due to the default opaque nature of the material itself.
We also offer perforated, clear and opaque car decal options for those seeking to use vehicle decals as a way to advertise a home or small business.
Are vinyl window decals the same thing as window stickers or window graphics?
For all intents and purposes the terms window stickers, window graphics and window decals are interchangeable. Or at the very least the use of these terms will generally be understood. Having said that any knowledgeable sign company will undoubtedly ask a few questions to make sure you are getting what you want.
This is because of the fact that clings and decals, which could both be called window graphics, are extremely different in how they work. Clings have no adhesive property and are repositionable. Decals on the other hand act more like a sticker and are semi-permanent in nature due to the adhesive backing used to adhere to the window. Attempting to remove and reposition a window decal will not work. Doing so with clings will take less than a minute or two to do.
So as long as you’re clear on the difference between clings and decals as well as the transparency provided by the different decal options we’ll understand you if you use the term window graphic or window sticker.
How thick are your perforated window decals?
What is the lifespan of your perforated window decals?
The estimated lifespan of our perforated window decals is 5+ years with proper installation and maintenance. The lifespan can vary quite a bit depending on the situation and usage. The laminate option provides some extra protection against exposure.
Perforated decals placed on interior windows like an office setting can easily last 5+ years. Decals used on the exterior of a storefront that is located in a harsh climate may last anywhere from 3-5 years.
Further, decals that are damaged when washing the windows or even peeled away by passersby will obviously not last as long as one that is simply installed and not touched again.
Will the exposure to sun or the elements ruin my decal?
The actual printing should last the duration of the decal as we print with UV ink that is also fade and abrasion resistant.
As noted above the constant exposure to the elements can reduce the lifespan of your perforated decal. Nonetheless, even in the harshest of climates we’ve typically seen the decals last several years. The optional laminate for window decals has a gloss finish and provides extra durability and protection for your printed design.
What is the difference between your laminated and standard perforated window decals?
Can the decals be cut to shape? Individual letters?
Perforated decals are typically not used for vinyl lettering or individually cut letters. If you are interested in this type of window decal please visit our vinyl lettering product page.
Perforated window decals can technically be either cut custom with border (previously known as or sometimes referred to as halo cut) or custom cut (previously known as contour cut). "Custom With Border" means that your decal would be cut to shape with a small border left around the perimeter of the decal. "Custom" is the exact same thing but will not retain a small border.
While these cut-to-shape choices are technically possible to do, they aren’t typically necessary. The vast majority of those ordering perforated window decals simply fill the entire window with the decal and rely on the micropunctures for transparency. If you are still interested in a cut to shape perforated window decal you may do so by selecting one of our shape options.
Can I order a decal with rounded corners? What about other shapes?
Yes! you can choose to design your perforated window decal with 1/4" rounded corners or 1" rounded corners.
In addition to the custom shape options available, you can also chose to have your perforated window decal cut to the shape a square/rectangle or circle/oval. All of these options can be found in the design tool. Please contact us at support@signs.com or call us 888-222-4929 if you have any questions about the various cut options you have for your winodw decal!
How small or big can my perforated window decal be?
Our printers are large format printers that are capable of printing billboards and even signs much larger than that. While this means that we are able to print fairly big signs it also limits how small we can print our signs. Big printers trying to print incredibly small window decals simply do not result in a good looking decal. The minimum and maximum sizes of our perforated window decals are listed below. If your specifications fall outside these areas please contact us and we’ll see if there is any way to get you your decal printed at the size required.
The minimum size of our perforated window decals is 6”x6”.
The maximum size of our perforated window decals is 53”x11998”. :) In other words, assuming at least one of your dimensions is under 53” then we can print your decal!
What if my decal has more than 2 colors? Will it cost more?
All of our signs, including our custom perforated window decals, are printed in full color. Thus, whether you want 1 color or 100 your design, it will not impact the cost of your decal! We even offer free design services. Keep this in mind as your price shopping for window decals and always ask the sign company whether they print in full color or not.
Will the angle of my window affect the visibility through my perforated decal?
Yes. If your window is perpendicular to the ground, you should have no issue seeing through the perforated decal. However, if the window is at a steep angle, you may have trouble seeing through the perforated decal. The ‘steeper’ the window, the more difficult it will be to see through the decal.
Usage
Will my perforated decal damage or ruin my window?
What are perforated window decals typically used for?
Will the decal impact the transparency of my window/storefront?
Yes. Perforated decals are produced using a material that allows for one-way visibility. This means that anyone inside of the room or building will be able to see out while those on the outside looking in will not be able to see through the decal.
If there must be two-way visibility we would recommend our clear window decals which are fully transparent except for where they are printed.
Can I place my decal on the inside of my storefront/window and have it be visible to those outside?
Can the decal be used only on a glass surface?
The ideal surface for the perforated window decals is a clean and smooth glass surface. Nonetheless, they typically work on any smooth nonporous surface. They will definitely not work on any unsmooth (stucco, brick, etc) or porous (think window screen) surface.
If you intend on placing them anywhere other than a glass surface don’t hesitate to ask us whether it will work and we’ll be able to tell you.
Installation & Care
Does my decal have a backing? How do I remove it?
Similar to our other decals that use an adhesive to adhere to your window the perforated window decal has a backing that protects the adhesive side of the decal. Once removed the decal will be ready to be applied to the window.
But before you remove the very thin backing that protects the adhesive side please read through the installation instructions and make sure you are prepared to install it right away!
How do I install my perforated window decal?
The first step to installing your perforated window decal is to clean the window with a non-abrasive rag or cloth. Strong cleaners should be avoided as the purpose of cleaning it initially is just to give the decal a fresh surface to be adhered to. Often, simply using water to clean the surface area of the window is sufficient. Once it has had the chance to air dry you are ready for the next step.
The next step is to carefully remove the backing of the decal. Make sure that this is done gently and slowly so that the backing comes off clean and you don’t tear the decal which is 50% micropunctures!
The most difficult step, though it really isn’t that difficult, is applying the actual decal to the window. Unlike some of our other window decals water should NOT be used during the installation process! Rather, the decal can be “tacked” or lightly pressed against the window in the corners. If you’re installing a larger decal with more than one person it can be tacked in two corners as described in the question below. This will help the decal stay in place while you slowly and more firmly press the decal against the window without air bubbles getting in. The easiest way to do this is to work in one direction - whether this is from top to bottom or side to side. With the corners tacked gently peel it away from the window and use a sharp edge to firmly press the decal against the window. Any air bubbles that may pop up can then be eliminated by immediately peeling the decal away from the window and reapplying the decal to that area. Installing the decal in a methodical fashion will allow you to peel it away quickly before the adhesive kicks in and eliminate air pockets as needed.
In some cases the edges of the decals may need to be trimmed. A small razor blade can be used for this purpose as needed. Just be careful to not scratch or damage your window or the decal itself.
Does installation require more than one person?
In most cases the installation of a perforated window decal requires more than one person. This is particularly true for larger decals.
Having additional people help ensures that the decal doesn’t stick to itself when the backing is removed and makes the actual application of the decal much easier. For example, with a second person, the decal can be tacked in two corners and then held away from the rest of the window by one person while the other applies and removes air bubbles with a flat edge or a squeegee. From our own experience this is by far the best way to apply the decal.
How do I store my decal?
Before application your decal can be rolled and stored at room temperature in a dry location. Nothing should be set on the decal while it is rolled, nor should it be folded, as both of these actions can cause permanent crease marks in the decal.
Due to the adhesive used on the decal, it is meant for semi-permanent use. Meaning that once the decal firms up after installation, removing the decal and repositioning it will not be possible.
Your Perforated Window Decal cannot be re-used after it has been first installed.
How do I clean my decal?
How do I remove my decal? Will it leave behind a huge mess and lots of residue?
Can I wash my window with the decal installed?
Questions and Answers
Perforated window decals are typically designed for one-time use and are not intended to be removed and reused. When applied to a surface, the adhesive on the back of the decal adheres to the window, and attempting to remove it usually results in damage to the decal or difficulty in reapplying it due to the nature of the material and adhesive.
While there might be some cases where it's possible to carefully remove a perforated window decal and reapply it elsewhere, it's not recommended. The perforations in the material and the adhesive properties are usually optimized for a single application, and attempting to reuse the decal could lead to issues such as reduced adhesion, damage to the decal, or an uneven appearance when reapplied.
If you need a decal that can be removed and reused multiple times, you may want to consider alternative options such as static cling decals or removable vinyl decals, which are designed specifically for multiple applications and removals without damaging surfaces or losing their adhesive properties.
Our perforated decals are 50/50 micro-perforated, meaning 50% of your decal consists of solid vinyl material, while the other 50% features micro punctures. This design allows one side of the graphic to appear opaque and the other side to appear see-through.
Yes, that would be possible. You can create an order for every phrase. That would be 2 separate orders.
We may print your artwork on the perforated material. However, this is not advisable for QR codes, as they may not work because of the perforations across the material itself. The idea to use the perforations as the dots on the QR code is unique, but I'm afraid we are unable to cater to that at the moment since the material we have already has perforations across the material and not just the areas preferred on the artwork.
We are unable to provide blank decals to customers, but we may provide plain colors, such as pure black, printed on the products. As long as we are able to print on the product, it should be good to go.
Perforated window decals are the ultimate solution for those seeking one-way visibility on windows by using a decal or window graphic. As mentioned above, the perforated decal is made up of tiny micropunctures across the entire surface area of the decal. These micropunctures allow for one way visibility even when your decal covers the entire surface area of a window.
This one way visibility will be for store or homeowners looking from the inside to the outside of the store. For customers or patrons approaching the store or window they will see the design printed on the decal but will not be able to see through it. While there may be some ability to see in despite the decal, this is largely dictated by the situation and what is printed. Customers approaching a store front at night and looking into a lit store will be able to see more than during daytime hours. Further, a large decal with a design that features dark colors and covers the majority of the surface area will be much less transparent than a smaller design or lighter colors.
Regardless of the slight variations in visibility, design, and situation custom perforated window decals are an excellent option for storefront advertising that obscures the inside of the store and entices customers to come in while advertising a beautiful graphic!
Yes. We offer a wide variety of window signage solutions, including other types of window decals.
First, we offer custom window clings. Static clings are a great alternative to the semi-permanent window decals we offer as they can be applied and removed as many times as you might need. They “cling” to a window rather than use an adhesive.
Additionally, we offer several different types of custom window decals. Clear window decals are transparent wherever they aren’t printed and can be placed on the inside or outside of your window. Placing it on the inside so customers can see it from the outside is called “inside glass” or “reverse print” and is a great advantage for stores or homes located in harsh climates. Opaque window decals offer a fully opaque window sign regardless of where it is printed. An “inside glass” option is not possible with opaque window decals due to the default opaque nature of the material itself.
We also offer perforated, clear and opaque car decal options for those seeking to use vehicle decals as a way to advertise a home or small business.
For all intents and purposes the terms window stickers, window graphics and window decals are interchangeable. Or at the very least the use of these terms will generally be understood. Having said that any knowledgeable sign company will undoubtedly ask a few questions to make sure you are getting what you want.
This is because of the fact that clings and decals, which could both be called window graphics, are extremely different in how they work. Clings have no adhesive property and are repositionable. Decals on the other hand act more like a sticker and are semi-permanent in nature due to the adhesive backing used to adhere to the window. Attempting to remove and reposition a window decal will not work. Doing so with clings will take less than a minute or two to do.
So as long as you’re clear on the difference between clings and decals as well as the transparency provided by the different decal options we’ll understand you if you use the term window graphic or window sticker.